Friday, 20 February 2015

From SamuliS - Captured Universal Carrier (29 Points)

A slightly smaller entry this time with only one vehicle! Sticking with Germans, but this time in a slightly larger scale. What we've got here is a tiny Beutepanzer in the form of a captured Universal Carrier fitted with a Pak36. I got the kit as a christmas gift from Secret Santa run by Ian of the The Blog With No Name fame who is also taking part in the challenge.

I must admit at first I was a bit baffled as out of the packaging came a Universal Carrier box and I don't really have anything that could actually use it. But then opening the package up I noticed it contained a PaK36 and German crew along with some plasticard and building instructions for a Germanized version. Building this up was great fun and will certainly prove to be a striking vehicle for my 28mm Jerries. So if the mysterious benefactor is reading this thank you for a great and very thoughtful gift! This definitely wasn't thought up in a short last minute panic.

I had planned to do this already in early January to honour the gift, but unfortunately it took me a bit longer to finish than I though as I looked for readymade rivets to add to the gun shield. However none were to be found in a proper scale, so I had to do my own in the end.
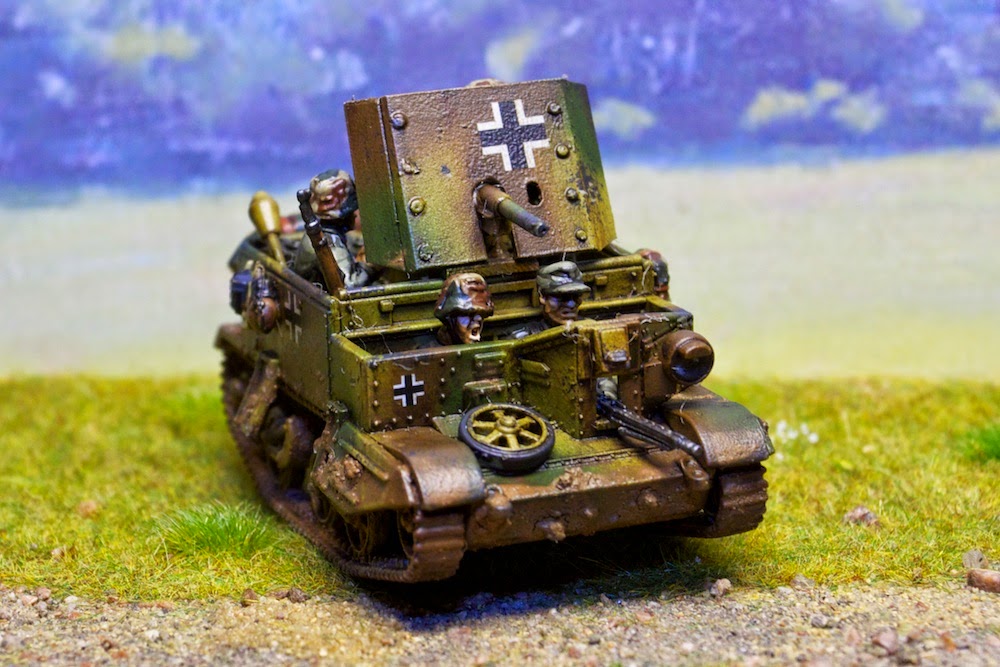

The Universal Carrier itself is pretty much straight out of the box with the driver and machine gunner figures being the normal British bodies that just had a head swap for conversion. I believe the PaK36 with it's crew come from an PaK36 Sdkfz251 kit. The gun was pretty much unchanged except for the fact that the gun shield was built up from plasticard with rivets added with Tamiya plastic filler. To make the carrier look more German I threw in some equipment I had left over from different Warlord plastic kits. There's some breadbags etc. hanging from the sides and Panzerfausts stored in the crew compartment as well as personal weapons.


My other German vehicles are all painted with a soft edged camouflage pattern so I decided to do the same with this one. I painted a three tone camouflage with my airbrush and then painted in the details wtih a brush. At this point I messed up the first time as I forgot to add decals before chipping and other weathering. I constantly had this feeling in the back of my head that something was missing, but couldn't really figure it out until the vehicle was going into a final matt varnish after everything was done. So I had to go back a few steps and add the decals. As these were added last they are a bit less weathered compared to everything else with no chipping and only some streaking done on them.


With the basic paintjob done I applied two different enamel washes on the carrier and let them dry before wiping most away leaving some streaking pattern down the sides. With that done I then added some rust and oil coloured streaks on the sides. The second error (or the first that I noticed) came in at this stage with Vallejo base coat paint starting to peel of at some edges when wiping away washes. At this point it was going to be hard to fix, but luckily it was mainly just on the lower part so I could cover it up with mud. The keen eyed can probably spot the areas from the photos though.


To finish the model up I applied a generous amount of mud in two different tones on the tracks and the lower part of the chassis. I prefer my vehicles muddy so there are quite large chunks in various different places. I also used mud to cover up the areas where paint had started to peel off a bit due to the basecoat sticking to the surface badly.

All in all a very enjoyable little project. As I've come to wargaming through scale models I really enjoy the building aspect of the hobby a lot and am really fond of plastic kits. A little conversion work is also fun and this did provide a lot of enjoyment. Yet again if my mysterious benefactor is reading this, a big THANK YOU to you!


From Curt:

Wow! That is a spectacular little model Samuli - well done! The three-tone camo came off brilliantly and I would not have been able to spot the supposed 'gaffs' if you had not pointed them out. The fabricated gun-shield turned out amazingly well (the rivets really do add to the overall impression). What a wonderful gift and reciprocated by an excellent build by you.

Well done!

From SeanS - 40mm Zombies!? (56 Points)

I finished these yesterday but didn't have time to draft the post what with Field Day at school, Chinese New Year and an evening of San Soo. Happy year of the Ram/ Sheep/ Goat (depending on your bias) to every one. 恭喜发财.

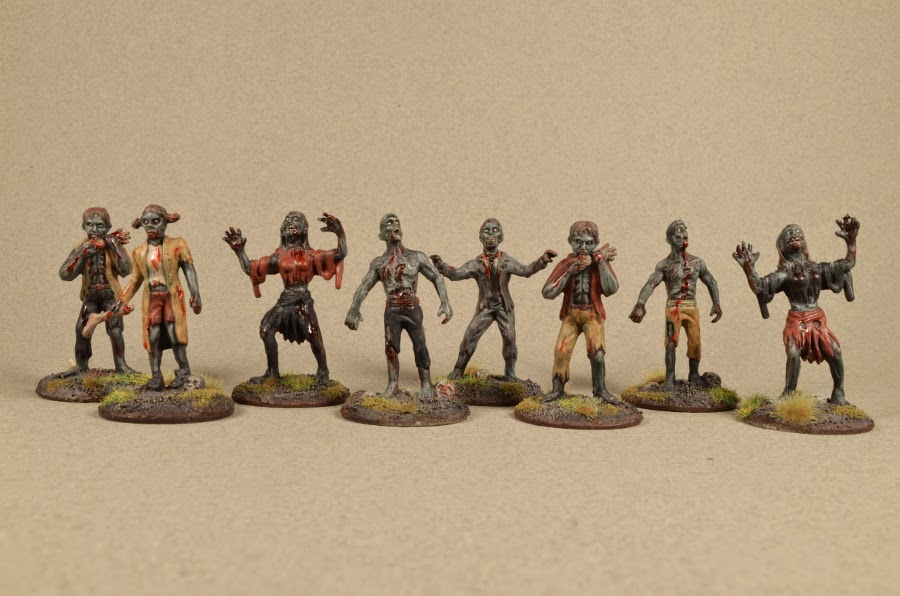
Anyway, here are eight Zombies from that EMCE Zombies vs. Zombie Hunters set.


I decided not to go with the sloppy drybrush technique and went with more of a shade, mid, highlight approach. I screwed it up and some areas and partially saved it with a combination of grunge and straight black washes.

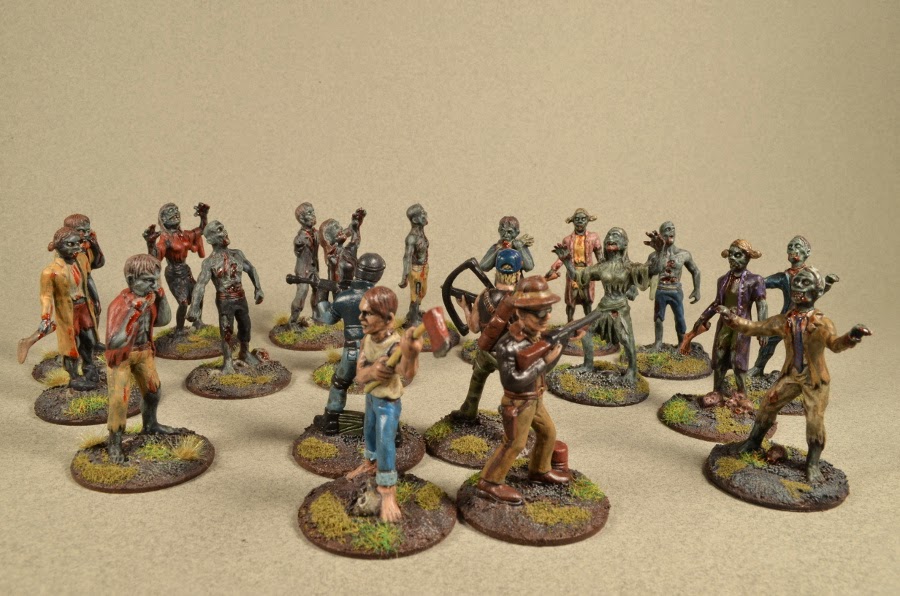
This group looks a little more pristine than the ones I did for Zombtober. I added the Tamiya Clear Red gore after the Vallejo Matt varnish and the ink I added did not dirty the blood up enough. The only other addition was those GW tufts to my regular flock and static grass on the base. I tired a few different sizes. Some glued down better than others.


Just a group shot of those done to date. Eight Zombies for today's entry, the four survivors for the last one, and the seven done during Zombtober.

We'll see if I can pull the Comedic round out of my butt.


From Curt:

That last sentence had me do the one-eyed cringe. Let's pray for you that it's a small theme round... :)

This is a lovely(?) group of huge(!) zombies Sean!. It's nice to see undead painted in defined layers as opposed to the now-common quickshade method. Also, I really like the blueish grey fleshtone you've created for them - what's your recipe for that? It looks marvelously hideous.

Great work!

From PaulS - Gladiators! Ready!... (21 Points)

Ok, so not quite those gladiators. No Wolf present here. Those are in the other post... *badum.. tish*

I'll get my coat.


With Salute coming up in a few months, I thought it was probably time that I started tackling the preview Jugula models that I bought two years ago! I did originally intended to get these painted up well before they were originally released, but that never happened. These are 40mm multi-part metal models from Gripping Beast. I bought a couple of the Familia boxes, each one giving you 4 gladiator bodies and a large selection of heads and weapons to create a range of different gladiatorial types. I've decided that, for now, both Familia will have the same 4 gladiators. The models are quite nice and I enjoyed the few games I've had so far, but I think if I were to start Jugula again I would go for 28mm models instead as these feel like scaled up models rather than something specifically made for 40mm


The shields are done using the slightly odd sticky waterslide transfers. It's an odd way to deal with these things and not being able to reposition the transfer on the model is going to take some getting used to, but the plastic covering does make it easier and safer to cut the holes out for the shields. The main problem area was getting it onto the domed shield as it really didn't want to stick at the edges. I fully expect to find this one flaking off sometime soon. Really nice detail on these though, so I may have to pick up some for my vikings with flat shields.


From Curt:

Ah, I was wondering when we'd see someone do up as set of these larger-scaled gladiators. I remember visiting the excellent 'Atlantica' hobby shop in Madrid last year and seeing these up close. Though they looked very good (and I love the idea of each being a small kit) I shied away as I didn't want to get in to a scale that wouldn't mix with any other range. Nonetheless you've done a cracking job on these Paul.  I really like the defined musculature and nuanced armour, especially on the central spear-armed figure. Wonderful.

As soon as you started to describe the shield transfers for these my eyes started to roll in my head. I think at this scale I would try freehand before risking a rage-induced aneurysm trying to fiddle with 'waterslide' transfers that don't slide (sounds like something invented by the Marquis de Sade).

Again, great work Paul.

Thursday, 19 February 2015

From MilesR - 28mm WW2 Gurkha Infantry and a M3 Grant Tank (120 Points)

 My plucky little British force gets some reinforcements in the form of 21 Gurkha infantry and a M3 Grant tank.  First up the Gurkha's - these are metal figures from Warlord Games box set and while the sculpting is OK, the casting quality was abysmal - I think I spent 6 hours cleaning up or repairing these figures prior to priming.  The box set comes with 21 figures - 1 Officer, 2 Bren Gunners and 18 riflemen.  Gurkhas are very expensive in game points for Bolt Action but are usually worth it if used properly.

 I tired to paint these up for service in Burma and used Vallejo Green Gray (70.971) for the basic uniform and Khaki for the webbing.  I choose Green Gray to have a more worn look to the uniforms and like the overall effect.

 The figures painted up fine but I'd have a hard time recommending this box set given the casting quality.  In the future I think I'll stick with Warlord plastics which have become very good.
 Next up is a 28mm scale M3 Grant Tank from Blitzkrieg models.  It's an all resin kit with a handful of parts and is just superb - zero flash, crisp detail and a snap to put together. It don't have any decals yet and will add those at a later date.

 The M3 Grant and the US version the M3 Lee saw service in the desert campaigns before being withdrawn in favor of the M4 Sherman.  The M3 continued to be used throughout the war in the Pacific theater as it proved to be more than a match for it's Japanese opponents.  The difference between the 2 versions is the turret - the Grant (used by the Brits) had a cast turret while the Lee had a rivets and more angular one.

The Brits received just under 2,900 M3's and used them extensively during the North Africa campaign.  The Grants were a much need boost to the British armored firepower and could out range the German Pak 38 and 50mm main guns used by the Panzer III's.  Once the Germans adjusted their tactics one of the critical short comings of the M3's design was revealed - "spalling" due to the riveted armor plates.  When struck by a round the rivets holding the armor in place would pop off and become projectiles inside the tank making the tank very vulnerable at medium and short ranges.

I've also been working on some 28mm Nappy's due the the inspiration of Mark O's Austrian onslaught - I'll never be able to match his numbers or quality but will throw a few more Frenchman into the mix!


From Curt:

Another excellent entry Miles! While the figures may have been a pain to deal with the Gurkhas will be a great addition to your growing collection.  Also, that Grant looks terrific, especially with the weathering along its rivet lines and plate edges.  Did you know that the Soviets were given a diesel powered Lee variant through the Lend Lease program? They has such a dim opinion of it that, with typical dark Russian humour, they wryly called it 'The coffin for seven brothers'.

Well done Mr. Reidy!

From PhilH -The Last of the 'Campbelleros' (20 points)

Evening all,

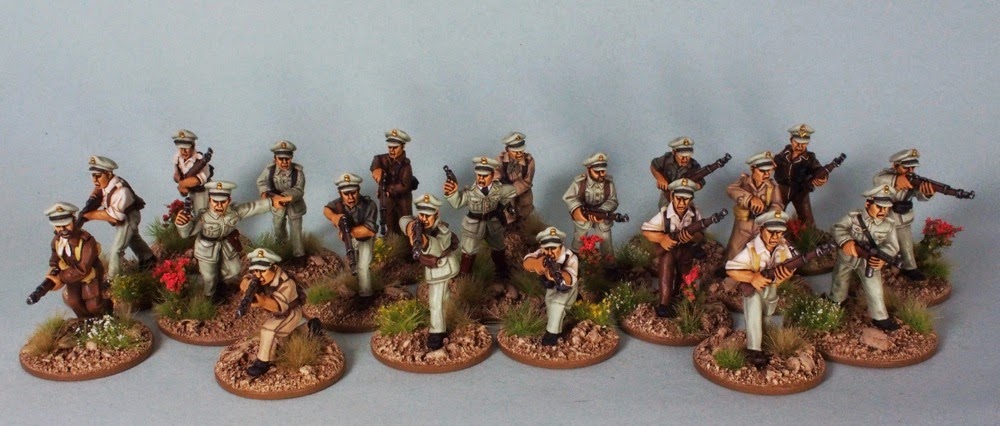
Thursday once again, and surprise surprise I bring you more Spanish Civil War 'Campbelleros'. There isn't much more to day about these: the last four troopers in their rather dapper tunics. These join the sixteen already completed to make 20: a full section of eighteen plus two officers.


With the officers that were finished last week.


And I couldn't resist once last shot of the whole section: a fine display of green caps. Getting a bit crowded!


Those of you that are sick of seeing these guys will be pleased to hear that this is the last of them. Well, for now at least!

And that, I believe is 20shiney points which drags me over the 100 point line for Curt and I's 'Duel so Civil'. Better late than never, eh?

Love and kisses (is how all the cool kids sign off these days, I gather?)


From Curt:

Oh stop, you're making me blush...

This, dear sir, is A Triumph of  the Phil!  (Sorry, I couldn't help myself.) Seriously, I'm delighted to see these fellows completed and arrayed in all their martial glory. 

As I had mentioned from your first test models earlier in the Challenge I'm amazed at the smoothness of your blending of the uniforms' colours - it's very impressive brushwork.

I especially like the leftmost fellow with his 5 o'clock shadow (or perhaps it's 10:15 with some of these swarthy Peninsular fellows). Are you planning to give them a Hotchkiss gun down the road or keep them as straight-up infantry? What will be next up for this project?

Again, great work Mr. Hawkins.

From PeterD - 28mm Italian Wars Starters (60 points)


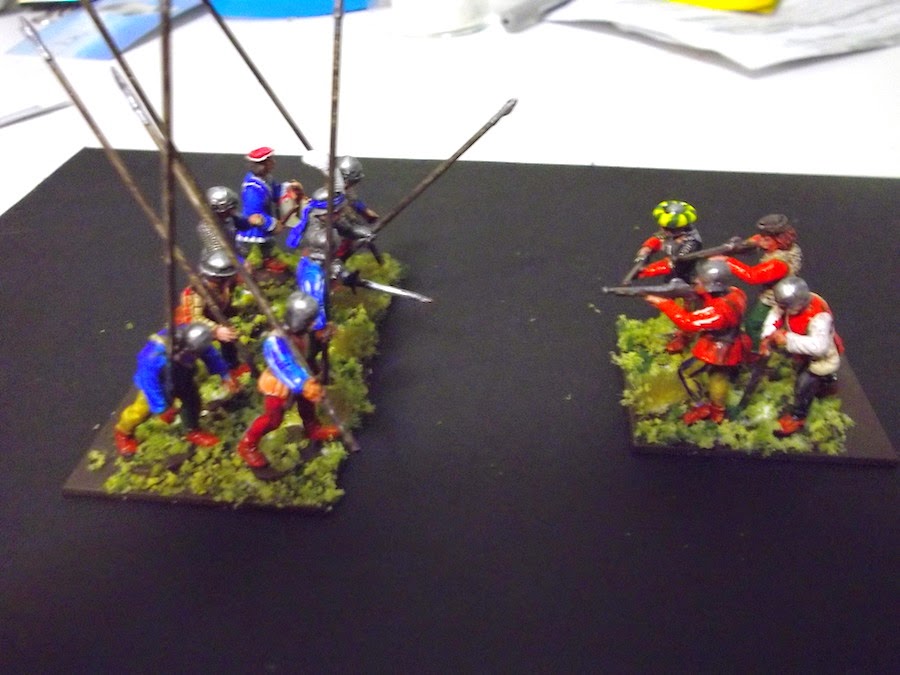
For this week’s entry I have a set of twelve 28mm infantry from the Italian Wars period.  These are made up of figures from the Perry brothers’ Plastic boxed set of European Mercenaries 1450-1500 with additional metal heads from the Italian and Tudor head sets.

I did up test sets of 2 half sized units so that I could get comfortable with the parts and making up the figures, and let’s face it limit the damage of the inevitable F*ck ups.  There are another 8 pike men to be primed, so it will be a unit of 16.  There will be 12 arquebusiers, and I have 2 more completed and 6 about ½ way done.  There is a standard bearer in the pike block, but his flag will wait until the unit is done.

These were very nice figures to put together, with tons of options available.  So far the only mess up on my part was putting the drummers arms on one of the torsos from the command stand.  I realized too late that this was the standard bearer’s torso so I now have a very well armoured drummer!   Obviously his mother loved him and made sure that he would be well looked after.


The arquebusiers have been painted up as Italians using 2 plastic heads, 2 metal Italian heads (the barbutas with cheek plates and the roll of fabric) and two Tudor heads (in soft caps).  I really like the “shot” arms, as there’s a nice mix of firing, prepping and loading poses. They will likely end up as Venetians, as Venice was involved in the thick of things all through Wars.   Also they were the only Italian State left independent when the Wars wound up.


The pikes are painted as generic Europeans, but I’ll likely field these as French.  All of the bits come from the Mercenaries box except for the metal Tudor cap on the well-protected drummer. The pike arms all come in marching position, which is a mixed blessing as some lowered pikes would be nice.  However, there are quite a variety of poses and arm choices and the overall effect is of a unit marching together but not quite in step.  Painting these up I could detect some real personalities – the chap in the quilted jacket and kettle hat looks grimly determined and one of the back rankers has a distinct hangdog slouch.  Meanwhile the chap in front of the sad sack looks way too happy and I picture him singing about the 98,000th bottle of beer on the wall (this may partly explain the looks of his erst while comrades).
 
I left a blank space in my flocking at the back, where I will add unit labels to each base.
I’ve kept with the theme colours idea, using scarlet as the theme for the shot and blue for the pike.  While there weren’t uniforms as such, liveried units weren’t unknown and Michael Mallet’s book on the Condoterri states that mercenary unit were often paid in part with bolts of fabric.  That gives me enough license for the unit colours as I picture the cloth bolts being farmed out between various seamstresses and camp followers to create a variety of tops in a common colour.

I had a lot of fun researching and painting these figures.  There’s a lot of  resource material available either on line or in your local public library.  Just get images related to Teenage Mutant Ninja Turtles Renaissance Italian artists.  The colours in the art of the period really pop and I want to get the same effect on table.  The Perry figures are a little early that the classic Italian Wars period so don’t have the full blown over the top Landsknecht slashing and Plunderhosen.  But I tried to mimic some slashing effects in paint – some of the quilted arms can be painted up as slashed sleeves in particular.
 
The arquebuisers better get their shot off and then scamper back to Venice!

Curt and I have been bashing about what to do with the Italian Wars and I’ve been hemming and hawing between “Pike and Shotte” and “Lion Rampant”.  In the end I decided to base them for P&S in blocks of four since I expect to have enough figures to do larger battles than LR can handle.  Plus AARs in the blogosphere indicate that LR works fine with multi-bases.  P&S uses 4 foot on a 40mm square base, and I’ve used the 45 by 40mm bases by Renedra that the Perry’s supply, but turned them 90 degrees so they have a 40mm frontage.

Hopefully in a week I'll have the completed units: flags, titles labels and all.


From Curt:

Great work Peter! I love the motley look of the marching pikemen and also how you've mimicked the puff and slash of the later period doublets and hose. I also like your idea of using a deeper base. I do this with my Napoleonics as the extra depth allows for the odd out-of-step figure/casualty/officer and any indulgences in groundwork. 

Hmm, I've yet to crack open any of the boxes I picked up for this project but after seeing yours I'm feeling a distinct urge to give them a whirl. 
 

Undead... so much undead... (80 Points)

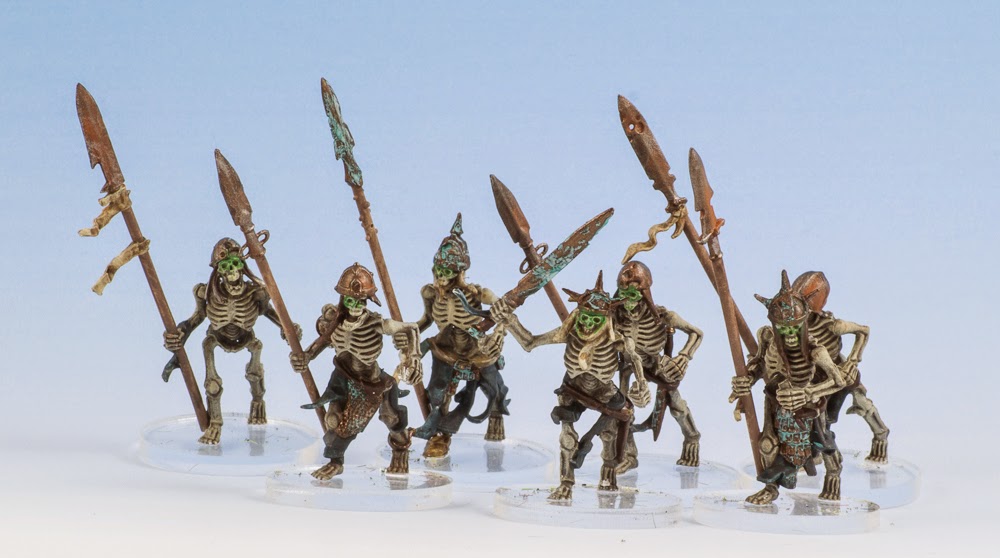
These undead have been sat undercoated on my workbench for a few years and are intended for my very slow burning attempt to rebuild my long lost and much loved Warhammer Quest set. They will also be great for 7th Voyage and Dungeon Saga games... so nice and versatile.

Ages ago a couple of us were lucky enough to go on a few educational sessions at GW hq. One of these was run by the sculpting team and involved taking bits from the Vampire Counts skeleton set, some Empire Greatsword figures and some greenstuff. These three champions were my creations once I got home from the course. I can't bring myself to paint the one we created on the day though as it is a really nice reminder of a fun day. The most insane thing I've ever seen was one of the GW guys sculpting individual chain links and making an actual (in scale) chain that moved and flowed properly! None of this pre-made metal chain for him!


Next up we have 6 bulk standard skeleton spearmen with their champion


And 5 swordsmen with their champion


That totals 16 skeletons to add to the growing pile of painted models from this year's challenge. 


From Curt:

These are very cool minis Paul! That GW field trip must have been awesome - I'm always so impressed when I see sculptors at work, creating little pieces of art from pure imagination. It's pretty humbling stuff.

I really like the look of these guys with their shattered swords, bits and pieces of armour and rotted kit. Very characterful. Will we be treated to more or is this the lot of them Paul?

Now I need to check out Warhammer Quest...

From Millsy - 40K Razorback APC and Catachans (55 points)

Despite hobby activity having to take a back seat most of the time at present I still managed to find a few moments here and there to keep my points total ticking over. It might not be a big haul like previous entries but it does see me complete a few items I've had hanging about which is always rewarding.

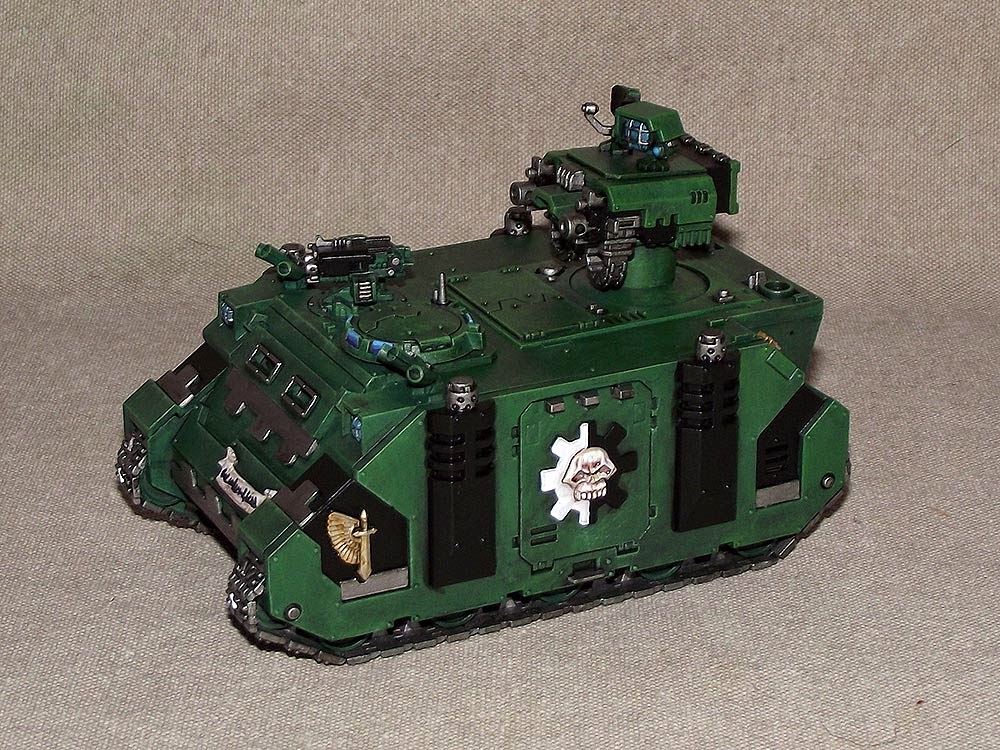
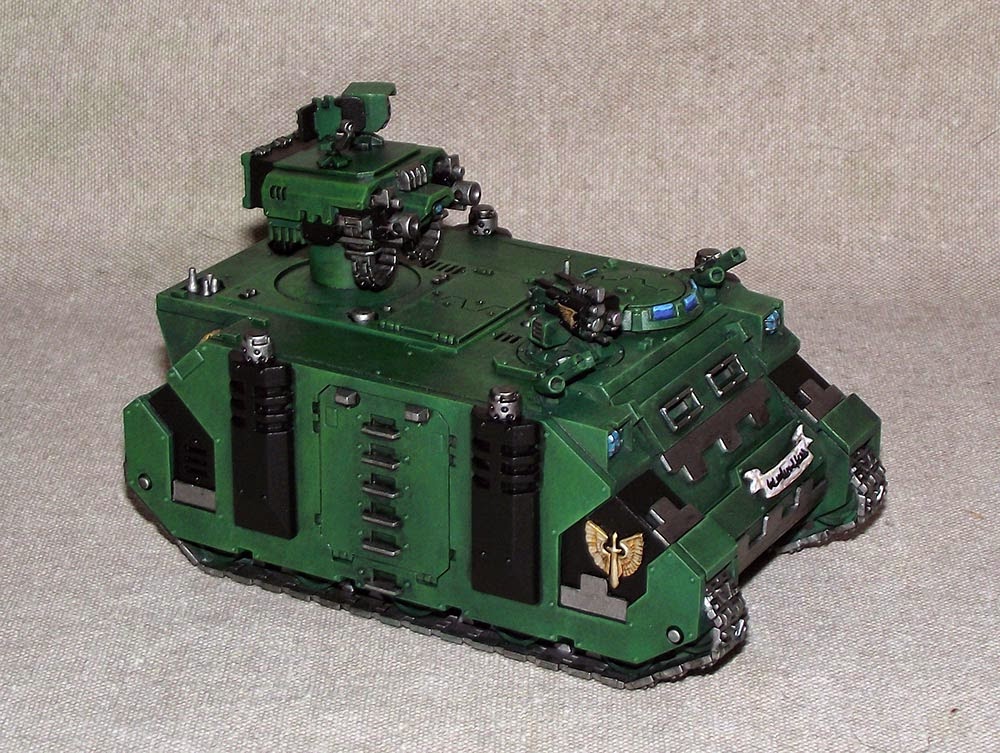
First up is my last armoured vehicle for my 40K Space Marines, in this case a second Razorback APC. I picked up the Rhino APC the kit rather cheaply on fleaBay which was a good but it left me with something on an issue in the I had no main weapons for the turret. That turret being the bit that turns a Rhino into a Razorback in the first place I had to find a solution!


Sellers of part kits always seem to want far more per individual part than they are really worth so I was loath to go that route. Instead I kit-bashed a dual heavy MG (that's a twin-linked heavy bolter for those in the know) turret from my bits box, using left-over parts from two previous kits and various plastic pipes and sheet. I'm pretty happy with the overall result and it certainly doesn't look out of place. It saved me a good $25-30 too!


I also added a bunch of gear-toothed extra armour and a bespoke Adeptus Mechanicus icon to the side access port to bring her in line with the overall theme of the army. I more than a little pleased to have all the armour out of the way as I never really enjoy painting them AND I've really gone to town on each with customizations which has extended the effort required even before I picked up the brush.


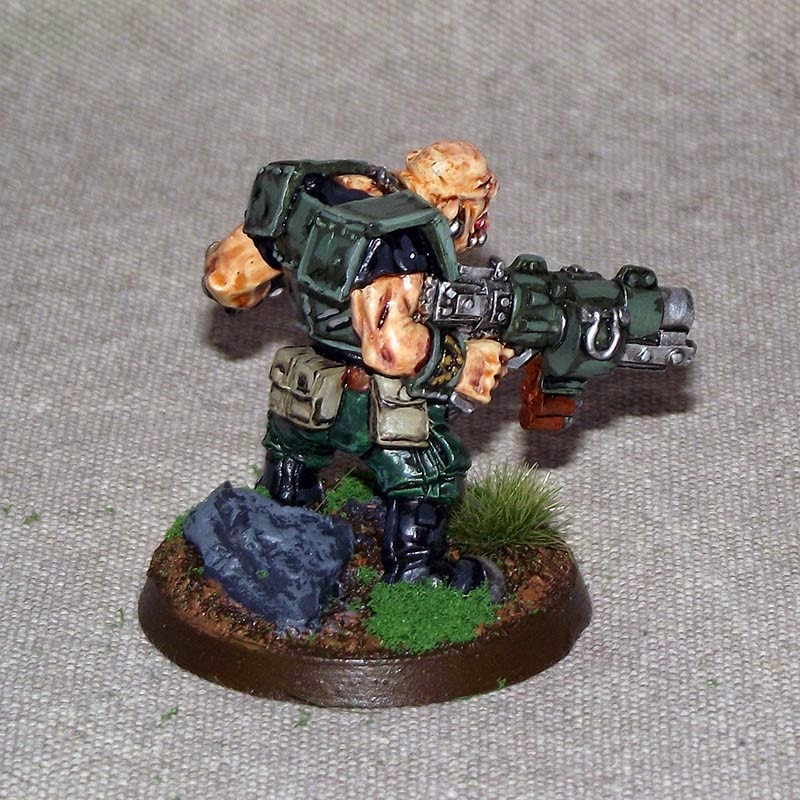
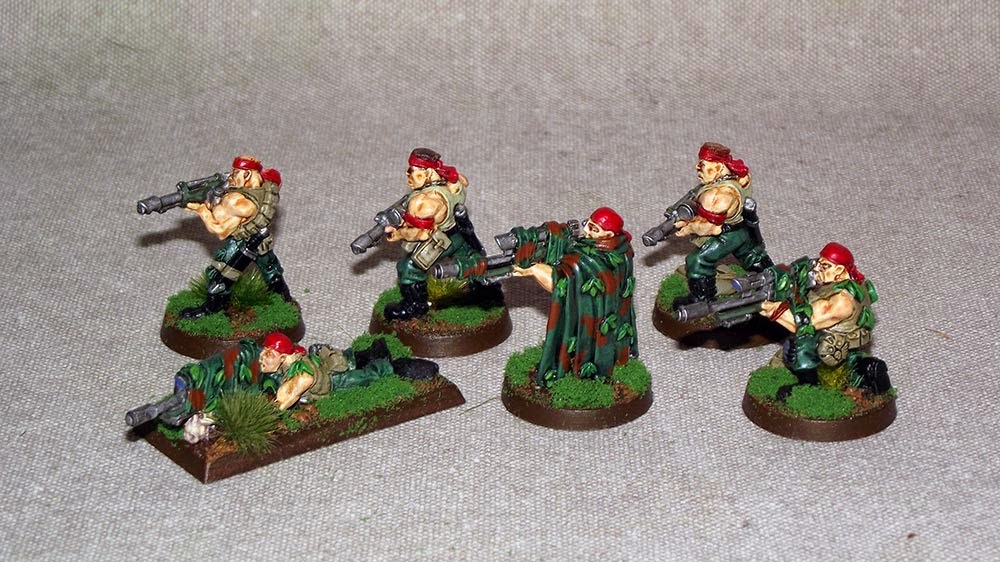
Part two of the submission is an expansion of my fledgeling Catachan force including a 40mm HQ character model and a unit of specialists. The big chap is Nork Deddog, crazed space-ogre (Ogryn) bodyguard. He's a nice enough model and the last of the second edition Orgyns which is about my cut-off point for models I like. Not quite as cool as the last set of earlier vintage chaps but still fun in his own way.


Then we have a unit of specialists consisting of 3 snipers and 3 assistants, for want of a better term. I think they are supposed to be some sort of defence team to handle the dirty work while the snipers get on with being menacing and ruthless.


I was tempted to paint their bandanas green or even camo but it doesn't really fit the whole Catachan feel. Plus there's something very "40K" in being a stealthy, nearly invisible killer with a bright read hat. Nothing else really makes sense about it so why should this?!?


And that's it for this submission. One APC, one 40mm nutter and six 28mm specialists all done and out of the way...


From Curt:

Nice to have you back Millsy! I like your kit-bashed twin-linked Heavy Bolter and Nork Deddog is always a perennial favourite (you can never go wrong with a snaggle-toothed ogre toting a BFG). 

Funny, the one thing I distinctly remember about 40K and snipers is how typically useless they were. I think I had snipers in almost every 40K force I collected and I don't think one of them ever hit a blasted thing. It made me crazy.

Great work Millsy!

From MilesR - 1/600 Scale ACW Naval (100 Points)

 My next submission consists of 6, 1/600 scale ships from the American Civil War - 3 Union, 2 Confederate and a generic river transport.  All six models are metal castings from Thoroughbred Miniatures and are superb kits - especially the Hartford (the biggest one) which has over 40 parts.  Please excuse the Hartford not being rigged but I've run out of rigging thread.  I have included a 28mm figure to give a sense of the size of these models.


First up is the USS Hartford, a Steam Screw Frigate and one of the most powerful Union ships in the war.  The Hartford served mostly in the Gulf of Mexico and participated in the the Battles of New Orleans and Mobile Bay.  She served as Admiral Farragut's flagship and was responsible for taking the Confederate Ironclad Tennessee.


The Hartford was very heavily gunned and was armed with 18 9" Dalgrens, 2 100 pounder rifles, 2 20 pounder rifles and 1 30 pounder rifle.  The rifled guns gave her a range advantage over most ships of the day and she'll be a close match for the HMS Warrior in my upcoming convention game.
The model was a lot of fun to put together and I may get a second one for her sister ship the USS Lancaster.  It's also a "big" model, with a 6 inch total length.
Next is a Itasca Class gunboat.  The ships were also referred to as "90-Day gunboats" as that was the time allotted for construction and fitting out.  23 were commissioned during the war.  At least one Itasca class ship participated in every major naval action of the conflict.  The Itasca served along with the Hartford in the Gulf of Mexico blockade fleet and was responsible for taking 5 confederate raiders as prizes.


 The last Union ship is a casemate ironclad - the USS Indianola.  While heavily armed for a riverine class ship with 2 11" guns in the bow casemate and 2 9' gun in the stern casemate, the Indianola was very poorly constructed and she ran aground and was captured in front of Vicksburg.  One of the more bizarre occurrences of the war happened after she was captured with the confederates being tricked into burning her rather than recruiting her.  What tricked the CSA?  It was the sight of several Union "ironclads" approaching the grounded Indianola.  In reality the union ships where fakes - just barges made to look like iron clads complete with tree trunks painted black to represent cannons and canvas covered "turrets".  These Union craft are referred to as "Quaker Boats".


 Hopefully the Indianola will do better on the gaming table than her historical counterpart
 The first Confederate ship is the CSS Gaines which was part of the fleet protecting Mobile Bay and was lost along with the Tennessee during that battle in 1864.  Part of her hull still lies in Mobile Bay and forms a relatively unknown fishing reef that I often visited as a kid growing up.


 The last Confederate ship is the ill fate CSS Missouri a casemate ironclad that served on the Red River in Louisiana.  She actually didn't see a lot of action during the war as low water levels trapped her in dock for the duration.  She did have an interesting design with a centrally mounted (and unprotected) paddle wheel.


Last up is a generic river transport steam ship that will be used in convoy scenarios.  It's a simple model of a basic side wheel steam ship.  I've got a few more on order.

I'm still a good number of points shy of my 250 point naval challenge goal so expect to see some more 1/600 civil war mini's in the near future.


From Curt: 

Wonderful work Miles. I've always loved the Thoroughbred range of kits. They are so well cast and precise - I often think of them as the GHQ of naval miniatures. 


The USS Hartford is a monster - and what masterful work you've put into her. I really look forward to hearing how the matchup goes between her and HMS Warrior. As a citizen of the Commonwealth I'll be pulling for the Brits.


Though the purpose-built casemate vessels like the Missouri, Tennessee, etc. are sleek and sexy I've always had a soft-spot for the whacky riverboat conversions. We often found they were tremendous fun to play with using 'Smoke on the Water' as they're typically quite nimble, but blow apart into kindling at the drop of a hat. 


Again, an excellent entry Miles!


From PaulS - Random selection of models (67 Points)

It's been a while since the last entry... a combination of birthdays, new hobby (sword fighting!) and painting burnout meant that I kept missing the deadline... so my apologies for that. At least you get lots of different things this week. One of my birthday presents were some lights for my photography setup, so hopefully things will start to look a bit clearer as I get to grips with actually having a decent light source for once.

First up are 10 28mm wolves. These are for my wife, who wanted some simple wolves for an art project of her own. I can't for the life of me remember the manufacturer, but they are not good models imo. There are very visible lines that run right across the faces and trying to remove them would pretty much destroy whatever is left of their faces. They are unbased as Claire hasn't decided how to mount them in her project yet... so points to deduct there.


Next up is this beauty, Kara in Gnosis armour from Studio McVey. This model will be used as a "counts-as" Bonehead in my "counts-as" Ogryn squad. The rest of the ogryns will be represented by the McVey THI suits which will be coming in the next week or two. Both of these models came as part of the ill fated Sedition Wars kickstarter and turned out to be some of the few models that I actually like from the campaign. There are severe scale issues in these models, not helped by them being early experiments in plastic resin... which I hate working with. Still... at least this one and the THI suits came out nicely. The pilot head in this suit was taken from one of the THI kits as the Gnosis head was a little small. The figure is about the size of a GW Terminator character, so taller and bulkier than a standard 28mm. Nice and chunky.


Lastly in this random image dump we have Spike from Buffy, or at least someone pretending to be him. This is from Hasstlefree and pretty much painted himself (shush you at the back.. Spike wears all black so of course he's easy to paint!). What isn't quite so clear in this photo is the jacket has a satin varnish on so it is slightly shiny, whereas the rest of him is all matt varnish so it doesn't. It is up to Curt if he would like Spike as his Curtgeld, or if he wants to take the risk and wait for the final bonus round entry instead ;)

He was supposed to be the Comedy round entry, but something funnier (at least to me) came along and usurped him.


So that is 10 unbased wolves, 1 standard 28mm figure (possibly Curtgeld) and 1 Terminator sized figure.


From Curt:

Great to see you back Paul, you've been missed! 

With this being your first of three submissions today you're definitely treating us to a nice selection of minis. 

Those wolves remind me of the old Ral Partha/Grenadier models from the late 80s. Characterful castings, but I remember them having some of the same mold line issues that you describe. You've done a good job on them (and it makes me curious to your wife's art project!)

I love the powersuit model, especially the 'multi-tool power blade' and the paint chipping. Very cool. I look forward to seeing the THI suits in the coming weeks. 

Speaking of cool, that Spike figure turned out very nicely. I can see the satin effect on the jacket quite clearly and I like the subtle grey highlighting. I'm going to be selfish and wait to see what your Antihero submission is before I make by decision. Nonetheless I'm going to give you the bonus points now as I know I have a wonderful figure in the bank. :)

Great work!