Showing posts with label google. Show all posts

Thursday, 16 September 2010

Add GMail in Thunderbird on Linux

Thunderbird is a powerful and popular email client from Mozilla which integrates a full set of great features.

If you want to access your GMail account directly from Thunderbird, follow the steps below.

Fire up Thunderbird, then go to File->New->Mail Account. Fill in the fields with your GMail details:


Then click Next. In the following window that appears, you can replace the Incoming and Outgoing servers by pressing the Edit button, and replace them with imap.gmail.com and smtp.gmail.com respectively. Also, make sure the selected protocol is IMAP (under the password field, where the two radio buttons are IMAP and POP).


Now click Create Account and this should be it. You can now use Thunderbird to access your GMail account.

Monday, 13 September 2010

How-To: Set Up KMail With GMail and IMAP

According to Wikipedia, IMAP (Internet Message Access Protocol), together with POP is one of the most popular protocols for email retrieval. In this short tutorial I will show you how to set up KMail (the default email client in KDE4 and also most - if not all - distributions which ship it, like Kubuntu) with a GMail account, using IMAP as a protocol.

Here are a few steps easy to follow:

1. Login to the GMail account
After logging in to GMail, click on Settings on the upper-right corner, and then click on the Forwarding and POP/IMAP tab. Tick the Enable IMAP option in the IMAP Access section, and then click the Save Changes button.

2. Fire up KMail
Press Alt+F2 and type kmail in the run box that appears. KMail should start, so if a first-run wizard appears, just close it.

3. Configure KMail to use IMAP settings for your GMail account
In KMail, go to Settings->Configure KMail... and click on the Accounts tab.

In the Receiving tab, click the Add... button on the right and then tick the IMAP option in the pop-up window that appears. Next click OK:


Now, a window with IMAP details should appear. Enter the following data:
Account name: you can leave this to the default value, IMAP Account
Incoming mail server: imap.gmail.com
Port: leave this to the default port 143
Login: your GMail account (e.g. myemail@gmail.com)
Password: your email (GMail) password


Do not close this window for now. Go to the Security tab and select the Use SSL for secure mail download radio button. This will use encryption for transferring your emails. Click OK, then Apply in the main configuration window.


This should be all. This part takes care about incoming emails via your GMail account.

For outgoing email, go again to Settings->Configure KMail... and then click on the Sending tab. Next, click Add..., check the SMTP account type in the window that appears, give it a name and click the Create and Configure button. Fill in the Outgoing mail server field with smtp.gmail.com and then click OK:


Your GMail account is now synchronized and you can now access it directly in KMail

Sunday, 12 September 2010

Google Launched Real Time Search

On September 8th Google launched instant search, a service which displays real time results from discussions on social networks, like Twitter or Facebook.


The service provides the options to customise the location from which the updates come from, very useful if you need to quickly find out something about a particular event in that region.

Thursday, 2 April 2009

How-To: Set Up Gmail in KMail (KDE4)

KMail is the default email client in KDE. In this tutorial I will show how to enable your Gmail account in KMail in several easy steps.

First of all, access your Gmail account in a web browser, then go to Settings (in the upper-right corner of the page), click on Forwarding and POP/IMAP link in the new page, and make sure to enable POP (either for all mail or for mail that arrives from now on).


Now, run KMail. The first time KMail starts it will prompt you with a welcome window, asking you to create a new identity:


Click on Next and at the following step make sure to select POP3 in the list:


At the following step enter your account information (you can leave the Organization field empty) and press Next:


In the window that appears now, enter your login name (that is your entire Gmail address) and the password:


Click next, and in the following window fill in the fields as shown in the image below (for Incoming server you should use pop.gmail.com and for Outgoing server use smtp.gmail.com):


Now click Finish. You should be prompted by KWallet to store your Gmail username and password, but you can choose not to store you password in KWallet and enter it every time you want to check your email.

Now KMail will start up and you will be able to press on Check Mail in order to have access to your Google email.


If the welcome message doesn't appear when starting KMail (if you already created an account before), then go to Settings -> Configure KMail, then go to the Accounts tab and add a new account for both incoming and receiving mail, using the servers and settings show above.


Also make sure to enable SSL encryption in the Security tab: You can also press on Check What the Server Supports to retrieve the settings automatically:


That's it! KMail should be now correctly set up for accessing your Gmail account.

Thursday, 23 October 2008

Google Gadgets for Linux in Debian and Ubuntu

Although I played a little in the past with Google Gadgets and I was not very much impressed, back at version 0.9.x, I decided to try it again, this time using the last release, 0.10.2.


Compiling Google Gadgets 0.10.12 in Debian and Ubuntu
Here are a few steps you need to follow in order to compile Google Gadgets from source on Debian and Ubuntu. To install the needed dependencies type as root:

apt-get install build-essential autoconf automake libtool
apt-get install libcurl4-openssl-dev libdbus-1-dev libgstreamer-plugins-base0.10-dev libgtk2.0-dev libmozjs-dev libqt4-dev libqt4-opengl-dev librsvg2-dev libxml2-dev libxul-dev xulrunner

In Ubuntu just precede each command with sudo and enter your user's password.

Next, you will have to download the source code from their website. At the time of writing, the last release is 0.10.2, and it includes both GTK and Qt interfaces. Change the current working directory to the one where you saved the .tar.bz2 file and uncompress it using:

tar -xjf google-gadgets-for-linux-0.10.2.tar.bz2

Then issue cd google-gadgets-for-linux-0.10.2 and compile it using:

./configure
make
make install

The last one as root. In Ubuntu, use sudo make install with your user's password.

To run it using the Qt interface, use:

ggl-qt

And for GTK:

ggl-gtk

To create a launcher in KDE 3.5.9, read this tutorial which I wrote a while ago.

How it looks and behaves
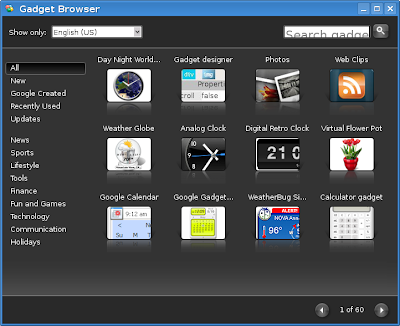
Below are some screenshots I took to both Qt and GTK interfaces, together with several gadgets on the desktop, using different sizes. The software is still in beta, and although I have the Qt4 settings configured to make it look fine, fonts are still too big and sometimes it's a pain to fill in text (for example adding and RSS/Atom feeds to the Google Feed Reader gadget). The system on which I took the screenshots, is Debian Lenny with KDE 3.5.9.

ggl-qt
Some of the gadgets, random layout on the desktop
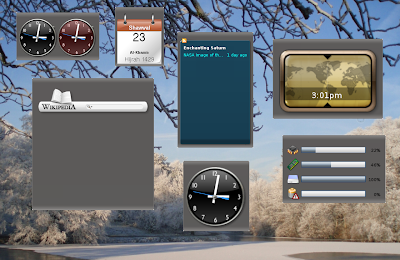
There is a difference however between ggl-qt and ggl-gtk, ggl-gtk auto-arranges the gadgets in the right side of the desktop, just like a panel, auto-resizing them to fit vertically, and if there are too many gadgets, the new ones are put over the others.

ggl-gtk

ggl-gtk automatically creates a right panel on the desktop
Qt4 settings

What do you think about the future of this application? Did you test it in KDE4 eventually? Please share your thoughts in the comments below.

Saturday, 18 October 2008

Running Google Chrome Under Wine 1.1.6 in Debian

Google Chrome is an open-source web browser from Google, currently available only for the Windows platform. It aims to have a minimal and easy to use interface. Chrome uses the WebKit rendering engine, which was developed from KHTML, and it is used in various browsers like Konqueror on KDE4 or Safari (on Mac OS X).


First of all, install Wine 1.1.6. I created two guides for installing the last Wine release, here (from the WineHQ APT repository) and here (compiling from source). Don't worry if the tutorials are for 1.1.5 and 1.1.4 respectively, they will work for a later Wine version too.

I only tried it with Wine setup as Windows XP in winecfg.

Also, install the cabextract package as root:

apt-get install cabextract

Get the last version of winetricks using this command:

wget http://www.kegel.com/wine/winetricks

Make the winetricks script executable, then install the packages below by issuing the following commands:

chmod 755 winetricks
./winetricks msxml3 corefonts flash winxp riched20 riched30

Next, download Google Chrome from here. You can use this command in your terminal:

wget http://dl.google.com/chrome/install/149.30/chrome_installer.exe

To run it, use:

wine chrome_installer.exe

Chrome should start the first time, and you will be able to see it as in the screenshots below:


Close it, then run it using the following command:

wine ~/.wine/drive_c/windows/profiles/YOUR_USERNAME/Local\ Settings/Application\ Data/Google/Chrome/Application/chrome.exe

Make sure to pay attention to any case-sensitive characters if that's the case, and also replace YOUR_USERNAME.


Edit: I saw suggestions to run chrome.exe with the arguments --new-http and --in-process-plugins, although it seemed to work fine for me without the need of those.

For a complete list of Chrome command-line arguments, go here. They are listed from the Google Chrome source file src/chrome/common/chrome_switches.cc and are briefly explained.

How it behaves
It looks very, very good in my opinion, but the interface is extremely slow. I guess until the Linux port will be ready, Google Chrome through Wine is useful only to have a preview of it, or eventually test how it displays web pages.


My impression was the one which Firefox gave me when I first used it, back at version 1.0 (1.0.4 if I recall correctly): simple interface, clean, with only the basic options which one needs, but powerful in the same time.

Special thanks go to the authors of these articles, from which I borrowed all the material for this tutorial:

http://appdb.winehq.org/objectManager.php?sClass=version&iId=13635
http://ubuntuforums.org/showpost.php?p=5719331&postcount=45
http://www.googlechromeboard.com/post259.html
http://tombuntu.com/index.php/2008/09/05/how-to-install-google-chrome-in-ubuntu-with-wine/
http://www.ubuntugeek.com/install-google-chrome-with-wine-in-ubuntu.html