We will use Keycloak as IDP, and OAuth 2 with JWT as AuthToken in react application with NodeJS (Express) back-end
KeyCloak IAM
Keycloak is a great tool for IAM from JBOSS, it is easy to get started and configure. Start KeyCloak as follows.
E:\softwares\keycloak-8.0.1\bin>standalone.bat


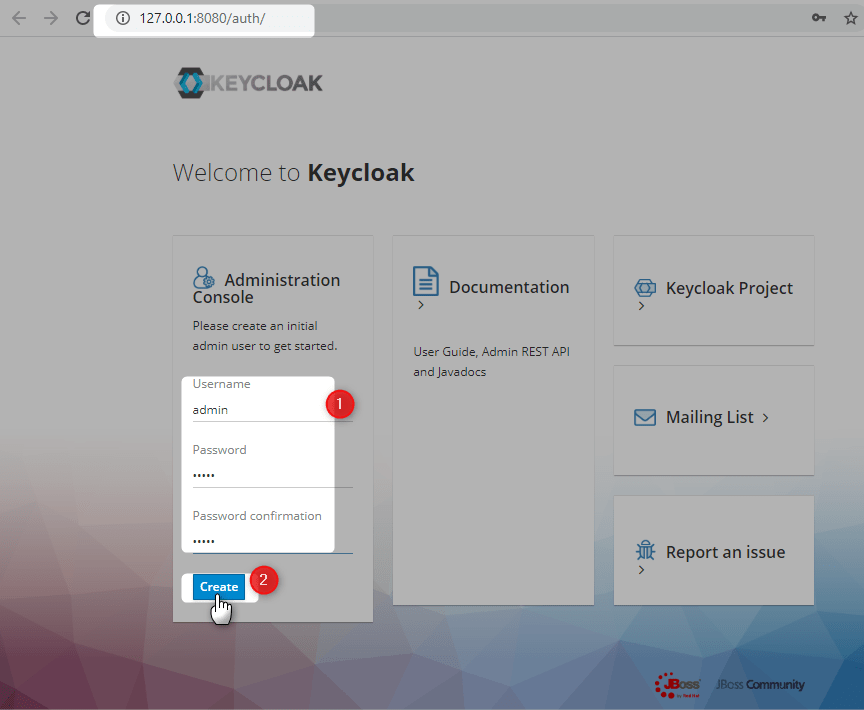
Add initial console user
E:\softwares\keycloak-8.0.1\bin>add-user.bat -u admin admin
Updated user 'admin' to file 'E:\softwares\keycloak-8.0.1\standalone\configuration\mgmt-users.properties'
Updated user 'admin' to file 'E:\softwares\keycloak-8.0.1\domain\configuration\mgmt-users.properties'
Press any key to continue . . .
Login with the credentials, created above

Start keycloak application


Create initial keycloak user
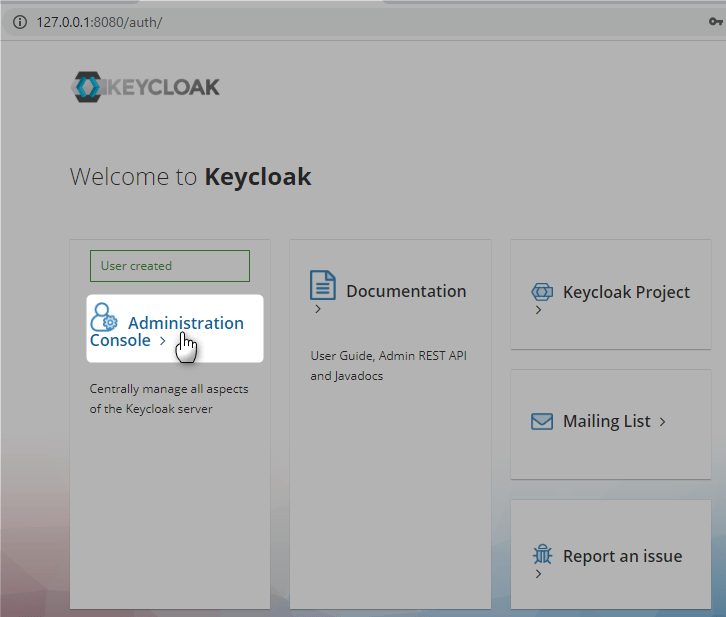
Login with initial keycloak user

Create New Realm


Create new client called react


Access Type should be confidential


Click Save, and go to Roles

New Role demo-user

New Role demo-admin


Client Secret can be found as follows

Add new user mnadeem


Add roles to user


OpenId Configuration
http://127.0.0.1:8080/auth/realms/demo/.well-known/openid-configuration
React App
Lets create react application following this
E:\practices\node>create-react-app react-sso-app

E:\practices\node>code react-sso-app

Create Backend NodeJs API
Lets follow the steps as described in here
E:\practices\node\react-sso-app>mkdir api
E:\practices\node\react-sso-app>cd api
E:\practices\node\react-sso-app\api>npm init --yes
Install dependencies
E:\practices\node\react-sso-app\api> npm install –save-dev babel-cli babel-preset-env nodemon
E:\practices\node\react-sso-app\api>npm install --save express
E:\practices\node\react-sso-app\api>npm install --save-dev rimraf
E:\practices\node\react-sso-app\api>npm install npm-run-all --save-dev
Final package.json of api project under react-sso-app
{
  "name": "api",
  "version": "1.0.0",
  "description": "",
  "main": "index.js",
  "scripts": {
    "test": "echo \"Error: no test specified\" && exit 1",
    "clean": "rimraf ./dist/",
    "build": "babel ./src/ --presets=babel-preset-env --out-dir dist --ignore ./node_modules,./.babelrc,./package.json,./npm-debug.log --copy-files",
    "server:dev": "nodemon ./src/server.js --exec babel-node --presets babel-preset-env",
    "server:prod": "node ./dist/server.js",
    "prod": "npm-run-all clean build server:prod",
    "dev": "npm-run-all server:dev"
  },
  "keywords": [],
  "author": "",
  "license": "ISC",
  "devDependencies": {
    "babel-cli": "^6.26.0",
    "babel-preset-env": "^1.7.0",
    "nodemon": "^2.0.2",
    "npm-run-all": "^4.1.5",
    "rimraf": "^3.0.1"
  },
  "dependencies": {
    "express": "^4.17.1"
  }
}
Add api to workspace


Create files, .babelrc, server.js

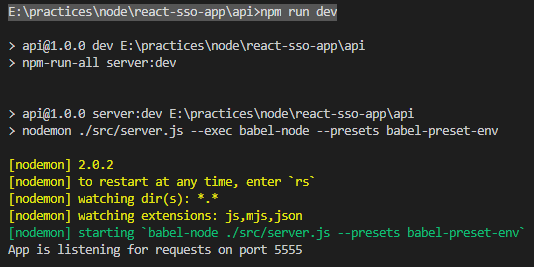
E:\practices\node\react-sso-app\api>npm run dev

> [email protected] dev E:\practices\node\react-sso-app\api
> npm-run-all server:dev


> [email protected] server:dev E:\practices\node\react-sso-app\api
> nodemon ./src/server.js --exec babel-node --presets babel-preset-env

[nodemon] 2.0.2
[nodemon] to restart at any time, enter `rs`
[nodemon] watching dir(s): *.*
[nodemon] watching extensions: js,mjs,json
[nodemon] starting `babel-node ./src/server.js --presets babel-preset-env`
App is listening for requests on port 5555
Lets install the following package
E:\practices\node\react-sso-app\api>npm install --save dotenv
lets create .env file (for local use) in api project

You can get all the details from keycloak (http://127.0.0.1:8080/auth/realms/demo/.well-known/openid-configuration)
SSO_CLIENT_ID=react
SSO_CLIENT_SECRET=202f6844-8b88-45b8-898a-327a74c10ab1
SSO_AUTH_URL=http://127.0.0.1:8080/auth/realms/demo/protocol/openid-connect/auth
SSO_TOKEN_URL=http://127.0.0.1:8080/auth/realms/demo/protocol/openid-connect/token
SSO_SCOPE=openid profile User roles
SSO_REDIRECT_URI=http://localhost:3000

TOKEN_SECRET=2423sdfsfsd3432fdwrerwtg
Lets add the following dependency
E:\practices\node\react-sso-app\api>npm install --save request-promise
E:\practices\node\react-sso-app\api>npm install --save jsonwebtoken
For more details look into the api project and react project
Lets start the api project
E:\practices\node\react-sso-app\api>npm run dev
Lets start the react project
e:\practices\node\react-sso-app>npm start

Demo
Make sure keycloak is running.
Key Points
There are three basic things:
- Redirecting to IDP for authorization code
- Get the JWT as auth token
- Re authenticate using JWT until token is valid.