Arduino Workshop Day 1 Slides
Basics of Arduino - Introduction, Basics of Circuits, Signals & Electronics, LED Interfacing, Switch, Buzzer, LCD & Bluetooth Communication.
This document provides an introduction to line follower competitions using Arduino microcontrollers. It discusses what a microcontroller is and types of Arduino boards. The coding structure is explained, covering data types, functions, control statements and loop statements. A workshop section describes how to control a DC motor using Arduino to rotate clockwise for 2 seconds and counter-clockwise for 5 seconds in an infinite loop.
Arduino Workshop Day 2 - Advance Arduino & DIYVishnu
Arduino Workshop Day 2 - IR, Ultrasonic & Temperature - Humidity Sensor Interfacing & Do It Yourself - Line Follower, Light Follower & Obstacle Avoider.
Introduction to Arduino Hardware and ProgrammingEmmanuel Obot
Introduction to Arduino Hardware and Programming:
Arduino is an open-source electronics platform based on easy-to-use hardware and software. It's intended for anyone making interactive projects.
Teachers and students use it to build low cost scientific instruments, to prove chemistry and physics principles, or to get started with programming and robotics. Designers and architects build interactive prototypes, musicians and artists use it for installations and to experiment with new musical instruments. Makers, of course, use it to build many of the projects exhibited at the Maker Faire. Arduino is a key tool to learn new things. Anyone - children, hobbyists, artists, programmers can use it to build an interactive device.
Arduino for beginners- Introduction to Arduino (presentation) - codewithgauriGaurav Pandey
The document provides an overview of the Arduino platform for beginners. It defines Arduino as an open-source platform used for building electronics projects. All Arduino boards contain a microcontroller, which is a small computer. It then describes some popular Arduino boards like the Uno, Nano, Due, and Mega and their key specs and applications. The document proceeds to explain the main components of an Arduino Uno board such as the power supply, USB port, microcontroller, analog and digital pins. It provides details on the functions of these components and how they enable the Arduino board to operate.
The document provides an overview of the Arduino platform, including what it is, what it is used for, and how to get started using it. Key points:
- Arduino is an open-source hardware and software platform for building interactive electronic projects through a simple programming language.
- It is used for physical computing projects, interactive installations, and rapid prototyping. Projects can include sensors and actuators.
- Getting started requires an Arduino board, USB cable, power supply, and downloading the IDE (integrated development environment) to write and upload code. Basic electrical safety knowledge is also important.
This document provides an overview of microcontrollers and the Arduino platform. It discusses what a microcontroller is and some common types. It then introduces Arduino as an open-source prototyping platform using easy hardware and software. Several Arduino boards are described and the ATmega328p microcontroller chip is specified. The document outlines how to download the Arduino software and write programs. It provides examples of basic Arduino projects like blinking LEDs, reading sensors, and creating sounds.
This document provides an overview of Arduino programming concepts including:
- The Arduino programming language is based on C/C++ and includes libraries for interfacing with hardware.
- Examples are provided for basic blink programs, using variables, functions, control structures like if statements and loops, reading analog/digital pins, and using the serial monitor.
- Key concepts covered include variable scope, data types, naming conventions, pin modes, analog/digital reading and writing, functions, arrays, and different loop structures.
This document outlines an Arduino workshop. It includes an overview of the agenda which involves introductions, checking equipment, experimentation time, and creating personal projects. It then details introducing participants and encouraging collaboration. A list of included parts in the kits is provided. Instructions are given for installing the Arduino software and development environment. Examples are shown for breadboard layouts and code for simple projects like blinking an LED and reading input from a button. Additional experiments suggested include using sensors, LCD displays, motors, and programming an RGB LED with a joystick. Sources for parts, tutorials, and inspiration are listed to encourage continued learning.
This presentation summarizes a summer training on Arduino. It defines Arduino as an open-source hardware and software platform for building electronics projects. It describes the main types of Arduino boards including the Arduino Uno, Mega 2560, Duemilanove, and Fio. It also outlines some key features of the Arduino Uno board. Furthermore, it provides examples of interfacing Arduino with a DC motor and RC car motor. The presentation concludes by listing some common applications of Arduino and its advantages.
This document introduces Arduino by defining what it is, the parts of an Arduino board, and how to program it. An Arduino is a microcontroller board that can be used to develop interactive objects by taking various inputs (e.g. sensors) and controlling physical outputs (e.g. lights, motors). It explains the basic components of an Arduino board and how Arduino code is uploaded and run. A simple example is provided to blink an LED using Arduino code and by changing the delay times, the blinking speed can be adjusted. Keywords like Arduino board, sketch, and LED are also defined.
This document provides an overview of Arduino, an open-source hardware platform used for building interactive objects and prototypes. It describes Arduino as a single-board microcontroller intended to make electronics projects more accessible. Key topics covered include the Arduino programming environment, common Arduino boards and their features, examples of simple Arduino projects like blinking an LED and building a line-following robot, and comparisons to other prototyping platforms. The document encourages readers to get started with Arduino for its low cost, easy programming environment, and large community support.
What is electronics?
Electronics is the science of how to control electric energy, which the electrons have a fundamental role.
This presentation gives a brief explanation about what is electronics and each of the part of the electronic components.
The document discusses the Arduino, an open-source electronics prototyping platform. It provides a brief history of how Arduino was created in 2005 to provide an affordable platform for interactive design projects. It describes the key features of the Arduino Uno board and the Arduino programming environment. Finally, it outlines some common applications of Arduino in fields like home automation, robotics, and sensor prototyping.
The document provides an introduction to programming with Arduino. It explains that Arduino is an open-source hardware and software platform used to build interactive electronic projects. It consists of a microcontroller board that can be programmed and used to read and control sensors, LEDs, motors and more. The document outlines the basic steps to get started which include downloading the Arduino IDE, installing drivers, selecting the board type, and uploading a test "Blink" program to make an LED turn on and off. It also provides explanations of some core electronic components like resistors, LEDs, sensors and describes how to set up a simple temperature sensing project and store the sensor readings in a database.
This document provides an overview of the Arduino Uno microcontroller board. It defines a microcontroller as a single-chip computer containing a CPU, memory, and input/output interfaces. The Arduino is an open-source electronics platform with easy-to-use hardware and software that allows anyone to develop interactive electronic projects. Key specifications of the Arduino Uno board are provided, including its microcontroller chip, memory, analog and digital pins. The process of analog to digital conversion is explained. Basic Arduino programming concepts like data types, statements, operators, and control structures are covered. The bare minimum code structure of setup() and loop() functions is described.
Arduino is an open-source project that created microcontroller-based kits for building digital devices and interactive objects that can sense and control physical devices.
This document provides an overview of different digital logic families. It begins by introducing logic gates and integrated circuits. It then classifies logic families as either bipolar or unipolar, and lists examples of each. Key specifications of digital ICs are defined, including propagation delay, fan-in/fan-out, input/output logic levels, and noise margin. Transistor-transistor logic (TTL) and complementary metal-oxide-semiconductor (CMOS) circuits are described. The TTL NAND gate uses multiple emitter transistors while the CMOS NAND gate uses both P-channel and N-channel MOSFETs. Emitter-coupled logic (ECL) provides the fastest
Arduino is an open-source hardware platform for building interactive electronic projects. It consists of a simple open hardware design with an Atmel processor and input/output support. The hardware is less expensive than other prototyping devices. It is accompanied by a software side written in Java and based on Processing. Arduino began in Italy to control student-built interaction design projects and is descended from the open-source Wiring platform. It has a large community and potential for growth supporting its future success.
This document discusses embedded systems. It defines an embedded system as a microprocessor-based system designed to perform dedicated functions. Embedded systems are found in devices ranging from household appliances to spacecraft. The document discusses the history of embedded systems and how they have evolved from using microprocessors to typically using microcontrollers. It also discusses the hardware and software components of embedded systems as well as common programming languages. Examples of different types of embedded systems are provided.
The document discusses the light dependent resistor (LDR), also known as a photoresistor. It describes how an LDR's resistance decreases with increasing light intensity due to the photoconductive effect. LDRs are made of semiconductor materials and can detect light levels and wavelengths. Their resistance ranges from megohms in the dark to kilohms in light. Common uses of LDRs include light sensors, audio compressors, and automatic street/emergency lights.
Original Uni-junction transistor or UJT is a simple device in which a bar of N-type semiconductor material into which P-type material is diffused; somewhere along its length defining the device parameter as intrinsic standoff. The 2N2646 is the most commonly used version of UJT.
This document provides an overview of embedded systems and their processors. It defines an embedded system as having computer hardware and software embedded as important components. Processors are the heart of embedded systems and can be microprocessors or microcontrollers. Components include hardware, memories, ports and application software. Languages for programming embedded systems include C and C++. Embedded systems are classified based on scale, connectivity and mobility. They have constraints like limited memory and need for low power. Common applications include household appliances, audio players, vehicle controllers and medical equipment.
Arduino is a microcontroller board that allows users to create interactive electronic objects and prototypes. It is commonly used by artists, students, and hobbyists to build devices that can sense and control the physical world. The Arduino Uno board contains a microprocessor, memory, and input/output connections that allow it to interface with sensors, LEDs, motors, and other physical computing components. Users write code using the Arduino IDE software to program the board and control the attached devices.
This document describes the design and implementation of a radar system using an Arduino. The system uses an Arduino Uno, ultrasonic sensor, servo motor, and other components to detect objects. It provides advantages such as seeing through fog or darkness and determining an object's range, position, and velocity. Limitations include not being able to distinguish close targets or recognize color. The system was created to learn about radar technology and demonstrate its uses and capabilities.
This document discusses light dependent resistors (LDRs), also known as photocells. It describes how LDRs work by changing resistance based on light intensity through the photoconductivity phenomenon. Their resistance decreases with more incident light. The document covers the types of LDRs, their characteristics like response time, construction using materials like cadmium sulfide, and applications including light sensors, audio compressors, fire alarms, and automatic street lights.
Arduino: On-board components description, IDE and Programming Pawan Dubey, PhD
The document describes the components and programming of Arduino boards. It discusses the major hardware components of Arduino boards including the microcontroller, analog and digital pins, power supply, and USB interface. It then explains the Arduino IDE software for writing, compiling and uploading code to Arduino boards. Finally, it covers basic Arduino programming concepts such as setup and loop functions, if/else statements, and functions for digital input/output, analog input, and PWM output.
1. Introduction to Embedded Systems & IoTIEEE MIU SB
This document provides an introduction to embedded systems and the Internet of Things (IoT). It defines embedded systems as hardware and software components that perform dedicated tasks as part of larger machines. Embedded systems are designed for specific tasks without human intervention and must meet real-time performance constraints. Examples are given of embedded systems applications. It then discusses microprocessors versus microcontrollers. The document introduces Arduino, an open-source hardware and software platform used to build electronics projects, and describes its various components. It defines IoT as the network of physical objects embedded with electronics that collect and share data over the internet. Applications and evolution of IoT are briefly outlined.
Oop 2014 embedded systems with open source hardware v2Michael Stal
The document discusses developing software for open source hardware. It begins with an overview of physical computing and the maker movement. It then discusses various open source hardware boards like Arduino, Raspberry Pi, and BeagleBone. The document outlines the prerequisites for building systems with these boards, including basic electronics knowledge. It provides examples of standard components that can be used. It also discusses programming models for embedded devices and provides a "Hello World" example in Arduino.
The document discusses Arduino, an open-source electronics prototyping platform. It began in 2005 as a cheaper alternative for students to use in physical computing classes compared to other microcontroller boards. Arduino boards use a microcontroller, such as the Atmega328, and can be programmed and controlled from a computer. The Arduino software and hardware designs are open-source, allowing anyone to build upon and distribute Arduino clones and compatible boards. The Arduino platform and community have grown significantly since 2005.
Arduino is an open-source electronics platform based on easy-to-use hardware and software. Arduino boards are able to read inputs - light on a sensor, a finger on a button, or a Twitter message - and turn it into an output - activating a motor, turning on an LED, publishing something online.
This document provides an overview of an ICT workshop on Arduino hardware platforms. It discusses the key components of a hardware project, including communication modules, microcontrollers, sensors/actuators, and power sources. It then describes the Arduino platform in more detail, including common Arduino boards, specifications of the Arduino Uno, the Arduino IDE, and how to connect Arduino to sensors and actuators. It also provides examples of temperature and other sensors that can be used in Arduino projects.
This document provides an overview and introduction to a digital home automation project using Arduino and Bluetooth. The project aims to develop a home automation system that allows appliances to be remotely controlled via an Android smartphone application. Key components include an Arduino Uno microcontroller, HC-05 Bluetooth module, relays, and an Android app. The system allows electrical appliances like lights and fans to be switched on or off from a smartphone. The Arduino code controls the relays based on commands received over Bluetooth from the Android app.
WORKING PRINCIPLE OF ARDUINO AND USING IT AS A TOOL FOR STUDY AND RESEARCHhugoshan513
This paper explores the working principle and applications of an Arduino board. This also explores on how
it can be used as a tool for study and research works. Arduino board can provide a quick tool in
development of VLSI test bench especially of sensors. Main advantages are fast processing and easy
interface. Today, with increasing number of people using open source software and hardware devices day
after day, technology is forming a new dimension by making complicated things look easier and interesting.
These open sources provide free or virtually low costs, highly reliable and affordable technology. This paper
provides a glimpse of type of Arduino boards, working principles, software implementation and their
applications.
WORKING PRINCIPLE OF ARDUINO AND USING IT AS A TOOL FOR STUDY AND RESEARCHijdpsjournal
This paper explores the working principle and applications of an Arduino board. This also explores on how
it can be used as a tool for study and research works. Arduino board can provide a quick tool in
development of VLSI test bench especially of sensors. Main advantages are fast processing and easy
interface. Today, with increasing number of people using open source software and hardware devices day
after day, technology is forming a new dimension by making complicated things look easier and interesting.
These open sources provide free or virtually low costs, highly reliable and affordable technology. This paper
provides a glimpse of type of Arduino boards, working principles, software implementation and their
applications.
The IoT Academy IoT training Arduino Part 1 basicsThe IOT Academy
This document provides an overview of microcontrollers and the Arduino platform. It defines a microcontroller as a small computer on a chip containing a processor, memory, and input/output. It then discusses Arduino specifically, defining it as an open-source electronics prototyping platform consisting of affordable hardware boards and software. The document outlines what Arduino is used for, including physical computing projects, interactive installations, and rapid prototyping. It also provides basic steps for getting started with Arduino development.
Arduino is an open-source hardware and software platform for building electronic projects and interactive objects. It consists of a circuit board with a microcontroller, and an IDE software to write and upload code. The boards can read inputs from sensors and turn them into outputs that control actuators. Arduino provides a standard format that simplifies use of microcontrollers. It allows controlling the board by sending instructions to the microcontroller via the Arduino IDE. The platform works with both the physical board and its libraries and IDE software.
Analog to Digital Conversion Using Microcontroller Education BoardsKyle VanDruten
This document compares the analog-to-digital converter (ADC) performance of the Tiva C Launchpad, Arduino, and MSP430 microcontrollers. It finds that the ADCs of the three boards have comparable performance, despite the Tiva C's advantage of an ARM processor. Using external ADCs or parallel communication could improve speed and accuracy over the boards' serial interfaces. The document also clarifies key terms like microprocessor, microcontroller, and ADC, and reviews the development history and environments of the evaluated boards.
This document provides an introduction to microcontrollers and compares the Arduino and NodeMCU platforms. It discusses the history and evolution of Arduino, describing its key features like onboard power supply, USB port, and Atmel microcontroller chip. Pinouts and specifications of the Arduino UNO and NodeMCU boards are presented. The document also covers programming Arduino using the Arduino IDE, examples like an LED blinking circuit, and applications of Arduino and NodeMCU in areas like IoT, home automation, and education. It concludes by discussing the future scope of these platforms with AI and their suitability for different types of projects.
How to-teach-an-online-circuits-class-with-tinkercad US ICT projectIonita Iuliana
This document discusses how to teach an online circuits class using Tinkercad and Arduino. It defines basic circuit elements like resistors, capacitors, and inductors. It describes Tinkercad as a free online 3D modeling tool and the Arduino platform. Examples are given for creating simple circuits in Tinkercad like a flashing LED and traffic light. The document provides code examples for controlling these circuits using Arduino.
This document is a project report for an embedded systems and advanced robotics project completed to earn a B.Tech degree in Electronics and Instrumentation Engineering. It includes an acknowledgments section thanking project mentors. The contents section lists chapters on interfacing Arduino with components like LEDs, sensors, motors and using Arduino to build an autonomous line follower robot. It provides introductions to embedded systems, Arduino, the Arduino UNO microcontroller and IDE. Circuit diagrams and code are given for sensor interfacing examples.
This document provides an introduction to Arduino and sensors. It discusses that Arduino was developed for artists and designers to prototype interactive displays using physical computing. It then describes the Arduino Uno board and lists examples of what can be taught using Arduino Uno such as introductory electronics, programming, and designing basic scientific equipment. Finally, it recommends some starter components for projects such as LEDs, LCD screens, temperature sensors, servos, and ultrasonic sensors.
The document discusses the Arduino open-source electronics prototyping platform. It describes what Arduino is, its programming environment, advantages, features, applications, and how it compares to other prototyping platforms. Arduino is an affordable and easy to use platform for creating interactive electronic projects through an open-source hardware board and software. It allows users to prototype sensors and control devices through code.
The document discusses mechatronics and provides information on microprocessors, microcontrollers, Arduino, and interfacing devices with Arduino. It defines mechatronics as an interdisciplinary field focusing on integrating mechanical, electrical, and electronic engineering systems. It describes microprocessors and microcontrollers, highlighting the Atmega328 microcontroller used on the Arduino Uno board. It discusses analog and digital pins on Arduino and provides an example code for reading analog sensor values. It also lists some common input and output devices that can be interfaced with Arduino like buttons, motors, and LCD displays.
Neural representations have shown the potential to accelerate ray casting in a conventional ray-tracing-based rendering pipeline. We introduce a novel approach called Locally-Subdivided Neural Intersection Function (LSNIF) that replaces bottom-level BVHs used as traditional geometric representations with a neural network. Our method introduces a sparse hash grid encoding scheme incorporating geometry voxelization, a scene-agnostic training data collection, and a tailored loss function. It enables the network to output not only visibility but also hit-point information and material indices. LSNIF can be trained offline for a single object, allowing us to use LSNIF as a replacement for its corresponding BVH. With these designs, the network can handle hit-point queries from any arbitrary viewpoint, supporting all types of rays in the rendering pipeline. We demonstrate that LSNIF can render a variety of scenes, including real-world scenes designed for other path tracers, while achieving a memory footprint reduction of up to 106.2x compared to a compressed BVH.
https://arxiv.org/abs/2504.21627
Introducing FME Realize: A New Era of Spatial Computing and ARSafe Software
A new era for the FME Platform has arrived – and it’s taking data into the real world.
Meet FME Realize: marking a new chapter in how organizations connect digital information with the physical environment around them. With the addition of FME Realize, FME has evolved into an All-data, Any-AI Spatial Computing Platform.
FME Realize brings spatial computing, augmented reality (AR), and the full power of FME to mobile teams: making it easy to visualize, interact with, and update data right in the field. From infrastructure management to asset inspections, you can put any data into real-world context, instantly.
Join us to discover how spatial computing, powered by FME, enables digital twins, AI-driven insights, and real-time field interactions: all through an intuitive no-code experience.
In this one-hour webinar, you’ll:
-Explore what FME Realize includes and how it fits into the FME Platform
-Learn how to deliver real-time AR experiences, fast
-See how FME enables live, contextual interactions with enterprise data across systems
-See demos, including ones you can try yourself
-Get tutorials and downloadable resources to help you start right away
Whether you’re exploring spatial computing for the first time or looking to scale AR across your organization, this session will give you the tools and insights to get started with confidence.
UiPath Community Zurich: Release Management and Build PipelinesUiPathCommunity
Ensuring robust, reliable, and repeatable delivery processes is more critical than ever - it's a success factor for your automations and for automation programmes as a whole. In this session, we’ll dive into modern best practices for release management and explore how tools like the UiPathCLI can streamline your CI/CD pipelines. Whether you’re just starting with automation or scaling enterprise-grade deployments, our event promises to deliver helpful insights to you. This topic is relevant for both on-premise and cloud users - as well as for automation developers and software testers alike.
📕 Agenda:
- Best Practices for Release Management
- What it is and why it matters
- UiPath Build Pipelines Deep Dive
- Exploring CI/CD workflows, the UiPathCLI and showcasing scenarios for both on-premise and cloud
- Discussion, Q&A
👨🏫 Speakers
Roman Tobler, CEO@ Routinuum
Johans Brink, CTO@ MvR Digital Workforce
We look forward to bringing best practices and showcasing build pipelines to you - and to having interesting discussions on this important topic!
If you have any questions or inputs prior to the event, don't hesitate to reach out to us.
This event streamed live on May 27, 16:00 pm CET.
Check out all our upcoming UiPath Community sessions at:
👉 https://community.uipath.com/events/
Join UiPath Community Zurich chapter:
👉 https://community.uipath.com/zurich/
Co-Constructing Explanations for AI Systems using ProvenancePaul Groth
Explanation is not a one off - it's a process where people and systems work together to gain understanding. This idea of co-constructing explanations or explanation by exploration is powerful way to frame the problem of explanation. In this talk, I discuss our first experiments with this approach for explaining complex AI systems by using provenance. Importantly, I discuss the difficulty of evaluation and discuss some of our first approaches to evaluating these systems at scale. Finally, I touch on the importance of explanation to the comprehensive evaluation of AI systems.
Cyber Security Legal Framework in Nepal.pptxGhimire B.R.
The presentation is about the review of existing legal framework on Cyber Security in Nepal. The strength and weakness highlights of the major acts and policies so far. Further it highlights the needs of data protection act .
Agentic AI Explained: The Next Frontier of Autonomous Intelligence & Generati...Aaryan Kansari
Agentic AI Explained: The Next Frontier of Autonomous Intelligence & Generative AI
Discover Agentic AI, the revolutionary step beyond reactive generative AI. Learn how these autonomous systems can reason, plan, execute, and adapt to achieve human-defined goals, acting as digital co-workers. Explore its promise, key frameworks like LangChain and AutoGen, and the challenges in designing reliable and safe AI agents for future workflows.
Sticky Note Bullets:
Definition: Next stage beyond ChatGPT-like systems, offering true autonomy.
Core Function: Can "reason, plan, execute and adapt" independently.
Distinction: Proactive (sets own actions for goals) vs. Reactive (responds to prompts).
Promise: Acts as "digital co-workers," handling grunt work like research, drafting, bug fixing.
Industry Outlook: Seen as a game-changer; Deloitte predicts 50% of companies using GenAI will have agentic AI pilots by 2027.
Key Frameworks: LangChain, Microsoft's AutoGen, LangGraph, CrewAI.
Development Focus: Learning to think in workflows and goals, not just model outputs.
Challenges: Ensuring reliability, safety; agents can still hallucinate or go astray.
Best Practices: Start small, iterate, add memory, keep humans in the loop for final decisions.
Use Cases: Limited only by imagination (e.g., drafting business plans, complex simulations).
Microsoft Build 2025 takeaways in one presentationDigitalmara
Microsoft Build 2025 introduced significant updates. Everything revolves around AI. DigitalMara analyzed these announcements:
• AI enhancements for Windows 11
By embedding AI capabilities directly into the OS, Microsoft is lowering the barrier for users to benefit from intelligent automation without requiring third-party tools. It's a practical step toward improving user experience, such as streamlining workflows and enhancing productivity. However, attention should be paid to data privacy, user control, and transparency of AI behavior. The implementation policy should be clear and ethical.
• GitHub Copilot coding agent
The introduction of coding agents is a meaningful step in everyday AI assistance. However, it still brings challenges. Some people compare agents with junior developers. They noted that while the agent can handle certain tasks, it often requires supervision and can introduce new issues. This innovation holds both potential and limitations. Balancing automation with human oversight is crucial to ensure quality and reliability.
• Introduction of Natural Language Web
NLWeb is a significant step toward a more natural and intuitive web experience. It can help users access content more easily and reduce reliance on traditional navigation. The open-source foundation provides developers with the flexibility to implement AI-driven interactions without rebuilding their existing platforms. NLWeb is a promising level of web interaction that complements, rather than replaces, well-designed UI.
• Introduction of Model Context Protocol
MCP provides a standardized method for connecting AI models with diverse tools and data sources. This approach simplifies the development of AI-driven applications, enhancing efficiency and scalability. Its open-source nature encourages broader adoption and collaboration within the developer community. Nevertheless, MCP can face challenges in compatibility across vendors and security in context sharing. Clear guidelines are crucial.
• Windows Subsystem for Linux is open-sourced
It's a positive step toward greater transparency and collaboration in the developer ecosystem. The community can now contribute to its evolution, helping identify issues and expand functionality faster. However, open-source software in a core system also introduces concerns around security, code quality management, and long-term maintenance. Microsoft’s continued involvement will be key to ensuring WSL remains stable and secure.
• Azure AI Foundry platform hosts Grok 3 AI models
Adding new models is a valuable expansion of AI development resources available at Azure. This provides developers with more flexibility in choosing language models that suit a range of application sizes and needs. Hosting on Azure makes access and integration easier when using Microsoft infrastructure.
Offshore IT Support: Balancing In-House and Offshore Help Desk Techniciansjohn823664
In today's always-on digital environment, businesses must deliver seamless IT support across time zones, devices, and departments. This SlideShare explores how companies can strategically combine in-house expertise with offshore talent to build a high-performing, cost-efficient help desk operation.
From the benefits and challenges of offshore support to practical models for integrating global teams, this presentation offers insights, real-world examples, and key metrics for success. Whether you're scaling a startup or optimizing enterprise support, discover how to balance cost, quality, and responsiveness with a hybrid IT support strategy.
Perfect for IT managers, operations leads, and business owners considering global help desk solutions.
Maxx nft market place new generation nft marketing placeusersalmanrazdelhi
PREFACE OF MAXXNFT
MaxxNFT: Powering the Future of Digital Ownership
MaxxNFT is a cutting-edge Web3 platform designed to revolutionize how
digital assets are owned, traded, and valued. Positioned at the forefront of the
NFT movement, MaxxNFT views NFTs not just as collectibles, but as the next
generation of internet equity—unique, verifiable digital assets that unlock new
possibilities for creators, investors, and everyday users alike.
Through strategic integrations with OKT Chain and OKX Web3, MaxxNFT
enables seamless cross-chain NFT trading, improved liquidity, and enhanced
user accessibility. These collaborations make it easier than ever to participate
in the NFT ecosystem while expanding the platform’s global reach.
With a focus on innovation, user rewards, and inclusive financial growth,
MaxxNFT offers multiple income streams—from referral bonuses to liquidity
incentives—creating a vibrant community-driven economy. Whether you
'
re
minting your first NFT or building a digital asset portfolio, MaxxNFT empowers
you to participate in the future of decentralized value exchange.
https://maxxnft.xyz/
Contributing to WordPress With & Without Code.pptxPatrick Lumumba
Contributing to WordPress: Making an Impact on the Test Team—With or Without Coding Skills
WordPress survives on collaboration, and the Test Team plays a very important role in ensuring the CMS is stable, user-friendly, and accessible to everyone.
This talk aims to deconstruct the myth that one has to be a developer to contribute to WordPress. In this session, I will share with the audience how to get involved with the WordPress Team, whether a coder or not.
We’ll explore practical ways to contribute, from testing new features, and patches, to reporting bugs. By the end of this talk, the audience will have the tools and confidence to make a meaningful impact on WordPress—no matter the skill set.
Adtran’s SDG 9000 Series brings high-performance, cloud-managed Wi-Fi 7 to homes, businesses and public spaces. Built on a unified SmartOS platform, the portfolio includes outdoor access points, ceiling-mount APs and a 10G PoE router. Intellifi and Mosaic One simplify deployment, deliver AI-driven insights and unlock powerful new revenue streams for service providers.
Grannie’s Journey to Using Healthcare AI ExperiencesLauren Parr
AI offers transformative potential to enhance our long-time persona Grannie’s life, from healthcare to social connection. This session explores how UX designers can address unmet needs through AI-driven solutions, ensuring intuitive interfaces that improve safety, well-being, and meaningful interactions without overwhelming users.
As data privacy regulations become more pervasive across the globe and organizations increasingly handle and transfer (including across borders) meaningful volumes of personal and confidential information, the need for robust contracts to be in place is more important than ever.
This webinar will provide a deep dive into privacy contracting, covering essential terms and concepts, negotiation strategies, and key practices for managing data privacy risks.
Whether you're in legal, privacy, security, compliance, GRC, procurement, or otherwise, this session will include actionable insights and practical strategies to help you enhance your agreements, reduce risk, and enable your business to move fast while protecting itself.
This webinar will review key aspects and considerations in privacy contracting, including:
- Data processing addenda, cross-border transfer terms including EU Model Clauses/Standard Contractual Clauses, etc.
- Certain legally-required provisions (as well as how to ensure compliance with those provisions)
- Negotiation tactics and common issues
- Recent lessons from recent regulatory actions and disputes
Improving Developer Productivity With DORA, SPACE, and DevExJustin Reock
Ready to measure and improve developer productivity in your organization?
Join Justin Reock, Deputy CTO at DX, for an interactive session where you'll learn actionable strategies to measure and increase engineering performance.
Leave this session equipped with a comprehensive understanding of developer productivity and a roadmap to create a high-performing engineering team in your company.
2. Free and Open-Source Software (FOSS)
Free and open-source software (FOSS) allows users and programmers to edit,
modify or reuse the software's source code. This gives developers the
opportunity to improve program functionality by modifying it.
The term “free” indicates that the software does not have constraints on
copyrights. The term “open source” indicates the software is in its project
form, enabling easy software development from expert developers
collaborating worldwide without any need for reverse engineering.
Some examples of FOSS include: Linux Kernel, Ubuntu, Nextcloud, Google
Chrome OS, Android OS, BSD, GIMP, Blender, OpenOffice, Chrome
Browser, Eclipse, etc.
3. Why Was Arduino Developed?
Physical Computing – using components that can interact with people and
with the world around us
The Arduino was originally developed for artists and designers to prototype
interactive displays at Italy by Massimo Banzi and David Cuartielles in
2005.
Developed for non-scientists
Minimalist programming
“Forgiving” circuitry that can handle a wide variety of wiring errors
4. What is Arduino Not?
It is not a chip (IC)
It is not a board (PCB)
It is not a company or a manufacturer
It is not a programming language
It is not a computer architecture
(although it involves all of these things...)
Official Definition: Arduino is an open-source electronics prototyping
platform based on flexible, easy-to-use hardware and software. It's
intended for artists, designers, hobbyists, and anyone interested in
creating interactive objects or environments.
5. So, What is Arduino?
It’s a movement, not a microcontroller
Founded by Massimo Banzi and David Cuartielles in 2005 based on
“Wiring Platform”, which dates to 2003
Open-source hardware platform
Open source development environment
Easy-to learn language and
libraries (based on Wiring
language)
Integrated development
environment (based on
Processing programming
environment)
Available for Windows /
Mac / Linux
6. Why Arduino?
For whatever reason, Arduino microcontrollers have
become the de facto standard
Strives for the balance between ease of use and
usefulness
1. Programming languages seen as major
obstacle
2. Arduino C is a greatly simplified version of
C++
It is an open-source project, software/hardware is
extremely accessible and very flexible to be
customized and extended
Arduino is backed up by a growing online
community, lots of source code is already available
and we can share and post our examples for others to
use, too!
It is inexpensive and comes with free authoring
software
Original Arduino.cc Manufactured Arduino Uno: ₹ 2,400.00
Electrical & Code compatible Arduino Uno Clone: ₹ 500.00
7. Electricity Electronics Basic Concepts
Voltage (V)
Voltage, also called electromotive force, is the potential difference in
charge between two points in an electrical field.
It is measured in Volt (V).
Current (I)
Current is the rate at which electric charge flows past a point in a circuit. In
other words, current is the rate of flow of electric charge.
It is measured in Ampere (A).
Resistance (R)
Resistance is a measure of the
opposition to current flow in an
electrical circuit.
It is measured in ohms, symbolized
by the Greek letter omega (Ω).
8. Alternating Current & Direct Current
Alternating Current (AC)
Alternating current is defined as the flow of charge that changes direction
periodically. The result obtained will be, the voltage level also reverses along with
the current. Basically, AC is used to deliver power to industries, houses, office
buildings, etc.
Direct current (DC)
Direct current is the movement of electric charge carriers, i.e. electrons in a
unidirectional flow. In DC, the intensity of the current will vary along with time,
but the direction of movement stays the same in all time. Here DC is referred to a
voltage whose polarity never reverses. DC power is widely used in low voltage
applications such as charging batteries, automotive applications, aircraft
applications.
9. Ohm’s Law
The relationship between Voltage, Current and Resistance in
any DC electrical circuit was firstly discovered by the German
physicist Georg Ohm.
Ohm's law states that the current through a conductor between
two points is directly proportional to the voltage across the two
points
The Power TriangleThe Ohm’s Law Triangle
10. Current Flow , Voltage Flow & Resistance Analogies
Water = Charge
Pressure = Voltage (V)
Flow = Current (I)
Size of the Pipe = Resistance (R)
11. Circuit
An electronic circuit is composed of individual electronic
components, such as resistors, transistors, capacitors, inductors
and diodes, connected by conductive wires or traces through
which electric current can flow. To be referred to as electronic,
rather than electrical, generally at least one active component
must be present.
The word “circuit” is derived from the circle. An Electrical
Circuit must have a continuous loop from Power (Vcc) to
Ground (GND).
12. Electronic Components
Active Components
Those devices or components which
required external source to their
operation is called Active Components.
For Example: Diode, Transistors,
SCR, ICs, etc.
Passive Components
Those devices or components which do
not required external source to their
operation is called Passive
Components.
For Example: Resistor, Capacitor,
Inductor, LDR, etc.
13. Resistor
A resistor is a passive two-terminal electrical component that
implements electrical resistance as a circuit element.
In electronic circuits, resistors are used to reduce current flow,
adjust signal levels, to divide voltages, bias active elements, and
terminate transmission lines, among other uses.
14. Breadboard
A breadboard is a solder-less device for
temporary prototype with electronics and test
circuit designs.
Because the solder-less breadboard does not
require soldering, it is reusable.
This makes it easy to use for creating
temporary prototypes and experimenting with
circuit design.
15. Analog & Digital Signals
What is analog ?
It is continuous range of voltage
values (not just 0 or 5V)
Analog has many (infinite) values
Why convert to digital ?
Because our microcontroller only
understands digital.
Digital has two values: on and off
19. Microcontroller (µC, MCU)
Computer on a single Integrated Chip
Processor (CPU)
Memory (RAM / ROM / Flash)
I/O ports (USB, I2C, SPI, ADC)
Common microcontroller families:
Intel: 4004, 8008, etc.
Atmel: AT and AVR
Microchip: PIC
ARM: (multiple manufacturers)
Used in:
Cell Phones, Toys, Household Appliances, Cars, Cameras, etc.
20. Embedded System
Embedded System
An embedded system is a combination of computer hardware and software,
either fixed in capability or programmable, designed for a specific function or
functions within a larger system.
Industrial machines, agricultural and process industry devices, automobiles,
medical equipment, household appliances, vending machines and toys, as well
as mobile devices, are possible locations for an embedded system.
21. Boot Loader
What's a boot loader?
Microcontrollers are usually programmed through
a programmer unless you have a piece of firmware in your
microcontroller that allows installing new firmware without
the need of an external programmer. This is called a boot
loader.
22. Communication: I2C, SPI
1. I2C (Inter-Integrated Circuit)
Speed = 100 kHz, 400 kHz, and 3.4
MHz (not supported by Arduino)
Two bi-directional lines: SDA &
SCL
Multiple slaves can share same bus
2. SPI (Serial Peripheral Interface Bus)
Speed = 1-100 MHz (clock/device
limited)
Four-wire bus: SCLK, MOSI, MISO &
SS
Multiple slaves can share same bus (but
each needs a dedicated SS, slave select)
23. PWM & Duty Cycle
Pulse-width modulation (PWM) is used for
controlling the amplitude of digital signals in
order to control devices and applications
requiring power or electricity.
Duty cycle = Pulse Width / Wave Period
24. Different Arduino Boards
Arduino Uno
Arduino Leonardo
Arduino LilyPad
Arduino Mega
Arduino Nano
Arduino Mini
Arduino Mini Pro
Arduino BT
Arduino Due
26. Getting Started with Arduino
Download Arduino compiler and development environment from:
http://arduino.cc/en/Main/Software
Current version: 1.8.10
Available for Windows, Mac OS X & Linux
Downloadable as Installer & Zip File
Before running Arduino, plug in your board using USB cable (external power
is not necessary)
When USB device is not recognized, navigate to and select the appropriate
driver from the installation directory
Run Arduino
27. Arduino IDE
(Integrated Development Environment)
1. Verify
2. Upload
3. New
4. Open
5. Save
6. Serial Monitor
7. Sketch Name
8. Code Area
9. Message Area
10. Text Console
11. Board & Serial Port
28. Setting Up of Arduino IDE
The computer
communicates
to the Arduino
microcontroller
via a serial port
through a USB-
Serial adapter.
Check to make
sure that the
drivers are
properly
installed.
Step 1
Settings: Tools Board Arduino Uno
Step 2
Settings: Tools Settings: Tools Serial Port COM#(Arduino Uno)
29. Arduino Sketch Structure
void setup()
Will be executed only when
the program begins (or reset
button is pressed)
void loop()
Will be executed repeatedly
30. Arduino Program Development
Based on C++ without 80% of
the instructions.
A handful of new commands.
Programs are called 'sketches'.
Sketches need two functions:
void setup( )
void loop( )
setup( ) runs first and once.
loop( ) runs over and over,
until power is lost or a new
sketch is loaded.
31. Important Functions
pinMode(pin, mode)
Designates the specified pin for input or output
digitalWrite(pin, value)
Sends a voltage level to the designated pin
digitalRead(pin)
Reads the current voltage level from the designated pin
analogWrite(pin, value)
Sends analog voltage of the range 0 to 1023 to the designated pin
digitalRead(pin)
Reads the current analog voltage of the range 0 to 1023 from the designated
pin
delay(delaytime)
pauses the execution of the program for the given amount of time
Serial Commands
print(), println(), write(), read(), begin(), end(), find()
32. Variables
A variable is a way of naming and storing a value for later use by the
program, such as data from a sensor or an intermediate value used in a
calculation.
Declaration
Before they are used, all variables have to be declared. Declaring a variable
means defining its type, and optionally, setting an initial value (initializing
the variable). Variables do not have to be initialized (assigned a value)
when they are declared, but it is often useful.
8 bits 16 bits 32 bits
byte
char
int
unsigned int
long
unsigned long
float
33. Conditions
If Statement: If a certain condition is true, the
set of statements enclosed in curly braces are
executed. If the condition is false, then the set of
statements are skipped during the execution.
if(some variable ?? state){
}
If Else Statement makes an “either-or decision.
The if statements checks a condition. If it is true,
it executes a set of statements; if the condition is
not true, it executes other set of statements under
else.
if (some variable ?? state){
}
else{
}
For Loop: If you want to repeatedly execute a set
of statements for a specific number of times, then
you can use a for loop.
for(initialization; condition; expression){
}
While Loop executes a set of statements until the
expression inside the parentheses is false
while (some variable ?? value){
}
Do While Loop executes a set of statements once
and repeatedly execute the set if a certain condition
is true.
do{
} while (some variable ?? value);
Switch Case Statement allows to execute one
code block among many alternatives.
switch (expression)
{
case 1:
// statements
break;
case 2:
// statements
break;
default: // default statements
}
34. Basic IDE Code
// Basic blinking LED
int ledPin = 13;
//Variable to store the pin number
void setup()
{
pinMode(ledPin, OUTPUT);
//set ledPin as output
}
void loop()
{
digitalWrite(ledPin, HIGH);
//LED ON
delay(1000); //Wait 1000ms (=1s)
digitalWrite(ledPin, LOW);
//LED OFF
delay(1000); //Wait 1000ms (=1s)
}
35. Sensor
What is a sensor?
A device that receives a stimulus and responds with an
electrical signal.
A special type of transducer, device that converts one type of
energy into another
36. Common Sensors
Mechanical
Accelerometers
Gyroscopes
Optical
Photo Detectors
Infrared
Semiconductor
Gas
Temperature
Magnetic
Sensor Characteristics
Range
Accuracy
Transfer Function
Sensitivity
Error
37. Actuators
Device that turns energy (typically electrical) to motion.
An actuator is a component of a machine that is responsible
for moving and controlling a mechanism or system, for
example by opening a valve. In simple terms, it is a "mover".
An actuator requires a control signal and a source of energy.
Features:
Force
Speed
Torque
Power
Efficiency
38. Activities
Activity 1 : Blinking & Fading an LED
What is LED?
An LED lamp or LED light bulb is an electric light for use in light fixtures that
produces light using one or more light-emitting diodes (LEDs).
LED lamps have a lifespan many times longer than equivalent incandescent lamps,
and are significantly more efficient than most fluorescent lamps.
The main semiconductor materials used to manufacture LEDs are: InGaN, AlGaInP,
AlGaAs, GaP
LED
Applications
40. Code & Explanation
/*LED Blink Experiment */
int led =9; // LED anode is connected to Arduino Pin 9
void setup(){
pinMode(led,OUTPUT); // Initialize the digital pin as an output
}
// The loop routine runs over and over again forever:
void loop(){
digitalWrite(led,HIGH); // turn the LED on by making voltage HIGH
delay(1000); // wait for a second
digitalWrite(led,LOW); // turn the LED off by making the voltage LOW
delay(1000); // wait for a second
}
41. Activity 2 : Potentiometer
Potentiometer
A potentiometer is a three-terminal resistor with a sliding or rotating
contact that forms an adjustable voltage divider.
If only two terminals are used, one end and the wiper, it acts as a variable
resistor or rheostat.
Applications:
Controllers
Audio Systems
Measuring Devices
Tuners & Calibrators
43. Code & Explanation
/* Program to control LED by varying the pulse width */
int potPin = 2; // select input pin A2 for the pot
int ledPin = 13; // select output pin 13 for the LED
int val = 0; // variable to store pot voltage
void setup() {
pinMode(ledPin, OUTPUT); // declare ledPin13 as an
OUTPUT
}
void loop() {
val = analogRead(potPin); // read pot voltage as integer
digitalWrite(ledPin, HIGH); // turn the ledPin on
delay(val); // stop the program for some time
digitalWrite(ledPin, LOW); // turn the ledPin off
delay(val); // stop the program for some time
}
44. Activity 3 : Push Button Switch
Switch
A switch is an electrical component that can "make" or "break" an
electrical circuit, interrupting the current or diverting it from one conductor
to another.
The mechanism of a switch removes or restores the conducting path in a
circuit when it is operated.
It may be operated manually, for example, a light switch or a keyboard
button, may be operated by a moving object such as a door, or may be
operated by some sensing element for pressure, temperature or flow.
46. Code & Explanation
// Program for Push Button with LED
// set pin numbers:
const int buttonPin = 7; // Pushbutton pin
const int ledPin = 9; // LED pin
// variables will change:
int buttonState = 0;
// variable reads pushbutton status
void setup() {
pinMode(ledPin, OUTPUT);
// initialize the LED pin as an output
pinMode(buttonPin, INPUT);
// initialize the pushbutton pin as an input
}
void loop()
{
buttonState =
digitalRead(buttonPin);
// read the state of the pushbutton value
// if it is, the buttonState is HIGH:
if (buttonState == HIGH) {
// check if the pushbutton is pressed
digitalWrite(ledPin, HIGH);
// turn LED on
}
else
{
digitalWrite(ledPin, LOW); // turn
LED off
}
}
47. Activity 3.1 : Interrupt
Interrupt Introduction
An interrupt, in microcontroller context, is a signal that temporarily stops what
the CPU is currently working at.
A typical Arduino sketch consists of setup() and loop() functions. When a
sketch is executed, the top most lines are run first. So logically
the setup() function is run before the loop() function. Although it’s far more
common to have headers for libraries above setup() which are of course catered
first by the compiler. The loop() function is an endless loop so there is no way
to exit it.
If we will now use interrupts, we add a third function named isr(). ISR is short
for Interrupt Service Routine. This is where the program jumps to whenever
there is an interrupt.
When does the program jump to isr()?
Arduino Uno Digital Pins: 2 & 3 usable for interrupts
attachInterrupt(digitalPinToInterrupt(interruptPin), isr, CHANGE);
void setup(){
}
void loop(){
}
void isr(){
}
48. Code & Explanation
//Program for Arduino Interrupt
//Make connections as per the code !
const byte ledPin = 13;
const byte interruptPin = 2;
volatile byte state = LOW;
void setup() {
pinMode(ledPin, OUTPUT);
pinMode(interruptPin, INPUT_PULLUP);
attachInterrupt(digitalPinToInterrupt(interruptPin), blink, CHANGE); //Interrupt
}
void loop() {
digitalWrite(ledPin, state);
}
void blink() { //ISR
state = !state;
}
49. Activity 4 : Controlling an RGB LED
RGB LED
RGB LED means Red, Blue and Green Light Emitting Diode.
By configuring the intensity of each LED, other colours can be produced.
There are two kinds of RGB LEDs: common anode LED and common
cathode LED.
Applications:
Interior Lighting
Signs & Displays
Designer Decorations
51. Code & Explanation
/* Program to control RGB
LED */
int redPin = 11;
int greenPin = 10;
int bluePin = 9;
void setup()
{
pinMode(redPin, OUTPUT);
pinMode(greenPin,
OUTPUT);
pinMode(bluePin, OUTPUT);
}
void loop()
{
setColor(255, 0, 0); // red
delay(1000);
setColor(0, 255, 0); //
green
delay(1000);
setColor(0, 0, 255); //
blue
delay(1000);
// Next, we also get some
secondary colours!
setColor(255, 255, 0); //
yellow
delay(1000);
setColor(80, 0, 80); //
purple
delay(1000);
setColor(0, 255, 255);
// aqua
delay(1000);
}
Void setColor(int red, int
green, int blue)
{
analogWrite(redPin, red);
analogWrite(greenPin,
green);
analogWrite(bluePin,
blue);
}
52. Activity 5 : Piezo Buzzer
Piezo Buzzer
A buzzer or beeper is an audio signalling device, which may be mechanical,
electromechanical, or piezoelectric (piezo for short).
Typical uses of buzzers and beepers include alarm devices, timers, and confirmation
of user input such as a mouse click or keystroke.
Whenever an electric potential is applied across a piezoelectric material, a pressure
variation is generated. A piezo buzzer consists of piezo crystals in between two
conductors. When a potential difference is applied across these crystals, they push
one conductor and pull the other conductor by their internal property. The
continuous pull and push action generates a sharp sound wave.
54. Code & Explanation
//A sketch to demonstrate the tone()
function
//Specify digital pin on the Arduino that
the positive lead of piezo buzzer is
attached.
int piezoPin = 9;
void setup() {
}//close setup
void loop() {
/*Tone needs 2 arguments, but can
take three
1) Pin#
2) Frequency - this is in hertz (cycles
per second) which determines the pitch
of the noise made
3) Duration - how long teh tone
plays */
tone(piezoPin, 1000, 500);
//tone(piezoPin, 1000, 500);
//delay(1000);
}
55. Activity 6 : LCD Display
LCD
LCD (Liquid Crystal Display) is a type of flat panel display which uses liquid
crystals in its primary form of operation.
LCDs have a large and varying set of use cases for consumers and businesses, as
they can be commonly found in smartphones, televisions, computer monitors and
instrument panels.
I2C Bus
I2C stands for Inter Integrated Circuit
A I2C bus is a bidirectional two-wired
serial bus which is used to transport the data
between integrated circuits.
57. Code & Explanation
//Program for LCD Display with I2C
Bus
#include <Wire.h>
#include <LiquidCrystal_I2C.h>
LiquidCrystal_I2C lcd(0x27,20,4); //
set the LCD address to 0x27 for a 16
chars and 2 line display
void setup()
{
lcd.init(); // initialize the
lcd
lcd.scrollDisplayLeft();
// Print a message to the LCD.
lcd.backlight();
lcd.setCursor(2,0);
lcd.print("Hello Everyone");
lcd.setCursor(2,1);
lcd.print("Welcome To DIC");
}
void loop()
{
}
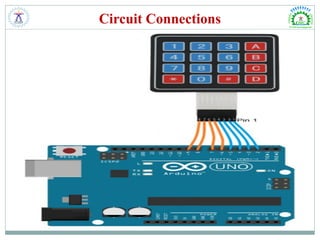
58. Activity 7 : Alphanumeric Keypad
Alphanumeric Keypad
An alphanumeric keypad is a keyboard that contains both numbers and
letters on the same keys.
Typically, they are found on telephones and cellular phones.
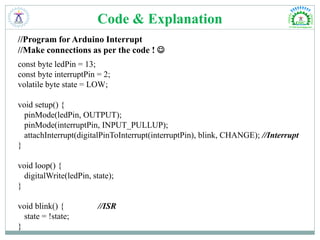
60. Code & Explanation
/* Program for Using Keypad with Arduino */
#include <Keypad.h>
#include <Wire.h>
const byte Rows= 4;
//number of rows on the keypad i.e. 4
const byte Cols= 4;
char keymap[Rows][Cols]=
{
{'1', '2', '3','A'},
{'4', '5', '6','B'},
{'7', '8', '9','C'},
{'*', '0', '#','D'}
};
//a char array is defined
byte rPins[Rows]= {9,8,7,6};
//Rows 0 to 3
byte cPins[Cols]= {5,4,3,2};
//Columns 0 to 3
// command for library for keypad
Keypad kpd=
Keypad(makeKeymap(keymap), rPins, cPins,
Rows, Cols);
void setup(){
Serial.begin(9600); // serial monitor
}
//If key is pressed, this key is stored in
'keypressed' variable’
//If key is not equal to 'NO_KEY', then this
key is printed out
void loop() //main program
{
char keypressed = kpd.getKey();
if (keypressed != NO_KEY)
{
Serial.print(keypressed); // write this string on
the top row
}
}
61. Activity 8 : HC-05 Bluetooth Module
Bluetooth
Bluetooth is a wireless technology standard for exchanging data between
fixed and mobile devices over short distances using short-wavelength UHF
radio waves in the industrial, scientific and medical radio bands, from 2.400
to 2.485 GHz, and building personal area networks (PANs).
It was originally conceived as a wireless alternative to RS-232 data cables.
HC-05 Bluetooth Module
HC‐05 module is an easy to use Bluetooth SPP
(Serial Port Protocol) module, designed for
transparent wireless serial connection setup.
The HC-05 Bluetooth Module can be used in a
Master or Slave configuration, making it a great
solution for wireless communication.
62. AT Command Mode
AT commands are instructions used to control a modem. AT is the
abbreviation of ATtention. Every command line starts with "AT" or "at".
Few commonly used AT commands are:
AT : Check the connection
AT+NAME : See default name
AT+ADDR : see default address
AT+VERSION : See version
AT+UART : See baudrate
AT+ROLE : See role of bt module (1=master/0=slave)
AT+RESET : Reset and exit AT mode
AT+ORGL : Restore factory settings
AT+PSWD : see default password
63. AT Command Code
//Make the Connections as per the code !
#include <SoftwareSerial.h>
SoftwareSerial BTSerial(5, 6); // RX | TX
void setup(){
Serial.begin(9600);
Serial.println("Enter AT commands:");
BTSerial.begin(38400); // HC-05 default speed in AT command more
}
void loop(){
if (BTSerial.available()) // read from HC-05 and send to Serial Monitor
Serial.write(BTSerial.read());
if (Serial.available()) // Keep reading from Serial Monitor and send to HC-05
BTSerial.write(Serial.read());
}
65. Bluetooth Terminal App
Download & Install Bluetooth
Terminal App
https://play.google.com/store/apps/
details?id=Qwerty.BluetoothTermi
nal&hl=en_IN
Open the app and pair the HC-05
module to your mobile. The
password is: 1234 (default)
Then select the Byte Stream mode
out of the three modes that appear.
Send “1” to ON the LED and “0”
to OFF the LED.
Thus the LED on the Arduino can
be controlled by the App through
Bluetooth.
66. Code & Explanation
/* Program to interface Bluetooth
Module with Arduino */
#include <SoftwareSerial.h>
SoftwareSerial mySerial(3, 2);
int ledpin=13;
int Data;
void setup() {
mySerial.begin(9600);
pinMode(ledpin,OUTPUT);
}
void loop(){
if (mySerial.available()){
Data=mySerial.read();
if(Data=='1'){
digitalWrite(ledpin,HIGH);
mySerial.println("LED On!");
}
else if (Data=='0'){
digitalWrite(ledpin,LOW);
mySerial.println("LED Off!");
}
}
}
68. Additional Resources
1. https://www.arduino.cc/ - Arduino.cc is the home of Arduino platform. It
has extensive learning materials such as Tutorials, References, code for
using Arduino, Forum where you can post questions on issues/problems
you have in your projects, etc.
2. http://makezine.com/ - Online page of Maker magazine, with lots of
information on innovative technology projects including Arduino.
3. http://www.instructables.com/ - Lots of projects on technology and arts
(including cooking), with step-by-instructions, photographs, and videos
4. http://appinventor.mit.edu/ - It allows the budding computer
programmers to build their own apps that can be run on Android devices. It
used a user-friendly graphical user-interface that allows drag-and-drop
technique to build applications that impacts the world.
5. http://fritzing.org/ - Fritzing is open source computer aided design (CAD)
software for electronic circuit design and printed circuit board (PCB)
fabrication, especially with Arduino prototyping. It is an electronic design
automation (EDA) tool for circuit designers.