About GitHub Copilot in JetBrains IDEs
If you use a JetBrains IDE, GitHub Copilot can help you with a variety of tasks, including generating code suggestions, explaining how the code in your editor works, and suggesting code fixes. After installation, you can enable or disable GitHub Copilot, and you can configure advanced settings within your IDE or on GitHub. This article describes how to configure GitHub Copilot in the IntelliJ IDE, but the user interfaces of other JetBrains IDEs may differ.
Prerequisites
To configure GitHub Copilot in a JetBrains IDE, you must install the GitHub Copilot plugin. For more information, see Installing the GitHub Copilot extension in your environment.
Using or rebinding keyboard shortcuts for GitHub Copilot
You can use the default keyboard shortcuts for inline suggestions in your JetBrains IDE when using GitHub Copilot. Alternatively, you can rebind the shortcuts to your preferred keyboard shortcuts for each specific command. For more information on rebinding keyboard shortcuts in your JetBrains IDE, see the JetBrains documentation. For example, you can view the IntelliJ IDEA documentation.
Keyboard shortcuts for macOS
| Action | Shortcut |
|---|---|
| Accept an inline suggestion | Tab |
| Dismiss an inline suggestion | Esc |
| Show next inline suggestion | Option (⌥) or Alt+] |
| Show previous inline suggestion | Option (⌥) or Alt+[ |
| Trigger inline suggestion | Option (⌥)+\ |
| Open GitHub Copilot (additional suggestions in separate pane) | Option (⌥) or Alt+Return |
Keyboard shortcuts for Windows
| Action | Shortcut |
|---|---|
| Accept an inline suggestion | Tab |
| Dismiss an inline suggestion | Esc |
| Show next inline suggestion | Alt+] |
| Show previous inline suggestion | Alt+[ |
| Trigger inline suggestion | Alt+\ |
| Open GitHub Copilot (additional suggestions in separate pane) | Alt+Enter |
Keyboard shortcuts for Linux
| Action | Shortcut |
|---|---|
| Accept an inline suggestion | Tab |
| Dismiss an inline suggestion | Esc |
| Show next inline suggestion | Alt+] |
| Show previous inline suggestion | Alt+[ |
| Trigger inline suggestion | Alt+\ |
| Open GitHub Copilot (additional suggestions in separate pane) | Alt+Enter |
Enabling or disabling GitHub Copilot
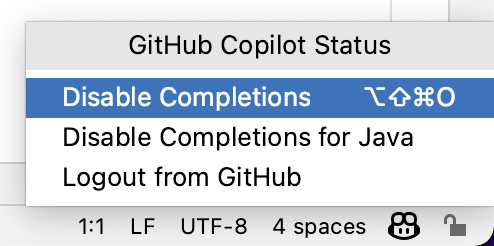
You can enable or disable GitHub Copilot from within your JetBrains IDE. The GitHub Copilot status icon in the bottom panel of the JetBrains window indicates whether GitHub Copilot is enabled or disabled. When enabled, the icon is highlighted. When disabled, the icon is grayed out.
-
To enable or disable GitHub Copilot, click the status icon in the bottom panel on the right of the JetBrains window.

-
If you are disabling GitHub Copilot, you will be asked whether you want to disable it globally, or for the language of the file you are currently editing. To disable globally, click Disable Completions. Alternatively, click the language-specific button to disable GitHub Copilot for the specified language.

Configuring advanced settings for GitHub Copilot
You can manage advanced settings for GitHub Copilot in your JetBrains IDE, such as how your IDE displays code completions, and which languages you want to enable or disable for GitHub Copilot.
- JetBrains IDE で、ファイル メニュー (Windows) またはメニュー バー (macOS) のアプリケーションの名前をクリックし、設定 をクリックします。
- Languages & Frameworks で、 [GitHub Copilot] をクリックします。
- Edit the settings according to your personal preferences.
- To adjust the behavior and appearance of code suggestions, and whether to automatically check for updates, select or deselect the corresponding checkboxes.
- If you have selected to receive automatic updates, you can choose whether to receive stable, but less frequent updates, or nightly updates, which may be less stable. Click the Update channel dropdown and select Stable for stable updates, or Nightly for nightly updates.
Configuring language settings for GitHub Copilot
You can specify which languages you want to activate or deactivate GitHub Copilot for either in the IDE or by editing your github-copilot.xml file. If you make changes to language settings in your IDE, you can individually select and deselect the languages you want to activate or deactivate.
If you make changes to the language settings in your github-copilot.xml file, you can specify individual languages, or you can use a wildcard to activate or deactivate GitHub Copilot for all languages. You can also specify exceptions, which will override the wild card setting for the specified languages. For example, you can deactivate GitHub Copilot for all languages, except for Python and YAML. By default, when you install the GitHub Copilot extension, GitHub Copilot is activated for all languages.
Configuring language settings in the IDE
- JetBrains IDE で、ファイル メニュー (Windows) またはメニュー バー (macOS) のアプリケーションの名前をクリックし、設定 をクリックします。
- Languages & Frameworks で、 [GitHub Copilot] をクリックします。
- Under "Languages," select or deselect the checkboxes for the languages you want to activate or deactivate GitHub Copilot for.
- Click Apply, and then click OK.
- Restart your JetBrains IDE for the changes to take effect.
Editing your github-copilot.xml file
To configure language settings in the github-copilot.xml file, you must edit the languageAllowList. Every line you add to the languageAllowList must contain an entry key and a value. The entry key is the name of the language, or (*) for a wildcard. The value is either true or false. If the value is true, GitHub Copilot is activated for the specified language. If the value is false, GitHub Copilot is deactivated for the specified language.
The file is located in the following directory:
- macOS:
~/Library/Application Support/JetBrains/<product><version>/options/github-copilot.xml - Windows:
%APPDATA%\JetBrains\<product><version>\options\github-copilot.xml - Linux:
~/.config/JetBrains/<product><version>/options/github-copilot.xml
For example, if you are using IntelliJ IDEA 2021.1 on macOS, the file is located at ~/Library/Application Support/JetBrains/IdeaIC2021.1/options/github-copilot.xml.
The github-copilot.xml file might not be generated until you make a change to your default language configuration in the IDE's settings. If you cannot locate the file, you should try modifying the default language settings in the IDE. For more information, see Configuring language settings in the IDE.
Alternatively, you can create the file manually and save it in the location for your operating system listed above. For more information, see Example language configurations.
-
Open the
github-copilot.xmlfile in a text editor. -
Between the
<map>tags, add the line or lines for the languages you want to activate or deactivate GitHub Copilot for. For example, to deactivate GitHub Copilot for all languages:XML <entry key="*" value="false" />
<entry key="*" value="false" /> -
Save the changes to the
github-copilot.xmlfile. -
Restart your JetBrains IDE for the changes to take effect.
Example language configurations
The default configuration of the github-copilot.xml file, which enables GitHub Copilot for all languages is as follows:
<application>
  <component name="github-copilot">
    <languageAllowList>
      <map>
        <entry key="*" value="true" />
      </map>
    </languageAllowList>
  </component>
</application>
<application>
  <component name="github-copilot">
    <languageAllowList>
      <map>
        <entry key="*" value="true" />
      </map>
    </languageAllowList>
  </component>
</application>
To deactivate GitHub Copilot for all languages, the wildcard (*) value is changed to false:
<application>
  <component name="github-copilot">
    <languageAllowList>
      <map>
        <entry key="*" value="false" />
      </map>
    </languageAllowList>
  </component>
</application>
<application>
  <component name="github-copilot">
    <languageAllowList>
      <map>
        <entry key="*" value="false" />
      </map>
    </languageAllowList>
  </component>
</application>
To specify languages individually, add an entry for each language you want to activate or deactivate GitHub Copilot for. Specific language settings will override the wildcard. For example, to activate GitHub Copilot for Python and YAML, and deactivate GitHub Copilot for all other languages, add the following entries:
<application>
  <component name="github-copilot">
    <languageAllowList>
      <map>
        <entry key="*" value="false" />
        <entry key="Python" value="true" />
        <entry key="YAML" value="true" />
      </map>
    </languageAllowList>
  </component>
</application>
<application>
  <component name="github-copilot">
    <languageAllowList>
      <map>
        <entry key="*" value="false" />
        <entry key="Python" value="true" />
        <entry key="YAML" value="true" />
      </map>
    </languageAllowList>
  </component>
</application>
You can also add a configuration to make the languageAllowList readonly in the IDE's settings. This will prevent you from changing the language settings in the IDE. For example:
<application>
  <component name="github-copilot">
    <option name="languageAllowListReadOnly" value="true" />
    <languageAllowList>
      <map>
        <entry key="*" value="true" />
      </map>
    </languageAllowList>
  </component>
</application>
<application>
  <component name="github-copilot">
    <option name="languageAllowListReadOnly" value="true" />
    <languageAllowList>
      <map>
        <entry key="*" value="true" />
      </map>
    </languageAllowList>
  </component>
</application>
GitHub.com
での Copilot の設定の構成
Copilot Pro プランをお使いの場合は、一般公開されているコードに一致するコード補完候補を許可または禁止できます。 これを設定するには、GitHub.com の個人用の設定を使用します。 「Managing Copilot policies as an individual subscriber」を参照してください。
GHE.com
のアカウントに対する認証
GHE.com 上の マネージド ユーザー アカウント 用に Copilot プランをお使いの場合は、サインインする前にいくつかの設定を更新する必要があります。「Using GitHub Copilot with an account on GHE.com」を参照してください。
Further reading
About GitHub Copilot in Visual Studio
If you use Visual Studio, GitHub Copilot can help you with a variety of tasks, including generating code suggestions, explaining how the code in your editor works, and suggesting code fixes. After installation, you can enable or disable GitHub Copilot, and you can configure advanced settings within Visual Studio or on GitHub.
Prerequisites
To configure GitHub Copilot in Visual Studio, you must install the GitHub Copilot plugin. For more information, see Installing the GitHub Copilot extension in your environment.
Using or rebinding keyboard shortcuts for GitHub Copilot
You can use the default keyboard shortcuts in Visual Studio when using GitHub Copilot. Alternatively, you can rebind the shortcuts in the Tools settings for Visual Studio using your preferred keyboard shortcuts for each specific command. You can search for each keyboard shortcut by its command name in the Keyboard Shortcuts editor.
Using default keyboard shortcuts
| Action | Shortcut | Command name |
|---|---|---|
| Show next inline suggestion | Alt+. | Edit.NextSuggestion |
| Show previous inline suggestion | Alt+, | Edit.PreviousSuggestion |
Rebinding keyboard shortcuts
If you don't want to use the default keyboard shortcuts in Visual Studio when using GitHub Copilot, you can rebind the shortcuts in the Keyboard editor using your preferred keyboard shortcuts for each specific command.
-
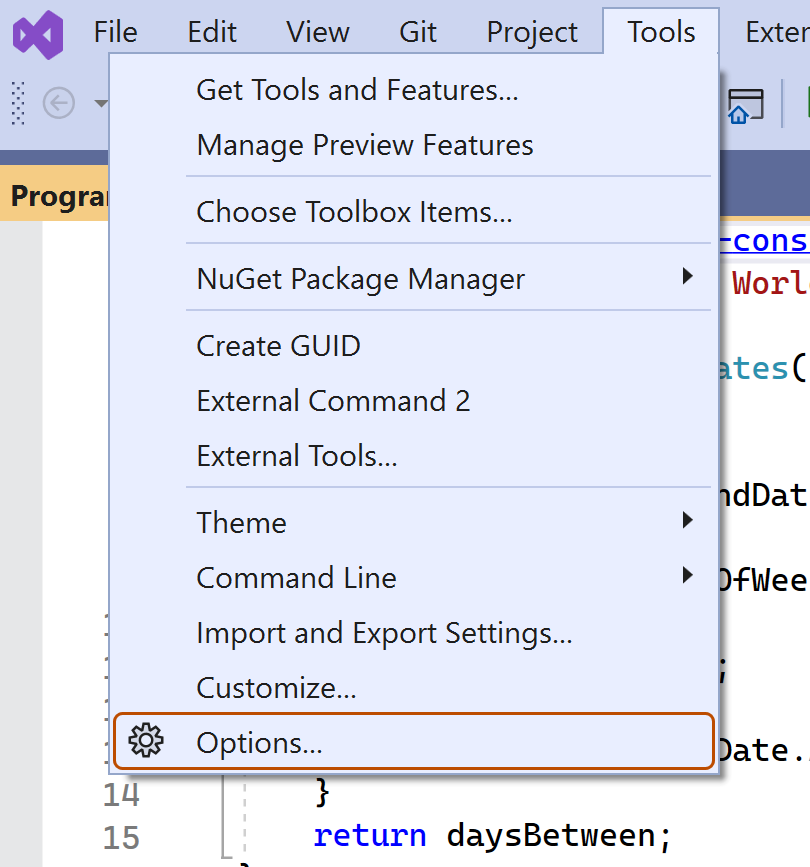
In the Visual Studio menu bar, under Tools, click Options.
-
In the "Options" dialog, under Environment, click Keyboard.
-
Under "Show commands containing:", search for the command you want to rebind.

-
Under "Press shortcut keys," type the shortcut you want to assign to the command, then click Assign.


GitHub Copilot の有効化または無効化
Visual Studio ウィンドウの下部パネルにある GitHub Copilot 状態アイコンは、GitHub Copilot が有効であるか無効であるかを示します。 有効にすると、アイコンの背景色はステータス バーの色と一致します。 無効にすると、異なるものになります。
-
GitHub Copilot を有効または無効にするには、Visual Studio ウィンドウの下部パネルにある GitHub Copilot アイコンをクリックします。

-
GitHub Copilot を無効にする場合は、候補をグローバルに無効にするか、現在編集中のファイルの言語に対して無効にするかを確認するメッセージが表示されます。
- GitHub Copilot からの候補をグローバルに無効にするには、 [グローバルに有効にする] をクリックします。
- 指定された言語に対して GitHub Copilot からの候補を無効にするには、 [言語に対して有効にする] をクリックします。

Configuring ReSharper for GitHub Copilot
If you use ReSharper, GitHub Copilot may work best when you configure ReSharper to use GitHub Copilot's native IntelliSense. For more information about ReSharper, see the ReSharper documentation
- In the Visual Studio menu bar, under Extensions, click ReSharper, then click Options.
- In the "Options" dialog, under Environment, click IntelliSense and then click General.
- Under "General" select Visual Studio and then click Save.
GitHub.com
での Copilot の設定の構成
Copilot Pro プランをお使いの場合は、一般公開されているコードに一致するコード補完候補を許可または禁止できます。 これを設定するには、GitHub.com の個人用の設定を使用します。 「Managing Copilot policies as an individual subscriber」を参照してください。
GHE.com
のアカウントに対する認証
GHE.com 上の マネージド ユーザー アカウント 用に Copilot プランをお使いの場合は、サインインする前にいくつかの設定を更新する必要があります。「Using GitHub Copilot with an account on GHE.com」を参照してください。
Enabling 次の編集候補
To use 次の編集候補 in Visual Studio, you need to enable the feature first.
- In the Visual Studio menu bar, under Tools, click Options.
- In the "Options" dialog, under GitHub, click Copilot and then click Copilot Completions.
- Check Enable 次の編集候補.
Further reading
About GitHub Copilot in Visual Studio Code
If you use Visual Studio Code, GitHub Copilot can help you with a variety of tasks, including generating code suggestions, explaining how the code in your editor works, and suggesting edits based on your instructions. You can enable or disable GitHub Copilot, and configure advanced settings within Visual Studio Code or on GitHub.
You can learn more about scenarios and setup in the VS Code documentation.
Keyboard shortcuts for GitHub Copilot
You can use the default keyboard shortcuts for GitHub Copilot in GitHub Copilot. Search keyboard shortcuts by command name in the Keyboard Shortcuts editor.
Alternatively, you can rebind the shortcut for each command in the Keyboard Shortcuts editor. For more information, see the VS Code documentation on editing shortcuts.
Keyboard shortcuts for macOS
| Action | Shortcut | Command name |
|---|---|---|
| Accept an inline suggestion | Tab | editor.action.inlineSuggest.commit |
| Dismiss an inline suggestion | Esc | editor.action.inlineSuggest.hide |
| Show next inline suggestion | Option (⌥)+] | editor.action.inlineSuggest.showNext |
| Show previous inline suggestion | Option (⌥)+[ | editor.action.inlineSuggest.showPrevious |
| Trigger inline suggestion | Option (⌥)+\ | editor.action.inlineSuggest.trigger |
| Open GitHub Copilot (additional suggestions in separate pane) | Ctrl+Return | github.copilot.generate |
| Toggle GitHub Copilot on/off | No default shortcut | github.copilot.toggleCopilot |
Keyboard shortcuts for Windows
| Action | Shortcut | Command name |
|---|---|---|
| Accept an inline suggestion | Tab | editor.action.inlineSuggest.commit |
| Dismiss an inline suggestion | Esc | editor.action.inlineSuggest.hide |
| Show next inline suggestion | Alt+] | editor.action.inlineSuggest.showNext |
| Show previous inline suggestion | Alt+[ | editor.action.inlineSuggest.showPrevious |
| Trigger inline suggestion | Alt+\ | editor.action.inlineSuggest.trigger |
| Open GitHub Copilot (additional suggestions in separate pane) | Ctrl+Enter | github.copilot.generate |
| Toggle GitHub Copilot on/off | No default shortcut | github.copilot.toggleCopilot |
Keyboard shortcuts for Linux
| Action | Shortcut | Command name |
|---|---|---|
| Accept an inline suggestion | Tab | editor.action.inlineSuggest.commit |
| Dismiss an inline suggestion | Esc | editor.action.inlineSuggest.hide |
| Show next inline suggestion | Alt+] | editor.action.inlineSuggest.showNext |
| Show previous inline suggestion | Alt+[ | editor.action.inlineSuggest.showPrevious |
| Trigger inline suggestion | Alt+\ | editor.action.inlineSuggest.trigger |
| Open GitHub Copilot (additional suggestions in separate pane) | Ctrl+Enter | github.copilot.generate |
| Toggle GitHub Copilot on/off | No default shortcut | github.copilot.toggleCopilot |
GitHub Copilot のコード補完の有効化または無効化
Visual Studio Code 内から GitHub Copilot を有効または無効にすることができます。
-
コード補完を構成するには、Visual Studio Code のタイトル バーで アイコンの横にある矢印をクリックして、[Configure code completions] を選びます。
![GitHub Copilot ドロップダウンのオプションのスクリーンショット。 [Configure code completions] がオレンジ色で強調されています。](/https/docs.github.com/assets/cb-92287/images/help/copilot/configure-code-completions-option-vscode.png)
-
[Configure Copilot Completions] ダイアログで、[Enable Completions] または [Disable Completions] を選びます。
![[Configure Copilot Completions] ダイアログのスクリーンショット。 [Enable Completions] と [Disable Completions] オプションがオレンジ色で強調されています。](/https/docs.github.com/assets/cb-18235/images/help/copilot/disable-completions-dialog.png)
![GitHub Copilot ドロップダウンのオプションのスクリーンショット。 [Configure code completions] がオレンジ色で強調されています。](/assets/cb-92287/mw-1440/images/help/copilot/configure-code-completions-option-vscode.webp)
![[Configure Copilot Completions] ダイアログのスクリーンショット。 [Enable Completions] と [Disable Completions] オプションがオレンジ色で強調されています。](/assets/cb-18235/mw-1440/images/help/copilot/disable-completions-dialog.webp)
Enabling or disabling inline suggestions
You can choose to enable or disable inline suggestions for GitHub Copilot in Visual Studio Code.
-
File メニューで Preferences に移動し、 Settings をクリックします。

-
In the left-side panel of the settings tab, click Extensions and then select Copilot.
-
Under "Inline Suggest:Enable," select or deselect the checkbox to enable or disable inline suggestions.

Enabling 次の編集候補
You can enable 次の編集候補 via the VS Code setting github.copilot.nextEditSuggestions.enabled. For more detailed instructions, see Enabling edit suggestions in the VS Code documentation.
Copilot Business または Copilot Enterprise プランをお使いの場合、そのプランを提供する organization または Enterprise で、[Editor preview features] の設定を有効にする必要があります。 「Managing policies for Copilot in your organization」または「Managing policies and features for Copilot in your enterprise」を参照してください。
Enabling or disabling GitHub Copilot for specific languages
You can specify which languages you want to enable or disable GitHub Copilot for.
-
From the Visual Studio Code, click the Extensions tab, then navigate to the Copilot section. For more information, see Enabling or disabling inline suggestions.
-
Under "Enable or disable Copilot for specified languages," click Edit in settings.json.
-
In the settings.json file, add or remove the languages you want to enable or disable GitHub Copilot for. For example, to enable Python in GitHub Copilot, add
"python": trueto the list, ensuring there is a trailing comma after all but the last list item.{ "editor.inlineSuggest.enabled": true, "github.copilot.enable": { "*": true, "yaml": false, "plaintext": false, "markdown": true, "javascript": true, "python": true } }
Revoking GitHub Copilot authorization
Visual Studio Code retains authorization to use GitHub Copilot through a particular GitHub account. If you want to prevent your GitHub account being used for GitHub Copilot on a device you no longer have access to, you can revoke authorization and then go through the authorization process again. The device you previously used will not have the new authorization.
-
GitHub で、任意のページの右上隅にある自分のプロフィール写真をクリックしてから、 [設定] をクリックします。
-
サイドバーの [統合] セクションで、[ アプリケーション] を選択します。
-
[認可された OAuth アプリ] タブをクリックします。
![[アプリケーション] ページのスクリーンショット。 "認可された OAuth アプリ" というラベルの付いたタブが、オレンジ色の枠線で強調表示されています。](/https/docs.github.com/assets/cb-25464/images/help/settings/settings-authorized-oauth-apps-tab.png)
-
Click the ... next to GitHub for VS Code and click Revoke.
-
[承認されている GitHub Apps] タブをクリックします。
-
If the GitHub Copilot extension is listed, click Revoke.
![[アプリケーション] ページのスクリーンショット。 "認可された OAuth アプリ" というラベルの付いたタブが、オレンジ色の枠線で強調表示されています。](/assets/cb-25464/mw-1440/images/help/settings/settings-authorized-oauth-apps-tab.webp)
After revoking authorization, Visual Studio Code will be able to continue using GitHub Copilot in a current session for a maximum of 30 minutes. After that time, you will need to reauthorize GitHub Copilot for use in Visual Studio Code again.
Re-authorizing GitHub Copilot
After you have revoked authorization, if you want to continue using GitHub Copilot, you will need to complete the reauthorization process.
-
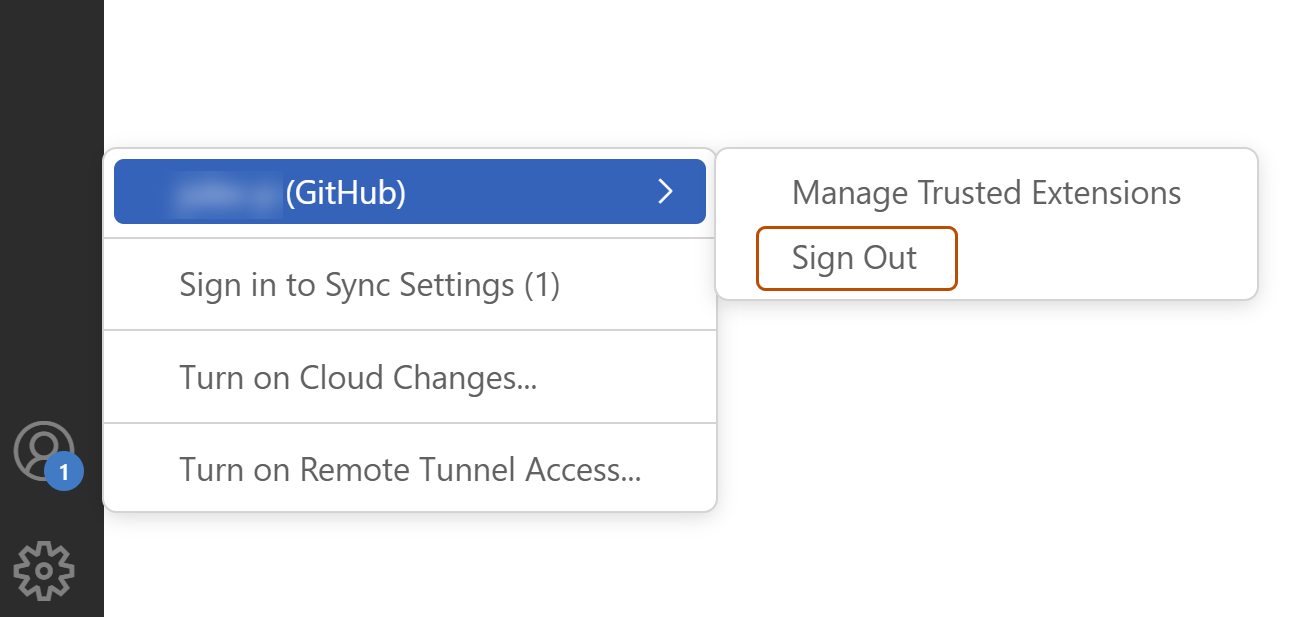
In the bottom left corner of Visual Studio Code, click the Accounts icon, hover over your username, and click Sign out.
-
In the "Visual Studio Code" pop-up, click Sign Out.
-
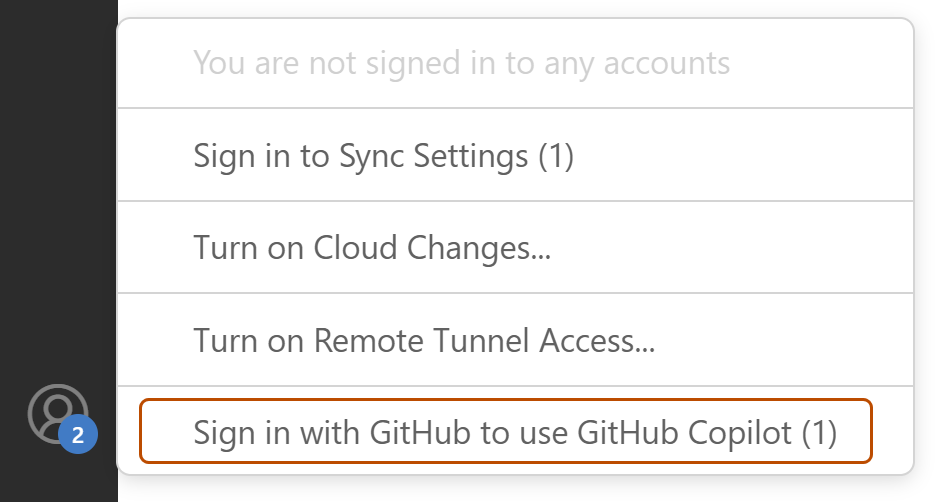
In the bottom left corner of Visual Studio Code, click the Accounts icon, hover over your username, and click Sign in with GitHub to use GitHub Copilot.
-
In your browser, GitHub will request the necessary permissions for GitHub Copilot. To approve these permissions, click Continue.
-
In the "Open Visual Studio Code?" pop-up, click Open Visual Studio Code.


GitHub.com
での Copilot の設定の構成
Copilot Pro プランをお使いの場合は、一般公開されているコードに一致するコード補完候補を許可または禁止できます。 これを設定するには、GitHub.com の個人用の設定を使用します。 「Managing Copilot policies as an individual subscriber」を参照してください。
GHE.com
のアカウントに対する認証
GHE.com 上の マネージド ユーザー アカウント 用に Copilot プランをお使いの場合は、サインインする前にいくつかの設定を更新する必要があります。「Using GitHub Copilot with an account on GHE.com」を参照してください。
Further reading
Configuring GitHub Copilot in Vim/Neovim
For guidance on configuring GitHub Copilot in Vim/Neovim, invoke the GitHub Copilot documentation in Vim/Neovim by running the following command:
:help copilot
Rebinding keyboard shortcuts
You can rebind the keyboard shortcuts in Vim/Neovim when using GitHub Copilot to use your preferred keyboard shortcuts for each specific command. For more information, see the Map article in the Neovim documentation.
GitHub.com
での Copilot の設定の構成
Copilot Pro プランをお使いの場合は、一般公開されているコードに一致するコード補完候補を許可または禁止できます。 これを設定するには、GitHub.com の個人用の設定を使用します。 「Managing Copilot policies as an individual subscriber」を参照してください。
GHE.com
のアカウントに対する認証
GHE.com 上の マネージド ユーザー アカウント 用に Copilot プランをお使いの場合は、サインインする前にいくつかの設定を更新する必要があります。「Using GitHub Copilot with an account on GHE.com」を参照してください。
Further reading
About GitHub Copilot in Xcode
If you use Xcode, GitHub Copilot can help you with a variety of tasks, including generating code suggestions, explaining how the code in your editor works, and suggesting code fixes. After installation, you can enable or disable GitHub Copilot, and you can configure advanced settings within Xcode or on GitHub.
Prerequisites
To configure GitHub Copilot for Xcode, you must install the GitHub Copilot extension. See Installing the GitHub Copilot extension in your environment.
Using or rebinding keyboard shortcuts for GitHub Copilot
You can use the default keyboard shortcuts for inline suggestions in Xcode when using GitHub Copilot. Alternatively, you can rebind the shortcuts to your preferred keyboard shortcuts for each specific command.
Default keyboard shortcuts
| Action | Shortcut |
|---|---|
| Accept the first line of a suggestion | Tab |
| View full suggestion | Hold Option |
| Accept full suggestion | Option+Tab |
Rebinding keyboard shortcuts
If you don't want to use the default keyboard shortcuts for GitHub Copilot, you can rebind the shortcuts in the Key Bindings editor and use your preferred keyboard shortcuts.
If you want to use something besides Tab to accept the first line of a suggestion, you need to disable the "Accept suggestions with Tab" option in the advanced settings in the GitHub Copilot for Xcode application. Additionally, we currently only support the Option key for the "View full suggestion" action.
- In the Xcode menu, click Xcode then Settings.
- Click Key Bindings and search for "Copilot" to find the commands you want to rebind.
Enabling or disabling GitHub Copilot
You can enable or disable the GitHub Copilot extension from within the application.
- Open the GitHub Copilot for Xcode application.
- At the top of the application window, click Advanced.
- In the "Suggestion Settings" section, use the "Request suggestions while typing" toggle to enable or disable the extension.
Automatically updating GitHub Copilot for Xcode
You can configure the GitHub Copilot extension to automatically check for updates.
- Open the GitHub Copilot for Xcode application.
- Select Automatically check for updates.
After updating the extension, Xcode must be restarted for the changes to take effect.
GitHub.com
での Copilot の設定の構成
Copilot Pro プランをお使いの場合は、一般公開されているコードに一致するコード補完候補を許可または禁止できます。 これを設定するには、GitHub.com の個人用の設定を使用します。 「Managing Copilot policies as an individual subscriber」を参照してください。
GHE.com
のアカウントに対する認証
GHE.com 上の マネージド ユーザー アカウント 用に Copilot プランをお使いの場合は、サインインする前にいくつかの設定を更新する必要があります。「Using GitHub Copilot with an account on GHE.com」を参照してください。
About GitHub Copilot in Eclipse
If you use Eclipse, GitHub Copilot can provide code suggestions as you work in the IDE. You can also use the Copilot Chat panel to work with Copilot as your AI pair programmer.
After you install GitHub Copilot in Eclipse, you can enable or disable it, and you can configure advanced settings within the IDE.
Prerequisites
To configure GitHub Copilot in Eclipse, you must install the GitHub Copilot extension. See Installing the GitHub Copilot extension in your environment.
Using or rebinding keyboard shortcuts for GitHub Copilot
You can use the default keyboard shortcuts for inline suggestions in Eclipse when using GitHub Copilot. Alternatively, you can rebind the shortcuts to your preferred keyboard shortcuts for each specific command.
Rebinding keyboard shortcuts
If you don't want to use the default keyboard shortcuts for GitHub Copilot, you can rebind the shortcuts in the Key Bindings editor and use your preferred keyboard shortcuts.
- In the IDE, click Copilot to open the menu.
- Click Edit Keyboard Shortcuts... to rebind the shortcuts.
Settings and configurations
For advanced settings, you can set auto-completion behavior, configure proxy, and assign a GitHub Enterprise authentication endpoint.
GitHub.com
での Copilot の設定の構成
Copilot Pro プランをお使いの場合は、一般公開されているコードに一致するコード補完候補を許可または禁止できます。 これを設定するには、GitHub.com の個人用の設定を使用します。 「Managing Copilot policies as an individual subscriber」を参照してください。
GHE.com
のアカウントに対する認証
GHE.com 上の マネージド ユーザー アカウント 用に Copilot プランをお使いの場合は、サインインする前にいくつかの設定を更新する必要があります。「Using GitHub Copilot with an account on GHE.com」を参照してください。