참고 항목
- MCP support is currently in 공개 미리 보기 and subject to change.
- MCP support is available in Copilot 채팅 for Visual Studio Code, JetBrains, Eclipse, and Xcode.
- The GitHub 시험판 사용 조건 apply to your use of this product.
Overview
The Model Context Protocol (MCP) is an open standard that defines how applications share context with large language models (LLMs). MCP provides a standardized way to connect AI models to different data sources and tools, enabling them to work together more effectively.
You can use MCP to extend the capabilities of Copilot 채팅 by integrating it with a wide range of existing tools and services. For example, the GitHub MCP server allows you to use Copilot 채팅 in Visual Studio Code to perform tasks on GitHub. You can also use MCP to create new tools and services that work with Copilot 채팅, allowing you to customize and enhance your experience.
For more information on MCP, see the official MCP documentation.
For information on some of the other currently available MCP servers, see the MCP servers repository.
Prerequisites
- Access to Copilot. Copilot에 액세스하는 방법에 대한 자세한 정보는 What is GitHub Copilot?을(를) 참조하세요.
- Visual Studio Code version 1.99 or later. For information on installing Visual Studio Code, see the Visual Studio Code download page.
Configuring MCP servers in Visual Studio Code
To configure MCP servers in Visual Studio Code, you need to set up a configuration script that specifies the details of the MCP servers you want to use. You can configure MCP servers for either:
-
특정 리포지토리입니다. 이를 통해 Visual Studio Code에서 프로젝트를 여는 모든 사용자와 MCP 서버를 공유할 수 있습니다. 이렇게 하려면 리포지토리의 루트에
.vscode/mcp.json파일을 만듭니다. -
Visual Studio Code의 개인 인스턴스입니다. 구성된 MCP 서버에 액세스 권한이 있는 유일한 사용자가 됩니다. 이렇게 하려면 Visual Studio Code에서
settings.json파일에 구성을 추가합니다. 이러한 방식으로 구성된 MCP 서버는 모든 작업 영역에서 사용할 수 있습니다.참고 항목
We recommend you use only one location per server. Adding the same server to both locations may cause conflicts and unexpected behavior.
The steps below show how to configure the Fetch MCP server in your .vscode/mcp.json file. The Fetch MCP server is a simple MCP server that provides web content fetching capabilities. For more information on the Fetch MCP server, see the Fetch directory in the MCP Server repository.
You can use the same steps to configure MCP servers in your personal Visual Studio Code settings. Details on how to configure other MCP servers are available in the MCP servers repository.
For information on configuring the GitHub MCP server, see Using the GitHub MCP Server.
-
Add the following configuration to your
.vscode/mcp.jsonfile:JSON { "inputs": [ // The "inputs" section defines the inputs required for the MCP server configuration. { "type": "promptString" } ], "servers": { // The "servers" section defines the MCP servers you want to use. "fetch": { "command": "uvx", "args": ["mcp-server-fetch"] } } }{ "inputs": [ // The "inputs" section defines the inputs required for the MCP server configuration. { "type": "promptString" } ], "servers": { // The "servers" section defines the MCP servers you want to use. "fetch": { "command": "uvx", "args": ["mcp-server-fetch"] } } } -
Save the
.vscode/mcp.jsonfile. -
A "Start" button will appear in your
.vscode/mcp.jsonfile, at the top of the list of servers. Click the "Start" button to start the MCP servers. This will trigger the input dialog and discover the server tools, which are then stored for later sessions.
-
Open Copilot 채팅 by clicking the icon in the title bar of Visual Studio Code.
-
In the Copilot 채팅 box, select Agent from the popup menu.

-
To view your list of available MCP servers, click the tools icon in the top left corner of the chat box. This will open the MCP server list, where you can see all the MCP servers and associated tools that are currently available in your Visual Studio Code instance.
- Optionally, you can define toolsets, groups of related tools that you can reference in chat. Toolsets make it easier to group related MCP tools together and quickly enable or disable them. For information on how to define and use a toolset, see the VS Code docs.


For more information on configuring MCP servers in Visual Studio Code, see Use MCP servers in Visual Studio Code (Preview) in the Visual Studio Code documentation.
Using MCP servers in Copilot 채팅
Once you have configured your MCP servers, you can use them in Copilot 채팅 to access a wide range of tools and services. In the example below, we will use the Fetch MCP server to fetch details about a web page.
-
Visual Studio Code의 제목 표시줄에 있는 아이콘을 클릭하여 Copilot 채팅을 엽니다.
-
Copilot 채팅 상자의 팝업 메뉴에서 Agent를 선택하세요.
-
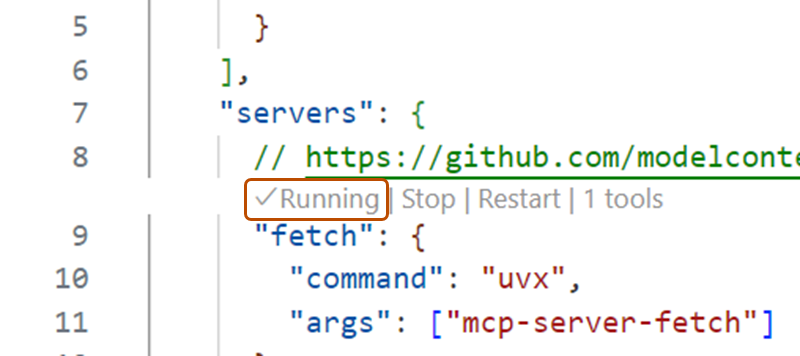
In the file with the MCP configuration, check that the MCP server is running. If it is not running, click the "Start" button to start the MCP server.
-
Ask Copilot 채팅 to fetch the details of a URL. For example:
Fetch https://github.com/github/docs. -
If Copilot asks you to confirm that you want to proceed, click Continue.
-
Copilot will fetch the details of the URL and display them in the chat box.

Optionally, you can use MCP prompts and resources in VS Code.
- MCP servers can define preconfigured prompts for interacting with their tools. You can access these prompts in chat with slash commands, using the format
/mcp.servername.promptname. - MCP servers provide resources, which are any kind of data that the server wants to make available. For example, the GitHub MCP server provides repository content as a resource. To add resources from an MCP server to your chat context, click Add Context... in the chat box, then click MCP Resources.
For more information on using MCP servers in Visual Studio Code, see Use MCP servers in Visual Studio Code (Preview) in the Visual Studio Code documentation.
Using existing MCP configurations
If you already have an MCP configuration in Claude Desktop, you can use that configuration in Visual Studio Code to access the same MCP servers. To do this, add the following configuration to your settings.json file in Visual Studio Code:
"chat.mcp.discovery.enabled": true
"chat.mcp.discovery.enabled": true
Visual Studio Code will automatically find your existing configuration and use it in your Visual Studio Code instance.
Overview
MCP(모델 컨텍스트 프로토콜)는 애플리케이션이 LLM(대규모 언어 모델)과 컨텍스트를 공유하는 방법을 정의하는 개방형 표준입니다. MCP는 AI 모델을 다양한 데이터 원본 및 도구에 연결하여 보다 효과적으로 함께 작동할 수 있도록 하는 표준화된 방법을 제공합니다.
MCP를 사용하면 다양한 기존 도구 및 서비스와 통합하여 Copilot 채팅의 기능을 확장할 수 있습니다. 또한 MCP를 사용하여 Copilot 채팅과 함께 작동하는 새 도구와 서비스를 만들어 환경을 사용자 지정하고 개선할 수 있습니다.
MCP에 대한 자세한 내용은 공식 MCP 설명서를 참조하세요.
For information on other currently available MCP servers, see the MCP servers repository.
Prerequisites
-
Access to Copilot. Copilot에 액세스하는 방법에 대한 자세한 정보는 What is GitHub Copilot?을(를) 참조하세요.
-
A compatible JetBrains IDE. GitHub Copilot is compatible with the following IDEs:
- IntelliJ IDEA(Ultimate, Community, Educational)
- Android Studio
- AppCode
- CLion
- Code With Me Guest
- DataGrip
- DataSpell
- GoLand
- JetBrains Client
- MPS
- PhpStorm
- PyCharm(Professional, Community, Educational)
- Rider
- RubyMine
- RustRover
- WebStorm
- Writerside
다운로드할 JetBrains IDE 도구 찾기를 참조하세요.
-
GitHub Copilot 플러그인. JetBrains Marketplace에서 GitHub Copilot 플러그 인을 참조하세요. 설치 지침은 Installing the GitHub Copilot extension in your environment을(를) 참조하세요.
-
JetBrains IDE에서 GitHub에 로그인합니다. 인증 지침은 Installing the GitHub Copilot extension in your environment을(를) 참조하세요.
Configuring MCP servers in JetBrains IDEs
-
In the lower right corner, click .
-
From the menu, select "Edit settings".
-
Under the MCP section, click "Edit in
mcp.json". -
Define your MCP servers. You can use the following configuration as an example:
JSON { "servers": { "memory": { "command": "npx", "args": [ "-y", "@modelcontextprotocol/server-memory" ] } } }{ "servers": { "memory": { "command": "npx", "args": [ "-y", "@modelcontextprotocol/server-memory" ] } } }
Alternatively, to access the MCP settings, once you're in "Agent Mode", click the tools icon, then click Add more tools.
Overview
MCP(모델 컨텍스트 프로토콜)는 애플리케이션이 LLM(대규모 언어 모델)과 컨텍스트를 공유하는 방법을 정의하는 개방형 표준입니다. MCP는 AI 모델을 다양한 데이터 원본 및 도구에 연결하여 보다 효과적으로 함께 작동할 수 있도록 하는 표준화된 방법을 제공합니다.
MCP를 사용하면 다양한 기존 도구 및 서비스와 통합하여 Copilot 채팅의 기능을 확장할 수 있습니다. 또한 MCP를 사용하여 Copilot 채팅과 함께 작동하는 새 도구와 서비스를 만들어 환경을 사용자 지정하고 개선할 수 있습니다.
MCP에 대한 자세한 내용은 공식 MCP 설명서를 참조하세요.
For information on other currently available MCP servers, see the MCP servers repository.
Prerequisites
- Access to Copilot. Copilot에 액세스하는 방법에 대한 자세한 정보는 What is GitHub Copilot?을(를) 참조하세요.
- GitHub Copilot for Xcode extension. See Installing the GitHub Copilot extension in your environment.
Configuring MCP servers in Xcode
-
Open the GitHub Copilot for Xcode extension.
-
In agent mode, click the tools icon.
-
Select "Edit config".
-
Define your MCP servers, editing
mcp.json. You can use the following configuration as an example:JSON { "servers": { "memory": { "command": "npx", "args": [ "-y", "@modelcontextprotocol/server-memory" ] } } }{ "servers": { "memory": { "command": "npx", "args": [ "-y", "@modelcontextprotocol/server-memory" ] } } }
Overview
MCP(모델 컨텍스트 프로토콜)는 애플리케이션이 LLM(대규모 언어 모델)과 컨텍스트를 공유하는 방법을 정의하는 개방형 표준입니다. MCP는 AI 모델을 다양한 데이터 원본 및 도구에 연결하여 보다 효과적으로 함께 작동할 수 있도록 하는 표준화된 방법을 제공합니다.
MCP를 사용하면 다양한 기존 도구 및 서비스와 통합하여 Copilot 채팅의 기능을 확장할 수 있습니다. 또한 MCP를 사용하여 Copilot 채팅과 함께 작동하는 새 도구와 서비스를 만들어 환경을 사용자 지정하고 개선할 수 있습니다.
MCP에 대한 자세한 내용은 공식 MCP 설명서를 참조하세요.
For information on other currently available MCP servers, see the MCP servers repository.
Prerequisites
- Copilot에 액세스합니다. Eclipse에서 GitHub Copilot을 사용하려면 활성 GitHub Copilot 구독이 필요합니다. Copilot에 액세스하는 방법에 대한 자세한 정보는 What is GitHub Copilot?을(를) 참조하세요.
- Eclipse의 호환 버전. GitHub Copilot 확장을 사용하려면 Eclipse 버전 2024-09 이상이 필요합니다. Eclipse 다운로드 페이지를 참조하세요.
- Latest version of the GitHub Copilot extension. Download this from the Eclipse Marketplace. For more information, see Installing the GitHub Copilot extension in your environment.
- Sign in to GitHub from Eclipse.
Configuring MCP servers in Eclipse
-
To open the Copilot 채팅 panel, click the Copilot icon () in the status bar at the bottom of Eclipse.
-
From the menu, select "Edit preferences".
-
In the left pane, expand Copilot 채팅 and click MCP.
-
Define your MCP servers. You can use the following configuration as an example:
JSON { "servers": { "memory": { "command": "npx", "args": [ "-y", "@modelcontextprotocol/server-memory" ] } } }{ "servers": { "memory": { "command": "npx", "args": [ "-y", "@modelcontextprotocol/server-memory" ] } } }
Creating a new MCP server
You can create a new MCP server to fulfill your specific needs, and then integrate it with Copilot 채팅. For example, you can create an MCP server that connects to a database or a web service, and then use that server in Copilot 채팅 to perform tasks on that database or web service.
For more information on creating and configuring your own MCP servers, see the official MCP documentation.