
A year ago, I’ve design reviewed an MCU module for CAN hacking, called TinySparrow. Modules are plenty cool, and even more so when they’re intended for remaking car ECUs. For a while now, every car has heavily depended on a computer to control the operation of everything inside it – the engine and its infrastructure, the lights, and Sadly, ECUs are quite non-hackable, so building your own ECUs only makes sense – which is why it’s heartwarming to see modules intended to make this easier on the budding ECU designer!
Last time we saw this module, it was quite a bit simpler. We talked about fixing a number of things – the linear regulator, the unprotected CAN transceiver, and the pinout; we also made the board cheaper to produce by reducing the layer count and instead pushing the clearance/track width limits. This time, we’re seeing TinySparrow v2 , redesigned accounting for the feedback and upgraded with a new MCU – it’s quite a bit more powerful!
For a start, it’s got ESD diodes, a switching-linear regulator chain for clean but efficient power supply, and most importantly, an upgraded MCU, now with USB and one more CAN channel for a total of two! There’s a lot more GPIOs to go around, too, so the PCB now uses all four of its sides for breakout out power, programming, and GPIO pads. Only a tiny bit bigger than its v1, this module packs a fair bit of punch.
Let’s revisit the design, and try to find anything still left to improve – there’s a few noteworthy things I found.
Protection Almost Perfect
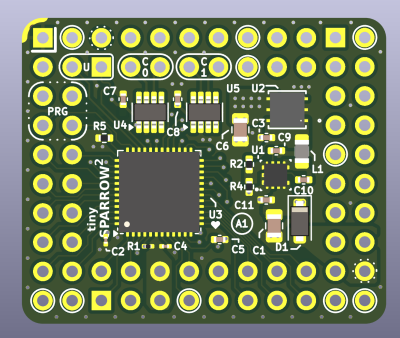

It took me a bit to try and find the ESD diodes mentioned in the README – I didn’t notice that they’re basically the only thing on the bottom layer. This is fine – protection elements like ESD diodes can be on a different layer, and as they’re SOT-23, they’re easy to solder on post-factum. This is quite a nice placement choice, in my opinion – you can basically solder this board with cheaper single-side assembly, use ESD-less boards for your bench testing, and then simply solder the few bottom side components onto “production” versions!
There is but one hiccup with the way they’re placed. ESD diode appnotes will tell you – there’s some extra considerations you can try and put into ESD diode layout. This design pulls connector tracks directly to the CAN ICs on top layer, and directly to diodes on the bottom one. Instead, you should try and route the signal “through” the ESD diodes – letting track inductance play in your favour, and not impeding the ESD diode’s impact.


Fortunately, by lightly rerouting 3.3V CAN transceiver power inputs and a few surrounding signals, we can put CAN+ and CAN- signals through vias under the package, so that the signal flows “in series” with ESD diode pads. Similarly, the ESD diodes get vias to ground, shared with transceiver ground vias, but oh well. It’s not perfect, but to my eye, it’s better than before, as far as ESD protection is concerned.
About the only problem I can see with the reroute, is having to reshuffle USB signals, putting them closer together. However, as long as they’re intra-pair length-matched, they’ll do just fine.
Vias Fit Inside Pads, But Maybe Don’t?
This is not the only change to consider as far as signal routing goes, but it’s the most major one. The next issue I see, is vias – specifically, vias inside component pads.
I’ve had a few run-ins with via-in-pad related problems. Previously, I’ve failed to assemble some boards specifically because of via-in-pad related problems, with solder paste wicking through the board and onto the opposite side. For 0402 components I used, this made a number of boards essentially non-solderable depending on how lucky I got reflowing them, and I had to run a new board revision to get the yield up.


This board’s files have a fair few hints about getting assembled by JLCPCB, and JLC can definitely do plugged vias, preventing any sorts of solder flowing through the board. If the designer or someone else takes the board elsewhere, however, that might no longer apply, which would be disappointing. Also, you might have to pay extra for plugging holes – just like with the previous review, let’s see if we can avoid it. Most problematic areas are around the transceivers, still – especially given the board files now have a custom rule for 0.5mm via-to-via distances. This is not a constraint I’ve seen actually stressed by JLCPCB, but I don’t mind – with just a little bit more signal shuffling, every newly moved via landed within the 0.5mm target area.
Pinout Considerations, Again
The VDC pin now has GND pins to match, and in general, there’s a lot more GND pins to go around – which is great! It’s pretty surprising to me that the VDC pin is duplicated and its trace goes across the board on an inner layer. This is supposed to be an at least somewhat unfiltered and unprotected car power rail, after all, and I don’t think that’d help things like noise integrity. Maybe this helps with testing because all the core signals are brought to the same corner, but to my eye, it has bad vibes.
The module could perhaps use a key pin – there’s zero omissions in the outer dual-row, which leaves for a possibility of inserting this module rotated 180 degrees by accident, likely obliterating at least something on the module. If these modules are ever meant to be swapped during testing, i.e. using machined headers, I’d try and remove one of the pins from the equation – there’s a NC pin in one of the corners already, thankfully.


There’s a pair of 3.3 V signals and GND signals on the opposite sides of each other. This is geometrically satisfying pinout-wise, and, it would short-circuit the module’s onboard regulator if the module’s ever rotated inserted 180 degrees. This is generally harmless with modern modules, but it could very well make the switching or the linear regulator heat up to finger-burning temperatures – last thing you need when trying to remove a module inserted incorrectly!
Thankfully, at the top, there’s a few unconnected pads, so perhaps GND and NC could swap places, making sure that 3.3 V lands on NC once rotated 180 degrees. The VDC pads could perhaps use the same consideration, but I’m comfortable leaving those as homework.
Moving Forward
It’s a joy to see how much the TinySparrow module has grown in its v2. From vastly improved layout to higher consideration given to design rules, nicer silkscreen, and a way more powerful MCU while at it, it’s that much more of a viable heart for a somewhat modern car, and it’d be quite nice to see some boards utilizing it in the future. I hope this review can help!

As usual, if you would like a design review for your board, submit a tip to us with [design review] in the title, linking to your board files. KiCad design files strongly preferred, both repository-stored files (GitHub/GitLab/etc) and shady Google Drive/Dropbox/etc .zip links are accepted.


Is there a non-KiCad schematic available ? I’m curious about the “switching-linear regulator chain” used. I’ve done something similar years ago when using an Arduino in a car, which can have a very harsh supply voltage environment.
I assume it’s just an LDO after a switcher, to smooth off the spikes and quiet everything down without dissipating too much power. It’s pretty common.
Not taking the time to spell out “ECU” once? Please drop the elitist writing style.
I normally read it as Electronic Control Unit, but … Not everyone agrees, and Arya may not know which full term the designer prefers.
Nobody ever refers to the ECU as anything other than an ECU. It’s not even an IT term, it’s an automotive one.
Are you just searching for acronyms so you can rant? It is always easier for you to have googled it than to have complained about it.
In my world “ECU” is the European Currency Unit, the old word for Euro. That does obviously not apply here. So enlighten me, what is an ECU? I drive more than 10000km per year but never came across the term ECU, so it can’t be something usual.
And no, I do not look for abbreviations – I doubt ECU is used as a word and would therefore qualify as an acronym – to nitpick about, I just don’t like users of tech stuff thinking that everyone should be familiar with their special niche.
Putting the ESD diodes on the bottom for later hand assembly could make sense … But it also makes leaving them off by accident more likely. Also, it keeps the board from being flat, which slightly reduces the options for how to install/mount it in a more complete assembly. This sort of goes against the goal of making this subcomponent a reusable-without-rethinking part.
The doubled VDC seems useful for various configurations of how this thing gets embedded, particularly if it is wired directly instead of being placed on a larger PCB. I do wonder about a possible need for an outgoing power connection, to power whatever the broken-out pins end up doing.
and if you wanna get it assembled by a pcb fab, double-sided pretty much doubles the price.
(Assuming I have correctly read and interpreted the before/after pictures…)
Do central “ground” pads for heat dissipation not get solder paste? Or is it just that solder paste there is so massive that some falling in the via doesn’t matter? Or that tenting is ideal, but if you won’t be tenting, those particular vias just have to stay put anyhow?
When you move the via off the pad proper, should there be at least a sliver of solder mask separating the via from the pad? If so, that isn’t visible above, but maybe that is just an artifact of which layers are shown.
I wish it was went up to 30V as batteries in a 24V system can go up to 27-28V….
Solid deisgn and this would be very useful on a lot of projects, where can I order these?