What's the first thing for any website to create a good impression on a user? ...
Yes...it's the user interface for any website. Every developer knows how important it is to create a beautiful design for users to interact with any website. Giving styling to web pages smartly in a minimal amount of time is not an easy task if you don't have a good knowledge of CSS and its selectors. CSS selectors target the specified elements in an HTML document and help developers apply styling to the web pages. You might know some basic CSS selectors but a bit more than basic knowledge helps in achieving your goal faster. Using the right CSS selectors minimizes the amount of code, makes it more readable, and makes the CSS simpler to maintain in the future.

There are a wide variety of CSS selectors available. Let's discuss some important ones to simplify your work in front-end development.
1. Element or Group Selector
This is one of the most basic selector to use in CSS. Element selector allows you to select and give styling to all elements with the same specified element name. If there are multiple elements with the same style definitions, you can group all the elements and apply styling to all of them together. This way you can minimize the code because you won't have to use class for each of the elements.
Example 1: Here, all paragraph on the page will be right-aligned, with a yellow text color
p {
  text-align: right;
  color: red;
}
Example 2: Now, look at the following CSS code...
h2 {
 text-align: center;
 color: yellow;
}
h3 {
 text-align: center;
 color: yellow;
}
p
 text-align: center;
 color: yellow;
}
You can minimize the above code using the group selector and write the same code as given below:
h2, h3, p {
 text-align: center;
 color: yellow;
}
2. #id selector
id selector is the other most powerful common selector in CSS. Using the # symbol followed by id name allows you to target by id and apply styling to all specified elements with a selected id. Using this selector sounds good because of its simplicity but keep in mind that id should be unique for the entire web page. It means you are not allowed to assign an id selector for multiple elements. If you won't assign unique id you will face problems in manipulating a specific element in JavaScript. Also, your code will not be validated by W3C and you will face compatibility issues across different browsers. So instead of creating many #id's use classes or any other logic for styling, else it will be tough to maintain your CSS later on.
Example:
#box{
width : 250px;
height: 250px;
background : yellow;
}
3. .class selector
Class selector is the most useful common selector used by the developers. You can define the class selector using period (.) followed by the class name. It gives styling to all elements with a specified class attribute. It is similar to the id selector but the only difference is, class selector allows you to target multiple elements in a page. You can also use multiple classes (separated by a space) on HTML elements.
Example 1:
.center{
text-align: center;
color: yellow;
}
Example 2: In the below example, only p elements with class 'center' will be affected.
p.center {
 text-align: center;
 color: yellow;
}
4. Attribute selector
Using attribute selector, you can select all elements by the name or value of a given attribute and apply styling to them.
Example 1: Below is an example of an HTML line which has 'rel' attribute with the value of "newfriend"
<h3 id="title" class="friend" rel="newfriend">David Walsh</h3>
Let's see how to use attribute selector for 'rel' attribute in the above line.
h3[rel="newfriend"] {
  color: yellow;
}
This selector is frequently used by the developers in code for 'checkbox' element. Read the example given below.
Example 2:
input[type="checkbox"] {
     color: purple;
}
It is also frequently used for the anchor tags in the code. Read the example given below.
Example 3:
a[title] {
  color: red;
}
Combinators: These are used to apply styling to the html elements by using the relationship between the selectors. Combinators allows you to mix simple selectors and apply logic between them. Let's discuss four different combinator selectors in CSS.
- Descendant selector
- Child selector
- Adjacent sibling selector
- General sibling selector
5. Descendant selector
Descendant selector apply styling to only those elements that are descendants of a specified element. This selector is very useful when you need to apply styling only for some specific elements. For example, what if, rather than targeting all 'h2' tags, you only need to target the 'h2' which are the part of 'div' tag only. These are the cases where you can use descendant selectors.
Example 1:
div h2 {
 background-color: green;
}
Example 2: You can also make a chain and use descendant selector.
ol li a {
 background-color: green;
}
Example 3: In the below example, you can mix it with class selector.
.box a{
color :green;
}
6. Child selector
Child selector allows you to selects all elements that are the children of a specified element.
Example 1:
div > h1 {
 background-color: green;
}
The difference between child selector and descendant selector is that the latter will only select direct children.
Example 2:
CSS:
span {
 background-color: white;
}

div > span {
 background-color: yellow;
}
HTML:
<div>
 <span>Span #1, in the div.
   <span>Span #2, in the span that's in the div.</span>
 </span>
</div>
<span>Span #3, not in the div at all.</span>
Result:

Example 3: You have a 'ul' that has some items and inside these items, there are new 'ol' of items, you might want to select a certain style just for the higher-hierarchy list items but not for the nested list’s items.
CSS:
ul > li {
   border-top: 5px solid red;
}
HTML:
<ul>
   <li>Unordered item</li>
   <li>Unordered item
       <ol>
           <li>Item 1</li>
           <li>Item 2</li>
       </ol>
   </li>
</ul>
Result:

7. Adjacent and general sibling selectors
Adjacent means "immediately following". This selector is used when you want to select the elements that immediately follow the specified element (adjacent siblings). In other words it selects the element which is right next to another element at the same level of the hierarchy.
Example: Below example select p element that are directly following a 'div' element
CSS:
div + p {
 background-color: red;
}
HTML:
<div>
 <p>Paragraph 1 in the div.</p>
 <p>Paragraph 2 in the div.</p>
</div>

<p>Paragraph 3. Not in a div.</p>
<p>Paragraph 4. Not in a div.</p>
Result:

General sibling selectors (~) are less strict than adjacent sibling selector. It allows you to select all the elements that are siblings of a specified element even if they are not directly adjacent.
Example: Below example selects all 'p' elements that are siblings of 'div' elements
CSS:
div ~ p {
 background-color: red;
}
HTML:
<p>Paragraph 1.</p>

<div>
 <p>Paragraph 2.</p>
</div>

<p>Paragraph 3.</p>
<span>GeeksforGeeks</span>
<p>Paragraph 4.</p>
Result:

8. The star selector *
It is also called as universal selector (*) and it selects everything in the document and apply styling to them. By default your browser already defines the styling to the element and when you want to reset the browser default styles you can use star selector. For example, instead of using the default styling of your browser such as margin, padding, text-align or font-size, you can define your own styling for the entire elements of your web page..
Example 1:
* {
text-align: center;
color: green;
margin: 0;
padding: 0;
font-size: 30px;
border: 0;
}
Example 2: Select all elements inside <div> elements and set their background color to red.
div * {
   background-color: red;
}
Did you notice that when you use other selectors like 'class' , 'element' or 'id', they already imply the star selector?
h1 {
...
}
is similar to
*h1 {
...
}
It is generally recommended to use * selector less in your code or use it for testing purpose only because it adds unnecessary too much weight on the browser.
9. Pseudo-classes and Pseudo element
If you want to style an element based on the state of a specified element, you can use pseudo classes (:) for that. For example, you can apply styling on an element when a user mouses over it, when a user visit or hover a link when an element gets focus. So this selector is useful to apply styles based on element states. Let's see the syntax and example.
Syntax:
selector:pseudo-class {
 property:value;
}
Example 1: Read the code below to change a button's color when the user's pointer hovers over it
button:hover {
 color: green;
}
Example 2:
a:link {
 color: red;
}
/* visited link */
a:visited {
 color: green;
}
Example 3:
input[type=radio]:checked {
 border: 2px solid green;
}
Pseudo element (::) allows you to apply styling to the specific piece or fragment of the selected element. For example, style the first character, or line, of an element.
Syntax:
selector::pseudo-element {
 property:value;
}
Example 1: ::first-line can be used to change the font of the first line of a paragraph.
p::first-line {
 color: green;
 font-size: 1.2em;
 text-transform: uppercase;
}
Example 2: Pseudo element can also be combined with the CSS classes. Read the example given below
p.intro::first-letter {
 color: red;
 font-size: 1.2em;
 font-weight: bold;
}
Example 3: Pseudo element can also be used to insert content before, or after, the content of an element. Read the example given below which insert an image before the content of each 'h1' element.
h1::before {
 content: url(abc.gif);
}
10. nth-of-type and nth-child
Consider a scenario where you have four unordered lists. If you want to apply CSS only on the third item of the ul, and you don't have a unique id to hook into, you can use the nth-of-type(n). Basically :nth-of-type selector allows you to select every element that is a specified nth child of a specified type of it parent. n can be any number, keyword, or formula that will specify the position of an element among a group of siblings. If the explanation still sounds complicated then let's understand with the example.
Example 1: In the example given below only the third 'li' will be affected by the :nth-of-type style.
CSS:
li:nth-of-type(3) {
 color: red;
}
HTML:
<ul>
<li>First item.</li>
<li>Second item.</li>
<li>Third item.</li>
<li>Fourth item.</li>
</ul>
Result:

Syntax:
:nth-of-type(number) {
 css declarations;
}
:nth-child(n) selector matches every element that is the nth child, regardless of type, of its parent. n can be a number, a keyword, or a formula that will specify the position of an element among a group of siblings.
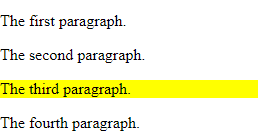
Example 1:
CSS:
p:nth-child(3) {
 background: yellow;
}
HTML:
<p>The first paragraph.</p>
<p>The second paragraph.</p>
<p>The third paragraph.</p>
<p>The fourth paragraph.</p>
Result:
Example 2:
p:nth-child(2n) {
 background: yellow;
}
Example 3: You can also chain multiple nth-child together for different elements with same styling.
div:nth-of-type(4) p:nth-of-child(3) {
 color: red;
}
Similar Reads
12 Web Development Checklists Every Team Should Keep Handy A website when build should be attractive, meet the goals of businesses, and be easy to handle. There are various factors that help in keeping it successful. A comprehensive web development checklist can help in delivering a better final product. A checklist is a list that keeps track of items requi
6 min read
12 JavaScript Code Snippets That Every Developer Must Know JavaScript is by far the most popular language when it comes to web development. It is being used on both the client side and the server side. To improve coding efficiency, every developer should know essential JavaScript code snippets to make their development fast and easy.1. Sorting an ArraySorti
4 min read
7 JavaScript Concepts That Every Web Developer Should Know JavaScript is Everywhere. Millions of web pages are built on JavaScript and it’s not going anywhere at least for now. On one side HTML and CSS give styling to the web pages but on the other side, it's the magic of JavaScript that makes your web page alive. Today this language is not just limited to
10 min read
Top 10 JavaScript Fundamentals That Every Developer Should Know Javascript is an object-oriented language that is lightweight and used for web development, web applications, game development, etc. It enables dynamic interactivity on static web pages, which cannot be done with HTML, and CSS only. Javascript is so vast that even mid-level professionals find it dif
8 min read
9 Features of Chrome Developer Tools That You Must Know We all know the popularity of the Chrome browser. This browser has made life easier for developers and being a developer using its built-in developer tool is nothing new for you. The chrome developer tool has made debugging a lot easier. The built-in developer tool allows you to edit the page, debug
6 min read
Top 10 Open Source Projects For Web Developers Any project, framework, software, or essentially, block of code publicly accessible and freely available for anyone to access, inspect, modify, and share is called to be OPEN SOURCE, i.e., if the source code of the project is present for the perusal of the general public then it is considered an OPE
13 min read