Spring Boot - AOP Around Advice
Last Updated :
15 Mar, 2022
Aspect-oriented programming(AOP) as the name suggests uses aspects in programming. It can be defined as the breaking of code into different modules, also known as modularisation, where the aspect is the key unit of modularity. Aspects enable the implementation of crosscutting concerns such as transaction, logging not central to business logic without cluttering the code core to its functionality. It does so by adding additional behavior that is the advice to the existing code. For example- Security is a crosscutting concern, in many methods in an application security rules can be applied, therefore repeating the code at every method, defining the functionality in a common class, and controlling were to apply that functionality in the whole application. In this article, we will be covering a working example of Around Advice.
Tip: Aspect-Oriented Programming and AOP in Spring Framework is required as a pre-requisite before proceeding further.
Around Advice is the strongest advice among all the advice since it runs "around" a matched method execution i.e. before and after the advised method. It can choose whether to proceed to the join point or to bypass join point by returning its own return value or throwing an exception. This type of advice is used where we need frequent access to a method or database like- caching or to share state before and after a method execution in a thread-safe manner (for example, starting and stopping a timer).
It is denoted by @Around annotation. The advice method requires special parameters. The first parameter must be of type ProceedingJoinPoint. We call proceed() method on this to execute the joint point method. We can pass an array of Object to proceed methods to be used as the arguments to the method execution when it proceeds.
Steps to Implement AOP Around Advice in Spring Boot Application
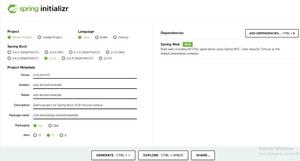
Step 1: Open Spring Initializr
Step 2: Provide the Group name: com.around
Step 3: Provide the Artifact Id: aop-around-example
Step 4: Add the Spring Web dependency.
Step 5: Click on the Generate button. A zip file will be downloaded into the system. Extract it.
Step 6: Import the folder in the IDE by using the following steps:
File ->
    Import ->
        Existing Maven Projects ->
            Next ->
                Browse ->
                    Look for the folder aop-around-advice-example
                         -> Finish
When the project is imported, it will install the dependencies. Once it is done, follow the next steps.
Step 7: Add the dependency for spring AOP in pom.xml
A. pom.xml
XML
<project xmlns="http://maven.apache.org/POM/4.0.0"
        xmlns:xsi="http://www.w3.org/2001/XMLSchema-instance"
   xsi:schemaLocation="http://maven.apache.org/POM/4.0.0
                            http://maven.apache.org/xsd/maven-4.0.0.xsd">
<modelVersion>4.0.0</modelVersion>
<groupId>com.around_advice</groupId>
<artifactId>aop-around-advice-example</artifactId>
<version>0.0.1-SNAPSHOT</version>

<packaging>jar</packaging>

<name>aop-around-advice-example</name>
<description>Demo project for Spring Boot AOP Around Advice</description>

 <parent>
    <groupId>org.springframework.boot</groupId>
    <artifactId>spring-boot-starter-parent</artifactId>
    <version>2.2.2.RELEASE</version>
    <relativePath /> <!-- lookup parent from repository -->
 </parent>

 <properties>
    <project.build.sourceEncoding>UTF-8</project.build.sourceEncoding>
    <project.reporting.outputEncoding>UTF-8</project.reporting.outputEncoding>
    <java.version>1.8</java.version>
 </properties>

<dependencies>
      <!-- dependency for spring web -->
      <dependency>
       <groupId>org.springframework.boot</groupId>
       <artifactId>spring-boot-starter-web</artifactId>
      </dependency>

      <!-- added dependency for spring aop -->
      <dependency>
       <groupId>org.springframework.boot</groupId>
       <artifactId>spring-boot-starter-aop</artifactId>
       </dependency>
</dependencies>

<build>
<plugins>
 <plugin>
  <groupId>org.springframework.boot</groupId>
  <artifactId>spring-boot-maven-plugin</artifactId>
 </plugin>
</plugins>
</build>

</project>
Save the changes and it will download the jars. Once it is done, move ahead with the next steps.
Note: If the jars are not added properly, you may get some errors.
Step 8: Create a package with the name com.around_advice.model. and add a Student model class to it.
B. Student class
Java
// Java Program to Illustrate Student class

package com.around_advice.model;

// Class
public class Student {

    // Class data members
    private String firstName;
    private String secondName;

    // Constructors
    public Student() {}

    // Getter
    public String getFirstName() { return firstName; }

    // Setter
    public void setFirstName(String firstName)
    {
        // This keyword refers to current instance itself
        this.firstName = firstName;
    }

    // Getter
    public String getSecondName() { return secondName; }

    // Setter
    public void setSecondName(String secondName)
    {
        this.secondName = secondName;
    }
}
Step 9: Create a package with the name com.around_advice.service and add a Student Service class to it. Add a method to add students with given name arguments.
C. StudentService class
Java
// Java Program to Illustrate StudentService Class

package com.around_advice.service;

// Importing required classes
import com.around_advice.model.Student;
import org.springframework.stereotype.Service;

// Annotation
@Service
// Class
public class StudentService {

    // Method
    public Student addStudent(String fname, String sname)
    {
        // Printing name of corresponding student
        System.out.println(
            "Add student service method called, firstname: "
            + fname + " secondname: " + sname);

        Student stud = new Student();
        stud.setFirstName(fname);
        stud.setSecondName(sname);

        // If first name i lesser than 4 words
        //  display below command
        if (fname.length() <= 3)
            throw new RuntimeException(
                "Length of firstname must be 4 or more");

        return stud;
    }
}
Step 10: Create a package with the name com.around_advice.controller. and add a Student Controller class to it. Add a method to handle Get requests and call Student Service from it.
D. StudentController Class
Java
// Java Program to Illustrate StudentController Class

package com.around_advice.controller;

// Importing required classes
import com.around_advice.model.Student;
import com.around_advice.service.StudentService;
import org.springframework.beans.factory.annotation.Autowired;
import org.springframework.web.bind.annotation.GetMapping;
import org.springframework.web.bind.annotation.RequestParam;
import org.springframework.web.bind.annotation.RestController;

// Annotation
@RestController
// Class
public class StudentController {

    @Autowired private StudentService studentService;

    @GetMapping(value = "/add")
    public Student addStudent(
        @RequestParam("firstName") String firstName,
        @RequestParam("secondName") String secondName)
    {
        return studentService.addStudent(firstName,
                                         secondName);
    }
}
Step 11: Create a package with the name com.around_advice.aspect and add a Student Service Aspect class to it. Here we will add our Advice method and PointCut expression.
E. StudentServiceAspect Class
Java
package com.around_advice.aspect;

// Importing required classes
import org.aspectj.lang.ProceedingJoinPoint;
import org.aspectj.lang.annotation.Around;
import org.aspectj.lang.annotation.Aspect;
import org.aspectj.lang.annotation.Pointcut;
import org.springframework.stereotype.Component;

// Annotation
@Aspect
@Component
// Class
public class StudentServiceAspect {

    // pointcut expression specifying execution
    // of any method in class of any return type
    // with 0 or more number of arguments

    @Pointcut(
        "execution(* com.around_advice.service.StudentService.*(..)) ")

    // pointcut signature
    private void
    anyStudentService()
    {
    }

    @Around("anyStudentService() && args(fname, sname)")

    // Method
    public Object
    beforeAdvice(ProceedingJoinPoint proceedingJoinPoint,
                 String fname, String sname)
        throws Throwable
    {
        // Print statements
        System.out.println(
            "Around method:"
            + proceedingJoinPoint.getSignature());
        System.out.println(
            "Before calling joint point service method");

        Object stud = proceedingJoinPoint.proceed();

        // Print statement
        System.out.println(
            "After calling joint point service method ");

        return stud;
    }
}
Step 12: We are done with the code structure. Now to run the application, start the application as "run as boot application". Open the browser and hit the following URL to make a get request call: http://localhost:{portNumber}/add?firstName={fname}&secondName={sname}
For the demo, we are hitting URL with fname as Harry and sname as Potter. In this case, the method will be executed normally.


When we hit URL with fname as Tom, the service method will throw an exception. The around advice will not be executed.
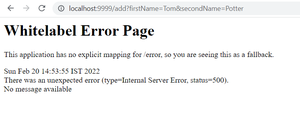

As seen in the output, the Around advice calls the join point through proceed() and we can add logic to be executed before and after that.
Similar Reads
Spring Boot - File Handling Spring Boot is a popular, open-source spring-based framework used to develop robust web applications and microservices. As it is built on top of Spring Framework it not only has all the features of Spring but also includes certain special features such as auto-configuration, health checks, etc. whic
5 min read
Spring Boot MockMVC Testing with Example Project In a Spring Boot project, we have to test the web layer. For that, we can use MockMVC. In this tutorial, let us see how to do that by having a sample GeekEmployee bean and writing the business logic as well as the test cases for it. Example Project Project Structure: Â This is a maven project. Let's
5 min read
Spring Boot Integration With MySQL as a Maven Project Spring Boot is trending and it is an extension of the spring framework but it reduces the huge configuration settings that need to be set in a spring framework. In terms of dependencies, it reduces a lot and minimized the dependency add-ons. It extends maximum support to all RDBMS databases like MyS
4 min read
Spring Boot Integration With MongoDB as a Maven Project MongoDB is a NoSQL database and it is getting used in software industries a lot because there is no strict schema like RDBMS that needs to be observed. It is a document-based model and less hassle in the structure of the collection. In this article let us see how it gets used with SpringBoot as a Ma
4 min read
Spring Boot MockMVC Example Automated testing plays a vital role in the software industry. In this article, let us see how to do the testing using MockMvc for a Spring Boot project. To test the web layer, we need MockMvc and by using @AutoConfigureMockMvc, we can write tests that will get injected. SpringBootApplication is an
3 min read
Spring Boot Integration With PostgreSQL as a Maven Project PostgreSQL is a user-friendly versatile RDBMS. This article lets us see how to integrate Spring Data JPA with PostgreSQL. There are some conventions to be followed while using PostgreSQL. We will cover that also. Working with PostgreSQL We can easily create databases and tables in that. The below sc
3 min read
Spring Boot JPA Sample Maven Project With Query Methods In this article, let us see a sample maven project in Spring Boot JPA with Query methods. Spring Boot + JPA removes the boilerplate code and it will be enhanced much if we use query methods as well. Let us discuss this project with MySQL Connectivity for geeksforgeeks database and table name as "Con
6 min read
Spring Boot - Service Class Example for Displaying Response Codes and Custom Error Codes Sometimes the error or status messages in webpages would be different from the default error message thrown by Tomcat (or any other server). An important reason for this is websites want to look unique in their approach to their users. So, a customized page for displaying status codes is always bett
6 min read
Spring Boot - Create a Custom Auto-Configuration Usually, we might be taking a maven project or grade project for Spring Boot related projects. We will be adding the dependencies in pom.xml (in case of a maven project). In a spring application, Spring Boot auto-configuration helps to automatically configure by checking with the jar dependencies th
4 min read
Spring Boot - Consume Message Through Kafka, Save into ElasticSearch, and Plot into Grafana In this article, we are going to make a program to produce some data using Kafka Producer which will consume by the Kafka Consumer and save into the elastic search DB, and later on, plot that JSON data into the Grafana dashboard. Start with configuring all the required software and tool. Requirement
7 min read