
Palming. This Is One of The Most Effective Eye Relaxation Techniques As It Offers Eye and Mind Relaxation at
Uploaded by
reenatiwari13Palming. This Is One of The Most Effective Eye Relaxation Techniques As It Offers Eye and Mind Relaxation at
Uploaded by
reenatiwari13Techniques: Palming All the methods used in the eradication of errors of refraction (improving vision) are simply different
ways of obtaining relaxation... This lesson is an introduction to the art of palming, as developed over a hundred years ago by Dr. Bates: ... most people, though by no means all, find it easiest to relax with their eyes shut. This usually lessens the strain to see, and in such cases is followed by a temporary or more lasting improvement in vision.......... But some light comes through the closed eyelids and a still greater degree of relaxation can be obtained in all but a few exceptional cases, by excluding it. This is done by covering the closed lids with the palms of the hands (the fingers being crossed upon the forehead) in such a way as to avoid pressure on the eyeballs. So efficacious is this practice, which I have called "palming", as a means of relieving strain, that we all instinctively respond to it at times, and from it most people are able to get a considerable degree of relaxation. Dr Wm. H. Bates: The Cure of Imperfect Sight Without Glasses (1919) Spend some time each day Palming To palm is to cover your closed eyes with your hands in such a way that there is no pressure on your eyeballs. The palms of your hands are slightly cupped over each eye (left over left and right over right), and usually the fingers are partly interlaced on your forehead. There should be no light, or as little as possible, allowed to enter the eye. Once you are palming, open your eyes and look around to see if you can adjust your hands in such a way as to exclude as much light as possible. Close your eyes. ________________________________________ Note: Palming is supposed to be relaxing, but you may end up being tight in your hands and arms in order to exclude light. Don't overdo it, and if necessary compromise. The next time you palm you may find a better position for the hands. Palming in a darkened room can be helpful. Palming Positions Sitting in a dining-type chair in front of a table with a stack of cushions, (or foam pads) on it. The cushions are for resting your elbows: there should be enough cushions so that you are able to easily bring your palms to your eyes without stooping forward (too few cushions), or having to look up (too many cushions). Rest your elbows on the cushions and bring your hands to your eyes. Close your eyes, rest with the darkness, and don't forget to breathe! Lying on your back, with a few books or pillow under your head, and your knees up and feet flat on the floor. Bring your hands to your eyes, and start palming. The disadvantage of this is that you have to hold your arms up, which can be difficult if you want to palm for a long period. How long should I palm? There is no fixed answer to this question. Some people enjoy palming as soon as they first try it, while a few people never find it enjoyable. As a result there is a different answer for each person, and it can vary from day to day for the same person - it would be counterproductive to force any strict rule: vision rebels against this. For the first time, try setting your alarm clock to ring at the end of five or ten minutes. Palm, and after the alarm goes off ask yourself if the ringing alarm left you feeling relieved.... or annoyed! If you felt relieved, then palm for less time; you can benefit from palming for just fifteen breaths at a time. If you felt annoyed, then ..... throw the alarm out the window. If you one day find yourself happy to continue, then do so: you can't do too much palming if you are feeling happy.
Palming. This is one of the most effective eye relaxation techniques as it offers eye and mind relaxation at the same time. You will not need any special equipment to perform the technique. Here is how palming is done: 1. Sit on a chair and make yourself comfortable. 2. Rub your hands until they warm up.
3. Close your eyes and cover them with the palms of your hands. Do not press over the eyes; just make sure no light can reach the eyelids. 4. Breath deeply, taking breaths at even intervals. 5. Stay like this for about three minutes.
Palming Rub both palms together, quickly, for 10 seconds. This friction creates mild heat. Close the eyes, and gently place the left
palm over the left eye and right palm over the right eye. Do not apply pressure with the palms, but just let them gently rest. Breathe in and out slowly to release stress. Repeat this 2-3 times. Sit comfortably in a chair, in front of a table, and stay relaxed. Close your eyes. Cup your right palm and shield the right eye with it. Cup your left palm and cover the left eye with it. Let the fingers of both hands meet on the forehead. Rest the elbows on the table and keep yourself completely relaxed. Look only at the darkness without opening the eyes. Let your mind also relax for some time. Sit like this for five minutes at a time, at least thrice a day.
Palming
This exercise is very good for the eyes and produces a calming effect on the nervous system. Palming is very useful to break the stress of the eyes because eyes need darkness to recover from the stress of light. So, when we cover the eyes and breathe deeply, we experience release from tension in the eye muscles. The nerves are enriched with blood supply. Steps 1. Rub your palms till they are charged with heat and gently place the palms over the eyes. 2. While cupping the palm over the eyes, take care not to apply direct pressure on the eyes. The eyes should relax in the darkness and stillness. The warm prana current flowing from the palms relieves the tension and strain around the eye muscles.
Palming
Your eyes are constantly on the move, whether you realize it or not. An exercise that can help improve your vision is to simply let your eyesrelax. This is called palming. Start by rubbing your hands together to make them as warm as possible. Then cup your hands and place over each eye. Then, the process is as simple as clearing your mind. The more your brain works, the more your eyes will move, so clearing your mind will allow them to relax. Do this for a few minutes, and when you uncover your eyes you should notice they are more focused and your vision is clearer.
Palming
Palming is a method of allowing the eyes to rest. It requires rubbing the hands together until warm, cupping the hands and lightly putting the palms of the hands over the eyes and blocking out the light. Cover the eyes until the hands cool, and rub the hands together again and repeat the process for about five minutes. Avoid pressing hard against the eyes.
Palming.
1. Sit on a chair and make yourself comfortable. 2. Rub your hands until they warm up. 3. Close your eyes and cover them with the palms of your hands. Do not press over the eyes; just make sure no light can reach the eyelids. 4. Breath deeply, taking breaths at even intervals.
5. Stay like this for about three minutes.
Palming exercise for release of stress from the eyes: * Rub both palms together quickly for 10 seconds. This friction creates mild heat. * Close the eyes and gently place the left palm over the left eye and right palm over the right eye. Do not apply pressure with the palms, but just left them gently rest. Breathe in and out slowly to release stress. Repeat this 2-3 times.
Palming - Deep Eye Relaxation There are a few ways to perform "Palming", you just need to choose the one that you will feel the most comfortable with. Palming - The easiest method Remember when you were playing hide and seek when you were a little kid? It was enough to cover the eyes with your palms and nobody was able to see you! Just do it exactly the same way as you did in your childhood - cup your eyes up with your hands and observe the darkness in front of your face. Make sure that you are not touching your eyelids with your palms. Palming - A bit more complicated variation, but, by yoga, there is a lot of meaning behind the following Palming technique: Warm up your hands - rub your palms against each other or hold them under hot water (not very hot!) running from the tap. Prepare your palms like on the picture. The base of your right pinkie will be on the base of your left pinkie or if it is more comfortable, place your left palm on the top of your right palm making an upside down V with your palms. Cover up your eyes with the palms. The base of the pinkie fingers will be right on the bridge of your nose. Make sure you are able to breathe through your nose, otherwise adjust the location of your palms and fingers. Now leaving your eyes open, turn to any light (sun, light fixtures, etc.) and check out the position of your palms. If you are able to see the light through any of the holes between your fingers, correct the placement of palms until you get a perfect cover that does not allow any light to get to your eyes. Now you are ready for the true eye rest - deep eye relaxation that will remove all eye strain. Do not concentrate on the eyes or area behind them. Breathe deeply. Focus on your breath; it helps to calm down all of the senses. Feel the warmth coming from palms. Then imagine absolutely black space in front of your eyes. I found out that in the beginning it could be an extremely difficult task to perform. The worse your vision is the more difficult it is to picture absolutely black space. But I was able to trick my mind. I recalled drawing different shapes with a black pencil. For example, I would picture in my mind how I draw a circle and then how I shade it in with the same black pencil. Just go ahead and play with yourself, find what tricks work with your mind. I also tried picturing a starry sky and then I was removing stars one by one with the black clouds. There is also another important point that has to be taken into consideration the head and neck position during this RELAXATION EYE EXERCISE. Your back and head have to create a straight line during Palming. If you are doing it at work, in front of the computer, place your elbows on the desk, and then place your head into prepared palms. If your head is bent down then move the chair out of the desk and bend in the waist until your back and neck create a straight line. The reason for this is that major blood vessels and your spinal cord must not be curved during ANY EYE RELAXATION EXERCISE. Do not forget about breathing. Improper posture for Palming
Proper posture for Palming
Palming.
1. 2. 3. 4. 5.
Sit on a chair and make yourself comfortable. Rub your hands until they warm up. Close your eyes and cover them with the palms of your hands. Do not press over the eyes; just make sure no light can reach the eyelids. Breath deeply, taking breaths at even intervals. Stay like this for about three minutes.
How To Reduce Eye Number
Here are some effective ways to lower eyeglass lenses number: 1. To reduce eyeglass number drastically and in a short span of time, you might want to consider laser eye surgery. 2. Laser eye surgery is a non invasive procedure. It works on the principle of reshaping the front portion of the eye called Cornea. In most cases, after a laser surgery, the patient is able to see the distant objects clearly without wearing glasses or contact lenses. Eye problems related to myopia (nearsightedness), Hyperopia (farsightedness) can be easily treated with laser eye surgery. 3. There are a couple of laser eye surgery methods available. The most popular one is LASIK, which is a surgery to reduce eye refraction. 4. Lens implants are also done with the help of lasers and can be done at an eye doctors clinic easily. 5. Eye exercises such as eye yoga may also help restore normal eyesight gradually. This yoga eye exercise is also known as Palming. Palming helps relax the stress and strain on the eye muscles. All you have to do is to close your eyes and sit in a relaxed position. With each palm, cup your eyes without pressing your eyes. Sit in this position for at least 15 minutes. Palming is known to have help patients reduce their eye prescription numbers. 6. Take frequent breaks while working on a computer or while reading. This will lessen the strain on your eye muscles. 7. Consciously blinking your eyes while you are at work, especially when focused on one object for long time, is beneficial for your eyes. 8. Some people believe that beta-carotene helps improve eyesight. Carrot is a rich source of beta-carotene.
9. 10. 11.
Vitamin A intake will help children with refractory error and also people with high eye numbers at an early age. Vitamin A can be found in its natural form in carrots, cod liver oil, cantaloupes, winter squash, spinach. Other eye exercises include closing the eye and placing the palm over it. Move the eye slowly, upward, and downward and right to left five to ten times . Splash cold water on the eyes two to three times a day. It keeps your eyes fresh and relaxed, especially after a strenuous work in front of a computer.
It's been said that Beauty lies in the eyes of the beholder' but have you given any thought to those eyes which help you capture this beauty. By adopting various patterns of life we can give your eyes a much needed boost. Bringing changes in your lifestyle and in your eating habits will help you see your eyes in a new light.
Lion Pose Kneel on your mat and sit back on your heels, with one foot crossed over the other, soles facing upward. Draw your navel inward to tone your belly, and lengthen your spine so your chest lifts and you're sitting up tall. Rest your hands on your legs, and relax your shoulders. Focus your gaze on the tip of your nose. Take a deep breath in, then open your mouth wide, stick out your tongue and say "ah." You'll sound like a lion roaring. Return to your regular breath for a few rounds. Repeat the sequence four times. Re-cross your ankles the other way and repeat the entire sequence for a total of five rounds. How to Do a Lion Pose in Yoga Instructions: 1. 2. 3. Sit up on the knees with the heels of the feet pressed against the buttocks and the calves of the legs flat on the floor. Place the balls of the hands on the knees, straighten the arms and keep the back erect and the head straight (not tilted forward, back, to the left or the right). Inhale while leaning forward slightly, stretching the mouth the jaws as wide as possible, extend the tongue out and downward as much as possible, fix your gaze either at the tip of the nose or between the eyebrows and stretch the fingers straight out from the knees. Hold the posture for the duration of the inhaled breath then exhale, relaxing the forward stretch, dropping the fingers to the knees and closing the mouth and eyes.
4.
Lion Pose Kneel on your mat and sit back on your heels, with one foot crossed over the other, soles facing upward. Draw your navel inward to tone your belly, and lengthen your spine so your chest lifts and you're sitting up tall. Rest your hands on your legs, and relax your shoulders. Focus your gaze on the tip of your nose. Take a deep breath in, then open your mouth wide, stick out your tongue and say "ah." You'll sound like a lion roaring. Return to your regular breath for a few rounds. Repeat the sequence four times. Re-cross your ankles the other way and repeat the entire sequence for a total of five rounds.
1. 2.
3. 4. 5. 6. 7. 8. 9. Oiling
First thing in morning Drink Glass of warm water when you get. Do gargal with water and put some splashes of water in your eys with your hands. Greet your Elders in home by touching their feet in morning. Specially your Mother, Give your mom as much respect as you can if you want to be successful in your life. You owe her your blood and life. Never disrespect your mom ever. Dont use too much force while doing Yoga ( Swami Ramdev Yoga). From Low, Mediem & High, You have to use medium force while doing kapalbhati and others. Dont disrespect poor people. Use organic shampoos or home made shampoos. Avoid drinking Pop/Soft drinks. Eat green vegetables Do good workout and stay away from drugs. Dont forget GOD.
Massage the scalp nicely with warm olive oil to relax for about 15-20 minutes. Once you are done with oiling, just wrap a towel dipped in warm water around your head. The idea is to provide steam to your hair. Make sure the towel is well squeezed with no dripping water droplets. The steam provided to hair helps in penetrating the oil within the scalp. Shampooing The next step in this hair spa procedure is shampooing. It is better if the first step is done at night and the oil is left as it is overnight. Though in case you don't want to keep the oiled hair overnight just shampoo them well with a mild natural shampoo after 2-3 hours. Try not to rub the scalp with shampoo and make sure you use luke warm water to wash the hair. The hair needs to be rinsed well with lots of water. Conditioning Next condition the hair with a suitable conditioner. It would be better to use a herbal hair conditioner than a chemical laden one. Rinse the conditioner well till the excess of slipperiness is gone. To make sure that every hair strand is conditioned, make small sections of hair to apply conditioner. Applying Hair Mask Now in the last step you would need to apply hair mask for nourishing the hair. There are numerous herbal hair masks available in market these days. Though, you can make hair masks at home too. Check out some of the hair masks here: Egg and Oil Hair Mask Make a well beaten mixture of 2 eggs and 6 spoonfuls of coconut oil. Whisk it thoroughly to get a smooth mixture. Apply this mixture on scalp with the help of fingers. The heat produced by the friction of fingers while massaging would help the oil penetrate deep into the scalp thus, nourishing the hair. Cover the hair after applying it evenly all over the head rinse it off with a herbal shampoo after 20 minutes. Banana and Milk Hair Mask Mix one mashed banana with one beaten egg, 2 tablespoons of honey, 3 tablespoons of milk and 5 tablespoons of olive oil. Mix all together thoroughly to get a smooth mixture. Apply it evenly all over the head and wash it thoroughly with a herbal shampoo after half an hour. What you'll get is a shiny and healthy mane! Mayonnaise and Honey Hair Mask Take half a cup of mayonnaise and mix it well with two tablespoons of honey. Use a blender to whip itinto a smooth cream like form. Apply generously all over the head and than wash it off using a mild shampoo. This one is a wonderful hair mask conditioner. 1- Cold Water Cold water is instrumental in closing the hair cuticle thus, making it reflect light rather than absorbing it. Though, it does not mean that you need to freeze yourself in cold shower. You can indeed enjoy your warm bath but to make your shiny, just pour a mug of cold water on your hair after the bath. This would smooth down the hair cuticles and allow a shiny mane. 2- Shampoo
It is extremely important to opt for the right shampoo. There are a number of factors that end up in hair dryness like chemically treated hair or the use of blow dryer. Thus, you would first need to identify the problem and counteract it with a suitable hair product; specialized shampoo. 3- Balanced Diet Hair are an essential part of our body hence, we need to watch our eating habits for healthy hair. A simple equation applies to get shiny hair i.e 'Eat healthy = Get Healthy Hair'. Shiny hair call for essential oils in body, thus, make sure you have a diet that is rich in Vitamin E. Foods like nuts, olives, spinach, asparagus, green leafy vegetables and avocado are Vitamin E enriched and should be a part of the regular diet for healthy black hair. Besides, water intake is also very important for well hydrated and soft hair. 4- Hair Brushing Brushing the hair is an probably the most easiest way to add shine to the hair. It so happens that while brushing, scalp tends to release natural oils that help in adding shine to hair. Thus, frequent brushing can work wonders for hair shine and hair care. Use a boar bristled hair brush as it evenly spreads the oil from root to tip and also removes unwanted dead hair. 5- Vinegar Apple cider vinegar is the ultimate home remedy to add shine to the hair. Just fill in a spray bottle with vinegar and spray it generously on wet hair. Leave it for few minutes and then rinse it off. Repeat this tip for a couple of weeks after every wash and get shimmering results over a period of time.
Improve Eyesight - Strengthen Eye Muscles With Dynamic Eye Exercises
The main position for this exercise is either standing or sitting, but it is important to straighten your back, roll the shoulders down and behind. Move your stomach in and your chest out. While you are standing in the newly learned perfect posture (or sitting) glance quickly to the most left position, then quickly glance to the most right position and return back to the left. Repeat 7-8 times. Keep up the speed. Follow up with blinking. Now eyes movements have to be started form the most right position going to the left. Repeat 7-8 times. Make sure, you are doing absolutely straight lines. Follow up with blinking.
Now roll your eyes up to the sky (or ceiling) and quickly look down to your feet. And up and down and up again. Repeat 7-8 times. Your chin can not move during these types of movements. Now execute this differently begin with checking out your feet first, then look up to the sky. Complete 7-8 straight lines and finish up with blinking.
Make the diagonal moves - begin with the top left corner and look down to the right down corner and then up to the left upper corner. After repeating it for 7-8 times relax your eyes with blinking. Now repeat in the opposite direction. And again relax your eyes with blinking.
Make different combination right top corner to the left bottom corner in both of the directions. Top it up with blinking.
Roll up your eyes to the upper right corner, and then quickly look down to the right bottom corner and up to the upper right corner again. Repeat 5-7 times and blink-blink-blink-blink. Repeat in the opposite direction from the right bottom corner to the right upper corner and back to the right bottom. It is very important to make lines as straight as possible.
Lets draw the line on the bottom: look at the bottom right corner (your right shoulder), glance over to the bottom left corner (your left shoulder) and back to the bottom right. Repeat a few times and finish up with blinking.
The next line will be on your left side from left bottom corner to the upper left. Proceed with the same technique, finish up with blinking
And the last one is upper line from upper left corner to the upper right corner.
EYE EXERCISES - Rolling Movements
Make sure that your eyes are warmed up by now (I hope, you performed set of Stretching Eye Exercises). If you did not follow up with the series of blinking after the stretching, please do so. 1. Now lets draw a horizontal number eight with your eyes.
2. 3.
4. 5.
Try to do that very slowly without cutting any edges. Move your eyes as far to the edges as possible. When you drew about seven horizontal eights, change the direction (e.g. if you were drawing an eight in a clockwise direction at the beginning, then change it on a counterclockwise direction) and draw 7 horisontal eights again. Follow up with blinking to relax your eyes. After that go ahead with drawing a vertical 8 with your eyes (seven times in a clockwise direction and seven times in a counterclockwise direction). Follow up with blinking.
6. 7.
8.
Now close your eyes and repeat this entire math drawing 8 and 8 with closed eyes. Even the blinking part has to be done with closed eyes. By the way, blinking with closed eyes is also considered as EYE EXERCISING RELAXATION TECHNIQUE. The next rolling eye excercise requires a pretty high level of concentration. Please, make sure that you keep your posture straight (chest out, stomach in, etc). Look up and start drawing a circle with your eyes. Try to make the circle as perfect as possible without cutting any angles. Complete 7-8 rounds, then blink for a minute. Then do another set of circular movements in the opposite direction. Follow up with blinking.
9. 10. After that, repeat circular movements in both directions again but with closed eyes. Blink a few times while your eyes are still closed. 11. Keep your eyes closed; concentrate all your attention on the eye sockets. Feel the warmth behind your eyes. Now relax bottom eyelids, and then relax your mouth, your ears, upper eyelids, forehead and the crown of your head.
Lion Pose
Kneel on your mat and sit back on your heels, with one foot crossed over the other, soles facing upward. Draw your navel inward to tone your belly, and lengthen your spine so your chest lifts and you're sitting up tall. Rest your hands on your legs, and relax your shoulders. Focus your gaze on the tip of your nose.
Take a deep breath in, then open your mouth wide, stick out your tongue and say "ah." You'll sound like a lion roaring. Return to your regular breath for a few rounds. Repeat the sequence four times. Re-cross your ankles the other way and repeat the entire sequence for a total of five rounds
Height Increasing Tips:
Stretching exercises are one of the most useful and natural ways to increase height. It focuses on the parts of your body that you want to grow. Tadasana is one of the famous asana of Yoga for increasing height. Do this asana regularly. Other asana of yoga is also helpful such as surya namashkar, sukahasana, bhujangasana etc. Steps for Tadasana: 1. Stand straight and move your hands over your head. 2. Join both the hands, in a way that your arms touch your ears. 3. Balance your weight on your toes. 4. Maintain the postures for 10-15 seconds. 5. Return back in normal position. Eat well balanced diet which contains proteins, calcium, vitamins, minerals and zinc. Include milk and green vegetables in your meals, it improves height. Cycling and swimming are most useful exercises for increasing height. It also enhances the overall fitness level of a person. You can also do exercises like skipping and spot jumping. Tennis and basket ball will help you in increasing a good height. For playing these games jumps require, so play it regularly. Sleep at least 8 hours per day. Sleep is necessary for getting a good height. Avoid alcohol & smoke.
Instructions for Utkatasan: Start by standing in Tadasana or Mountain Pose, which is the basic standing pose from which most yoga positions begin. Remember that Tadasana is not just standing; you need to follow the correct steps to be in proper Tadasana pose before proceeding into Utkatasana. Get into position. While standing in Tadasana, bring your arms straight out in front of you and press your palms together. You may interlock your fingers or keep them pointing straight ahead Exhale and squat. Bend your knees and push your butt toward the floor, like you are sitting into a chair. Come down until your thighs are almost parallel to the floor. Check your positioning. Your feet should be a couple inches apart, in line with your hips. If you cannot keep your heels on the floor while squatting, place a rolled towel or folded mat under them for support. Let your back bend only slightly. Elongate your back. Firm your shoulder blades down into your back so that they lay flat. Take your tail bone down toward the floor and tuck it down and under. This will help to keep your lower back long. Reach for the ceiling. From this squatted position, bring your arms up above your head, palms facing each other, and reach them toward the ceiling. Elongate your neck. Pull your chin back and elongate your neck so that the crown of your head gently rises up toward the ceiling. Do not look up. Keep your eyes focussed straight ahead of you. Hold the pose for 1 minute. Concentrate on your stretch and flexing your core, back, shoulder and leg muscles while you deeply inhale and exhale. Come out of the pose. Lower your arms so that they are directly in front of you again. While inhaling, straighten your knees and lifting with your arms and core, stand up. Be careful not to lock your knees. Release your arms and let them fall gently to your sides. Instructions for Rabbit Pose in Yoga
Trataka
Begin in a child's yoga position--kneel down and then lower your buttocks to sit on your lower leg and feet. With your arms on the sides, lower your torso on your thighs, as you bring your head down on the floor. From this position, you can start the rabbit pose. Press your forehead slightly on your knees. Then, extend your arms backward and hold on to the base of your feet. Give your heels a firm hold and then take a deep breath. Exhale as you gradually lift or elevate your hips. Keep your forehead as close as possible to your knees and the topmost part of your skull (crown of the head) near the floor or mat. Contract your abdominal muscles as you hold the pose for 5 to 8 seconds, then relax.
Light a candle, and keep it at eye level, at a distance of about two feet. Sit comfortably and gaze at the candle flame, without blinking, for about 2-3 minutes. If eyes begin to water before that, close the eyes. Once the eyes are closed, try to gaze internally at the after-image of the candle flame, at the back of your minds eye. Repeat this whole routine one more time. Then, slowly get up and fill your mouth with water. Keeping this water in your mouth, wash the eyes with tap water. Then spit the water out. This water will be warm as heat gets released from the body. This has to be done twice, or until the water temperature gets normal. This is a must after this particular Kriya. This routine will help you strengthen and relax the eye muscles. Also, it is used as a practice for developing focus and concentration, and can be used as a prelude to Meditation.
Washing the Eyes After attending to the call of nature, wash the eyes in the eye washing glass. Fill the eye washing glass with pure water, and cup the eyes in it. Blink inside the water 15 to 20 times. (In the absence of an eye washing glass, your palm can be cupped for the purpose.) Throw away the water, and refill the glass with some more fresh water, and wash once again. Repeat the same with the other eye. Wash them after watching television, before retiring to bed, as you come home after a long tiring day outdoors, and also after reading for a considerable time at a stretch. Do not watch television unblinkingly.
Sunbathing the Eyes Early morning, allow indirect Sunlight into the eyes (closed eye lids). Keep your feet a foot apart, let your arms hang loosely at the sides, and be as relaxed as possible; sway the body gently from side-to-side like a pendulum, for three to five minutes. Hot Sun at noon should be avoided. At Sunrise, and Sunset, look directly into the Sun for a short period of time; it should be stopped as soon as the Sun causes discomfort. After the Sun treatment, come to the shade and place a piece of cold wet cloth on the closed eye lids for two minutes. Sprinkle cold water over your eyes, and then dry them with a soft piece of cloth.
Note The body must be relaxed and the head should not move when the eye exercises are performed. Except for the eyes, all parts of the body should be in a relaxed position.
Height Increasing Tips:
Stretching exercises are one of the most useful and natural ways to increase height. It focuses on the parts of your body that you want to grow.
Tadasana is one of the famous asana of Yoga for increasing height. Do this asana regularly. Other asana of yoga is also helpful such as surya namashkar, sukahasana, bhujangasana etc. Steps for Tadasana: 1. Stand straight and move your hands over your head. 2. Join both the hands, in a way that your arms touch your ears. 3. Balance your weight on your toes. 4. Maintain the postures for 10-15 seconds. 5. Return back in normal position. Eat well balanced diet which contains proteins, calcium, vitamins, minerals and zinc. Include milk and green vegetables in your meals, it improves height. Cycling and swimming are most useful exercises for increasing height. It also enhances the overall fitness level of a person. You can also do exercises like skipping and spot jumping. Tennis and basket ball will help you in increasing a good height. For playing these games jumps require, so play it regularly. Sleep at least 8 hours per day. Sleep is necessary for getting a good height. Avoid alcohol & smoke.
Instructions for Utkatasan: Start by standing in Tadasana or Mountain Pose, which is the basic standing pose from which most yoga positions begin. Remember that Tadasana is not just standing; you need to follow the correct steps to be in proper Tadasana pose before proceeding into Utkatasana. Get into position. While standing in Tadasana, bring your arms straight out in front of you and press your palms together. You may interlock your fingers or keep them pointing straight ahead Exhale and squat. Bend your knees and push your butt toward the floor, like you are sitting into a chair. Come down until your thighs are almost parallel to the floor. Check your positioning. Your feet should be a couple inches apart, in line with your hips. If you cannot keep your heels on the floor while squatting, place a rolled towel or folded mat under them for support. Let your back bend only slightly. Elongate your back. Firm your shoulder blades down into your back so that they lay flat. Take your tail bone down toward the floor and tuck it down and under. This will help to keep your lower back long. Reach for the ceiling. From this squatted position, bring your arms up above your head, palms facing each other, and reach them toward the ceiling. Elongate your neck. Pull your chin back and elongate your neck so that the crown of your head gently rises up toward the ceiling. Do not look up. Keep your eyes focussed straight ahead of you. Hold the pose for 1 minute. Concentrate on your stretch and flexing your core, back, shoulder and leg muscles while you deeply inhale and exhale. Come out of the pose. Lower your arms so that they are directly in front of you again. While inhaling, straighten your knees and lifting with your arms and core, stand up. Be careful not to lock your knees. Release your arms and let them fall gently to your sides.
Improve Eyesight - Watching The Sun (Sungazing, Eye Sunning)
Most of us have a perception that sun rays are harmful to our body, that looking directly at the sun can damage our eyes. This is true for most people living in the city, who work inside all day with artificial lighting, exposed to the sun only during vacation or weekend, if you are lucky. And then, of course, getting sunburned. Did you ever notice vacationers on the beach? You can guess who just started vacation - they have distinct bright pink color to their otherwise pale-white skin. You also can use another trick - fill the sink with cold water and try to blink while your face is down in the water. The blood circulation tremendously speeds up inside of little eye blood vessels at this moment, so, please, do not get scared when you look at yourself in the mirror right at the end of this procedure.
Vision Exercises to Improve Eyesight: Tracing
Here is what you need to do: If you are inside 1. Close your eyes for a second and relax. 2. Start tracing the outlines of the objects around you. You can trace the outlines of virtually everything that is in the room the picture on the wall, the table, the TV set and so on. Follow the contours of each object slowly, as if you want to draw it with your eyes. 3. Finish if with the Palming or Blinking eye exercise. If you are outside 1. Find a convenient location. 2. Close your eyes for a second and relax. 3. Find a building or another object located in the distance and trace its outer contours with your eyes. Next, start tracing its windows and entrance. 4. Move your eyes to an object located half the distance of the first one. Trace its contours and the outlines of its details the same way you did with the first object. 5. Finally, move your eyesight towards something situated close to you. Trace it the same way you did before. 6. Finish with Palming exercise or Blinking exercise.
Vision Exercise Nearsightedness: for The Eye Compass
Here is how to perform this vision exercise for nearsightedness: 1. Sit comfortably on a chair take a deep breath and relax. 2. Rub the palms of your hands together until they warm up. 3. Close your eyes and place the palms of your hands over the eyes. Press lightly over the eye sockets creating a uniform pressure on the area that encloses the eyes. You should not touch, neither press on the eyelids. 4. Open your eyes. 5. Slowly move your eyes to the left as far as you can go. Do not worry that it is dark and you cant see anything. 6. Slowly move your eyes to the right, as far as you can go. 7. Continue to maintain the uniform pressure with the palms of your hands and slowly move your eyes up and down. 8. Close your eyes for 10 seconds and repeat. 9. Do the exercise four times.
Eye Activities for Kids: Vision Perception Eye Exercise
1. Print the image. Alternatively you can create a similar image or a set of similar images. You can use just about any shapes and symbols and even letters and numbers even if your child still doesnt know how to read or count. Ask your child to match the shapes at the top with the corresponding shapes below. As you can see, this is an extremely easy eye exercise. Probably the best thing about it is that this vision exercise can be done as often and as many times as your child wants. You can also set up regular eye exercise sessions aimed at enhancing your kid visual skills and ask them to do the Visual Perception Eye Exercise together with other eye activities for kids: eye tracking exercises or eye hand coordination exercises and games.
2.
Peripheral Vision Exercise.
1. 2. 3. 4. 5. 6.
Take a pencil or a pen and sit comfortably on a chair. Keep your back straight and look forward. Hold the pencil about 10 inches in front of your eyes. Look forward and try to see past the pencil into the distance. You should see the pencil but it shouldnt be your focus. Slowly move the pencil to the left without moving your eyes. You should see it with your peripheral vision. Move the pencil as far as you can see it peripherally. Repeat the same to the right, up and down. Remember not to look at the pencil but see it with your side vision. Once you master steps 1-5, you can start moving the pencil diagonally or do circular movements clockwise or counter clockwise.
1.
Two Dots Peripheral Vision Exercise
Look at the little black dot and lock your eyes on it. You should see the two colored dots with your side vision.
2. 3.
Keep your eyes focused on the little black dot for about 30 seconds. While doing that, resist the temptation to switch your focus to the colored dots. Close your eyes and perform Palming for about a minute and repeat.
Tibetan Eye Exrecise Chart to Improve Your Eyesight
1. 2. Print the Tibetan eye exercise chart on a sheet of paper. Stick it to the door or pin it to the wall. Make sure you position it at such height that its central dot will be at the same level with your nose when you sit in front of it. 3. Remove the glasses or contact lenses you are wearing and sit at about 10 inches from the Tibetan eye chart. 4. Do the Palming vision exercise. The aim is to relax your eyes and your mind which will increase the benefit of the exercise. 5. Start by moving your eyesight slowly clockwise on each dot of the outer circle of dots. 6. Take a second to relax your eyes and repeat the movement but counter clockwise. 7. Next, move your eyes several times back and forth between the dots at 2 and 8 oclock. 8. Finally, move your eyes several times between the dots at 4 and 10 oclock. 9. Blink several times briskly. It is recommended to learn the blinking technique explained in the Blinking vision exercise. 10. Finish with the Palming vision exercise.
Eye Exercise for Myopia: 3 Cups Vision Exercise
1. 2. 3. 4. 5. Draw a similar image on a piece of paper or print out this one. You will also need a pencil. Pin the chart youve created to the wall and sit on a chair 10-22 inches away. Make sure that the picture is at eye level.Hold the pencil vertically between the circles and align its top with the top of the circles. Initially, the pencil should be an inch away from the image. Focus your eyes on it and start moving it slowly towards your face. Do not let it out of focus. Keep moving the pencil towards your face until the two circles start to look like the image on the left. Once you see the third circle clearly, focus your eyes on the middle circle and start moving the pencil away from your face and towards the chart.
Vision Exercise Nearsightedness: for the Eye Compass
Here is 1. 2. 3. 4. 5. 6. 7. 8. 9. 10. how to perform this vision exercise for nearsightedness: Sit comfortably on a chair take a deep breath and relax. Rub the palms of your hands together until they warm up. Close your eyes and place the palms of your hands over the eyes. Press lightly over the eye sockets creating a uniform pressure on the area that encloses the eyes. You should not touch, neither press on the eyelids. Open your eyes.Slowly move your eyes to the left as far as you can go. Do not worry that it is dark and you cant see anything. Slowly move your eyes to the right, as far as you can go. Continue to maintain the uniform pressure with the palms of your hands and slowly move your eyes up and down. Close your eyes for 10 seconds and repeat. Do the exercise four times.
Yoga Improves Eyesight
HERE ARE THE USEFUL TIPS: (1) First of all, you should sit upright keeping your eyes open. (2) Look at a point straight to your nose in front of you and then look at a point on the floor, but do not move your head. Without moving your head, roll your eyes upwards and downwards at least four times. Blink your eyes rapidly after the completion of this exercise. (3) Now roll your eyes sideways, i.e., left and right. Blink your eyes rapidly after this too.
(4) Now roll your eyes diagonally upwards and downwards. Blink your eyes rapidly again. (5) Then close your eyes for some time. (6) After one week of this exercise, roll your eyes in a circular way like, top, right, down, left, etc. The simple yoga exercises described here can, no-doubt, prove useful in maintaining healthy eyesight. 1. Sit in Vajrasana by folding knees behind and sit on your legs. For those who find this pose difficult, you could choose another comfortable position, but your back should remain straight. 2. Light a lamp/candle at a distance of two feet at the eye level. Stare at the bluish centre of the flame with a steady gaze. Continue staring, even if the eyes start watering. You can do this for about 10 minutes to begin with, and slowly increase the duration until the time you feel comfortable. 3. Then slowly get up and fill your mouth with water. Keeping this water in your mouth, wash eyes with tap water. Then spit the water out. This water will be warm as heat gets released from the body. This has to be done twice or until the water temperature gets normal. This is a must after this particular kriya. 4. On doing the said practice daily, it not only improves eyesight, but makes your eyes more attractive. The practice opens up etheric channels called nadis in the subtle body, and generates intuitive abilities in the practitioner. 5. Another yoga exercise detailed below is recommended for strengthening eye muscles and releasing stress. 6. Sit in Sukhasana (easy pose), with legs comfortably crossed and spine, neck and head in straight line. Look directly to the front at eye-level and breathe normally. 7. Move eyes upward to the ceiling and stay for two seconds, look downwards and stay for two seconds. Close your eyes for two seconds. 8. Look towards the right, as far as your eye can reach, for two seconds. Look to the left for two seconds and then look at the front. 9. Close your eyes for 6-8 seconds. 10. Palming exercise for release of stress from the eyes: 11. Rub both palms together quickly for 10 seconds. This friction creates mild heat. 12. Close the eyes and gently place the left palm over the left eye and right palm over the right eye. Do not apply pressure with the palms, but just left them gently rest. Breathe in and out slowly to release stress. Repeat this 23 times. 13. Other yoga poses that strengthen eyes include Bhujangasana, Shavasana and Surya Namaskara. Few more tips: Dampen wads of cottonwool with pure Organic Rose Water and place over closed eyes. Relax for 10 minutes that way. The cooling effect of organic rose water helps cool tired eyes. Splash your face and eyes 10-15 times in the morning using warm water. Avoid abrupt temperature changes. Focus on particular diet to strengthen your vision, such as stewed apple, raw carrot, cabbage, and sprouted chickpeas. Winter Cherry (Ashwagandha) also helps strengthen vision. You could also consider drinking a cup of warm milk with a mix of half a teaspoon of ground almonds, raw sugar, anise seeds and add half a teaspoon a day. Drink plenty of water through the day, as constipation or internal dryness can have adverse effect on the eye. Stay away from caffeinated drinks. In case you have access to Triphala, put a teaspoonful of Triphala powder in a glass of water and let it stay overnight. Strain the water and wash the eyes with it. These remedies can help you keeping your eyes healthy and beautiful, and can be used by everyone.
Tips for Eye Beauty, Vision Care and Eye Health Care
Given below are some eye care tips for beautiful and attractive eyes. (1) Dip a cotton pad in a cup of water overnight. Strain this in the morning and add 1 cup of plain water to this. Splash the eyes with this water or wash them with the help of an eyecup. (2) Dip a pad of cotton wool in rose water to which 2-3 drops of Castor oil is mixed. Place these soaked pads on the eyelids for 15-20 minutes. Eye burns and other problems will be reduced. (3) Splash the eyes with a weak n very liter tea solution, thoroughly strained and cooled for 2 to 3 minutes. (4) Place Cotton pads dipped in a cold tea solution for an hour on the eyelids for 10 to 15 minutes and relax.
Dark Circles - Natural eye care, removing dark circles
Grate 3 pieces of cucumber and squeeze them through a muslin cloth and extract the juice. Dip cotton pads in
this juice for 2 minutes and place on eyelids and darkened areas. Relax for 15 minutes for best results continue for 2 to3 days. Take 1 teaspoon of Tomato pulp,1 pinch of Turmeric powder, half teaspoon of lime juice and 1 teaspoon of gram flour. Make a paste of the above ingredients and apply gently on the eye lids and the darkened areas and let it remain for half an hour. Remove gently with moist cotton pads after half an hour. Repeat this for a week
Deep Sunken Eyes - Herbal treatment
Mix 1 teaspoon of honey with half teaspoon of almond oil. Apply the above mixture gently on the eyes at bedtime. Repeat this for a week. Soak 5 Almonds overnight. Peel them and mix it with a glass of milk eat the almonds by chewing well. Repeat this in the morning for 21 days should definitely help.
Puffy Eyes
Slice a raw Potato and circle the closed eyes with these halves. Or else grate a raw Potato and place on Muslin cloth and squeeze. Place these on the eyes and relax for 15-20 minutes. Place cotton pads dipped in chilled milk before boiling on the eye lids while relaxing for 10-15 minutes. In a small bowl of chilled water add few drops of Vitamin E oil. Dip cotton pads for 5 minutes in this and place on the eyes while relaxing for 20 minutes everyday.
Eyecare Instructions for people using computers and computer professionals
Spending long hours in front of television or computers is part of peoples life today. Especially if you are a computer professional, there is usually no escape from it. This causes many eyes and vision related problems in future. Here are some useful eye care tips for computer users. After every 20 to 30 minutes of work, look at a distant away object and blink several times. This will help in better focusing Blink frequently. People tend to reduce blink rate while working on computer. This can lead to dry eyes. Try to blink 12 to 15 times every minute. Exercise you eyes at frequent intervals. Eye exercise is simple. All you need to do is just blink several times, then close your eyes and role them in clockwise and anti clockwise direction. While doing this, inhale and exhale slowly and open your eyes slowly after doing this. Rub your palms against each other till them become warm. Cover your eyes with your warm palms for about a minute. Palming is another great way to relax and soothe your eyes. Splashing water on you face during breaks can keep you refreshed. This also helps in cooling your eyes. A few minutes of walk during breaks will refresh your body and mind. It is also good for your eyes as walking increases blood supply to your eyes. Fix an anti glare screen on to your monitor or use anti glare glass while working on computers. Also position the monitor and lights in such a manner that glare from the screen is minimum.
Steps
(1) (2) Start with massaging your lower eyelids with the tips of your ring fingers. Use short and gentle circular movements. Close your eyes halfway down. You will notice that your upper lids constantly tremble with different amplitude. Concentrate your efforts on stopping this trembling. (Little hint it will be easier to do if you look at further
(3) (4) (5)
(6) (7) (8) (9) (10) (11)
(12)
(13)
objects). Slowly close your eyes, like your eyelids are made out of puffy cottony clouds. Think that your eyes get extremely comfortable in their position. The blood filled with the oxygen flows through your eye sockets. When you inhale imagine the breezy oxygenized air coming through your nose into the eyes. Exhale through the mouth. Breathe this way for one or two minutes and end this exercise with a smile. Concentrate your vision on the tip of your nose (in yoga practice it is called NASAGRA-DRASHTY). Blink. Always remember about the blinking to lubricate your eyes, cleanse them and at the same time relax all of the muscles surrounding your eyes. Sit straight, look to the most left side and hold to stretch your eye muscles. Return your gaze back to look straight in front of you. Blink for a few seconds in order to relax your eyes. Repeat. Blink a few times. This exercise has to be repeated for other eye positions (right, up, bottom, right top corner, right bottom corner, left bottom corner and left top corner). Do not forget about blinking. Draw a horizontal number eight with your eyes. Blink. Draw a circle with your eyes. Blink with your eyes closed. Perform Palming to relax your eyes after Stretching set of Eye Exercises. Spend 2 minutes to give yourself Eye Acupressure Massage to prepare your eyes for the Dynamic Eye Exercises. Sit straight. Look to the most left position and move your gaze to the most right position. Repeat 3 times. Blink a few times. Repeat looking up and down, diagonally (from the left top corner to the right bottom corner and from the top right corner to the left bottom corner). Each movement has to be repeated 3-4 times in the beginning. Do not forget to blink. Perform focusing exercises. Look at the tip of your nose and then on the far object and back to the tip of your nose. Repeat 10 times dynamically. Be inventive. Choose objects on the different distance and look at each of them. Finish up with Palming to relax your eyes.
Some tips
10. 11. 12. 13. 14. 15. 16. 17. 18. 19. First thing in morning Drink Glass of warm water when you get. Do gargal with water and put some splashes of water in your eys with your hands. Greet your Elders in home by touching their feet in morning. Specially your Mother, Give your mom as much respect as you can if you want to be successful in your life. You owe her your blood and life. Never disrespect your mom ever. Dont use too much force while doing Yoga ( Swami Ramdev Yoga). from Low, Mediem & High, You have to use medium force while doing kapalbhati and others. Dont watch porn movies or anything else, which arouse you. More you lose your c*m body defense gets weaker. Try to preserve your sperms for your marriage. If you are married do yoga your hunger for sex will be under control. Dont disrespect poor people. Avoid using Shampoos like head&shoulder, pentene kind. These shampoos can make you bald. Use organic shampoos or home made shampoos. Avoid drinking Pop/Soft drinks like Pepsi, coke, Mountain Due, Fanta, Sprite, Limca, Thumbsup and others. They all destroy your body defenses and help you in getting fat. Pops drink also help in growth of cancer. Eat green vegetables, avoid Pizza( It drinks your health) Burgers (It is house health of destruction) Do good workout and stay away from drugs. Dont forget GOD.
Diagonals Eyestrain Vision Exercise
Steps to properly perform the Diagonals Eyestrain Vision Exercise:
Take a look at the image on the left. You will need a similar chart for performing the Diagonals eye exercise. You can print this image or create your own chart on a standard size sheet of paper.
1. 2. 3.
Pin the chart on the wall or stick it to the door. Stand or sit approximately 10 feet away from the chart (you can adjust the distance according to your visual range). Make sure the center of the chart is at the same level as your nose.
Sequence I: First, you will be moving your head between the top left, top right and bottom right dots of the chart. 1. Look at the top left dot on the chart; point it with your nose. 2. Slowly move your head from left to right until your nose is pointing the top right dot. 3. Continue moving your head down until your nose is aligned with the bottom right point. Now, find the bottom left dot of the chart. 1. Point it with your nose and move your hear to the right until it is aligned with the bottom right dot. 2. Move your head back to the bottom left dot. 3. Move your head up until your nose is aligned to the upper left dot. Sequence II: Once you complete the above sequence, take a minute to relax and proceed to the next sequence of movements: 1. Point your nose to the top left dot. Start moving your head towards the top right dot until your nose is aligned with it. 2. Without interrupting the smooth movement of your head, slide your head diagonally down toward the bottom left dot. 3. Once your nose is centered at it, move your head to the right towards the bottom right dot. 4. Do not stop; slide your head diagonally upwards until your nose is pointing at the top left dot. 5. Repeat the movements but reversing their order (start from the top right dot). Sequence III: Take a couple of seconds to relax and proceed to the final set of movements: 1. Point your nose at the top left dot and start moving your head to the right until your nose is pointing towards the top right dot. 2. Move your head down until your nose is pointing at the bottom right dot. 3. Move your head to the left and once your nose is aligned with the bottom left dot, continue moving your head upwards until your nose is pointing at the top left dot. 4. Repeat in the opposite direction. Once you have completed the vision exercise, relax for a minute and repeat the same movements, this time moving only your eyes. Do not forget to breathe regularly during the whole exercise. Holding your breath will decrease the oxygen supply to your head and eyes and will diminish the positive effect of the eye exercise.
Here is for to perform the first Peripheral Vision Exercise. 1. Take a pencil or a pen and sit comfortably on a chair. Keep your back straight and look forward. 2. Hold the pencil about 10 inches in front of your eyes. 3. Look forward and try to see past the pencil into the distance. You should see the pencil but it shouldnt be your focus. 4. Slowly move the pencil to the left without moving your eyes. You should see it with your peripheral vision. Move the pencil as far as you can see it peripherally. 5. Repeat the same to the right, up and down. Remember not to look at the pencil but see it with your side vision. 6. Once you master steps 1-5, you can start moving the pencil diagonally or do circular movements clockwise or counter clockwise.
3 Peripheral Vision Exercise Techniques to Improve Eyesight Naturally
Two Dots Peripheral Vision Exercise
Here is what you need to do next: 4. 5. Look at the little black dot and lock your eyes on it. You should see the two colored dots with your side vision. Keep your eyes focused on the little black dot for about 30 seconds. While doing that, resist the temptation to switch your focus to the colored dots.
6. Close your eyes and perform Palming for about a minute and repeat. You may find the Two Dots Peripheral Vision Exercise somehow hard to perform at the beginning. Do not give up and keep trying. Your ability to maintain steady focus on the central dot while seeing the other two dots with your side vision will gradually improve. Remember that you should not push yourself too hard and strain your eyes. Always relax after each repetition and after completion of the exercise.
Vision Exercise for Nearsightedness: The Eye Compass
Here is how to perform this vision exercise for nearsightedness: 10. Sit comfortably on a chair take a deep breath and relax. 11. Rub the palms of your hands together until they warm up. 12. Close your eyes and place the palms of your hands over the eyes. Press lightly over the eye sockets creating a uniform pressure on the area that encloses the eyes. You should not touch, neither press on the eyelids. 13. Open your eyes. 14. Slowly move your eyes to the left as far as you can go. Do not worry that it is dark and you cant see anything. 15. Slowly move your eyes to the right, as far as you can go. 16. Continue to maintain the uniform pressure with the palms of your hands and slowly move your eyes up and down. 17. Close your eyes for 10 seconds and repeat. 18. Do the exercise four times.
Eye Exercise for Astigmatism: Tibetan Eye Chart for Astigmatism
1. 2. 3. 4. 5. 6. 7.
Print the Tibetan chart on a standard sheet of paper or draw a similar chart. Take off your eyeglasses or contact lenses and sit comfortably on a chair. Hold the Tibetan chart in front of your face, approximately an inch away. The tip of your nose must be aligned with the charts central circle. While inhaling slowly, start tracing the triangles of the 12 oclock spike of the chart. When you reach the top circle, start exhaling slowly and start tracing the triangles downwards. Do the same for each of the spikes of the chart in clockwise direction. Relax your eyes for a minute. Repeat steps 4 and 5 but in counter-clockwise direction. Remember to inhale while moving your eyes upwards and to exhale while moving your eyes towards the center of the chart.
Eye Activities for Kids: Vision Perception Eye Exercise
So, here is how the Vision Perception Eye Exercise is done.
1.
2.
Print the image below. Alternatively you can create a similar image or a set of similar images. You can use just about any shapes and symbols and even letters and numbers even if your child still doesnt know how to read or count. Ask your child to match the shapes at the top with the corresponding shapes below.
Double Vision: Eye Exercises and Vision Relaxation Techniques for Double Vision
Here is what you need to do: 1. Get two identical coins and a pencil. 2. Place the coins on the table at about 2 inches apart. Make sure they face the same direction and are properly aligned. 3. Sit in front of the coins and place the tip of the pencil between them. 4. Focus on the tip of the pencil and start moving it up towards your nose. You should see the coins with your peripheral vision but your eyes remain focused on the pencil. 5. When the tip of the pencil is about 8 inches away from your nose, you should see that the coins double (you should see four coins through your peripheral vision). 6. Keep on moving the pencil slowly away from the table until the central two images merge into one (you should see three coins through your peripheral vision). 7. Hold to the fused image for about 15 seconds and than close your eyes.
Tibetan Eye Exercise Chart to Improve Your Eyesight
Here are the steps to correctly use the Tibetan Eye Exercise Chart:
1. Print the Tibetan eye exercise chart on a sheet of paper. 2. Stick it to the door or pin it to the wall. Make sure you position it at such height that its central dot will be at the same level with your nose when you sit in front of it. 3. Remove the glasses or contact lenses you are wearing and sit at about 10 inches from the Tibetan eye chart. 4. Do the Palming vision exercise. The aim is to relax your eyes and your mind which will increase the benefit of the exercise. 5. Start by moving your eyesight slowly clockwise on each dot of the outer circle of dots. 6. Take a second to relax your eyes and repeat the movement but counter clockwise. 7. Next, move your eyes several times back and forth between the dots at 2 and 8 oclock. 8. Finally, move your eyes several times between the dots at 4 and 10 oclock. 9. Blink several times briskly. It is recommended to learn the blinking technique explained in the Blinking vision exercise. 10. Finish with the Palming vision exercise. The Tibetan eye exercise chart will not only strengthen your eye muscles but make them more flexible. It is particularly helpful for reducing eye strain and lowering the stress levels in the whole body. Practice this vision exercise every morning and you will shortly notice a great natural improvement of your eyesight
Eye Exercise for Myopia: 3 Cups Vision Exercise
Here is how to do the 3 Cups eye exercise for myopia: 1. Look at the image above you should draw a similar image on a piece of paper or print out this one. You will also need a pencil. 2. Pin the chart youve created to the wall and sit on a chair 10-22 inches away. Make sure that the picture is at eye level.
Hold the pencil vertically between the circles and align its top with the top of the circles. Initially, the pencil should be an inch away from the image. Focus your eyes on it and start moving it slowly towards your face. Do not let it out of focus. 5. Keep moving the pencil towards your face until the two circles start to look like the image on the left. 6. Once you see the third circle clearly, focus your eyes on the middle circle and start moving the pencil away from your face and towards the chart. Do not worry of you are unable to see the third circle the first time you try this eye exercise for myopia. It is also quite likely that you will not manage to keep your focus on it initially. Keep on doing the exercise and eventually you will get it right.
3. 4.
Vision Exercises to Improve Eyesight: Tracing
Here is what you need to do: If you are inside 1. Close your eyes for a second and relax. 2. Start tracing the outlines of the objects around you. You can trace the outlines of virtually everything that is in the room the picture on the wall, the table, the TV set and so on. Follow the contours of each object slowly, as if you want to draw it with your eyes. 3. Finish if with the Palming or Blinking eye exercise. If you are outside 1. Find a convenient location. 2. Close your eyes for a second and relax. 3. Find a building or another object located in the distance and trace its outer contours with your eyes. Next, start tracing its windows and entrance. 4. Move your eyes to an object located half the distance of the first one. Trace its contours and the outlines of its details the same way you did with the first object. 5. Finally, move your eyesight towards something situated close to you. Trace it the same way you did before. 6. Finish with Palming exercise or Blinking exercise. The whole exercise should take you approximately 3 minutes. It is a wonderful way to take a break from your work and give your eyes and your mind a couple of minutes to relax.
Eyes Stretch Astigmatism Vision Exercise
Here is what you need to do to perform the Eyes Stretch Astigmatism Vision Exercise: 1. Sit comfortably on a chair and relax your body. 2. Start by performing Palming for about a minute. 3. Imagine your face is a clock 12 oclock is at your forehead, 6 oclock at your chin and 3 and 9 oclock on your left and right cheeks. 4. Start rotating your eyes clockwise: Move them up and look at number 12, then slowly move them to 1,2,3 oclock until you reach number 6. Keep on rotating your eyes until you reach upward position. 5. Repeat the above 10 times and make a short break. 6. Do the same 10 times but in counterclockwise direction. 7. Finish the Eyes Stretch exercise with Palming for another minute.
Figure Eights Vision Exercises to Improve Eyesight
Here is how to perform Figure Eights: 1. Place a chair three steps away from a wall (approximately 10 feet). 2. Imagine a big figure eight, flipped horizontally is right there on the wall in front of you. 3. Start tracing the outlines of the figure with your eyes. You can go from its middle point left to right or vice versa, it doesnt really matter in which direction you will choose to trace the figure first. Do it slowly and work with your eyes only remember to not move your head!
Once you trace the figure eight in one direction, stop and relax your eyes for a few seconds and trace it in the opposite direction. 5. Do the exercise four times. If tracing the figure eights four times makes your eyes tired, do not push yourself. Start with one repetition and increase the number of repetitions slowly until you feel comfortable doing the full number of repetitions. Another great vision exercise for improving eye muscle strength and enhancing eyesight is the Two Dots Eye Exercise. You can see how it is done by following this link:
4.
Near Far Focus Exercise to Improve Eyesight
Here is what you need to do to perform this near far focus exercise: 1. Print the chart on the left on a piece of paper. It should be approximately 55 inches in size. 2. Hang a wall calendar on one of your walls and sit at about 10 feet away from it. 3. Keeping the small chart youve printed about 10 inches away from your eyes, concentrate on the number one. If you need to, move the little chart back and forth until you see it clearly. 4. Once you see clearly the number 1 on the small chart, move your eyes towards the wall calendar and search the number one on it. Concentrate on it until you see it clearly. 5. Next, move your eyes again to the small chart in your hands and look at the number 2. Search for the same number on the wall calendar. 6. Repeat the same for all the dates in the month. The goal of this near far focus exercise is to remove the tension off your eye muscles, make them more flexible and regain their ability for fast focusing shifts. The near far focus exercise is a great way to reduce eye strain and vision stress as well.
Two Dots Vision Exercise to Improve Your Eyesight
Here is what you need to do: 1. Place a chair about 10 feet away from a wall. 2. Sit comfortably, take a deep breath and relax. 3. Imagine two dots, approximately one and a half meter apart from each other on the wall in front of you. If you are having hard time imagining the dots, you can cut to medium sized circles out of colored paper and pin them to the wall. 4. Look at one of the dots for a few seconds than slowly move your eyes to the other dot. Look at it for a few seconds and slowly move your eyes to the first dot. 5. Repeat this for about three minutes, then close your eyes and relax.
Shavasana or the corpse pose
Before beginning the eye exercises, it is important to assume the corpse pose to relax all the body parts. Steps 1.
To do this pose, one should lie motionless on the floor and close the eyes.
2. 3.
All the body parts from the toes to the head should be in a relaxed state. In this relaxed posture, total calmness, and peace is felt when the whole body and mind have taken complete rest.
Steps Bhastrika Pranayam: Bellows Breath
1. 2. Breathe in deeply through your nostrils. First, feel the diaphragm move down, allowing the lungs to expand and forcing the abdomen out; then feel your chest expand with your collar bones rising last. Breath out quickly through your nostrils. Feel the collar bones dropping, chest deflating, and abdomen shrinking as the lungs collapse. This process of exhaling should be much faster than the process of inhaling -- almost like a rapid deflation. Repeat the process. When correctly done, your chest will expand when you breathe in and deflate when you breathe out. Continue doing this for 5 minutes. With practice, speed up your breathing. Beginners should always start slowly to avoid hyperventilating, but over time, it will be possible to turn this into a rapid breathing technique.
3. 4.
Kapalbhati Pranayam: Shining Forehead Breath
1. Inhale through your nostrils normally until your lungs are full. Keep your inhalation slow but unforced. First, feel the diaphragm move down, allowing the lungs to expand and forcing the abdomen out; then feel your chest expand with your collar bones rising last. Exhale through both nostrils forcefully. This places the emphasis of the breath on the exhale rather than the (natural) inhale. Assist your exhalation by pulling in your stomach muscles to expel air. Exhaling should take much less time than it took to inhale. Forced exhalation means that the contraction of your stomach muscles helps push the air out of your body. It does not mean that the exhalation should be uncomfortable for you in any way. Repeat breaths for 15 minutes. You may take a minute's rest after every five minutes.
2.
3. 4.
Anulom Vilom Pranayam: Alternate Nostril Breath
1. 2. 3. Close your eyes. Focus your attention on your breathing. Close the right nostril with the right thumb. Simply press the thumb against your nostril to block it. Inhale slowly through the left nostril. Fill your lungs with air. First, feel the diaphragm move down, allowing the lungs to expand and forcing the abdomen out; then feel your chest expand with your collar bones rising last. 4. Remove your thumb from your right nostril. Keep your right hand by your nose and your lungs full of air. 5. Use your ring and middle finger to close your left nostril. Most people find it easier to continue using the same hand to block either nostril, but youre welcome to switch hands depending on which nostril youre blocking. 6. You can also switch if your arm gets tired. 7. Exhale slowly and completely with the right nostril. Feel the collar bones dropping, chest deflating, and abdomen shrinking as the lungs collapse. When youve finished exhaling, keep your left nostril closed. 8. Inhale through the right nostril. Fill your lungs. 9. Close the right nostril and open the left. 10. Breathe out slowly through the left nostril. This process is one round of Anulom Vilom Pranayam. 11. Continue for 15 minutes. You may take a minute's rest after every five minutes of exercise.
Bahya Pranayam: External Breath
1. 2. Inhale deeply through your nose. First, feel the diaphragm move down, allowing the lungs to expand and forcing the abdomen out; then feel your chest expand with your collar bones rising last. Exhale forcefully. Use your stomach and diaphragm to push the air from your body. Forced exhalation means that the contraction of your stomach muscles helps push the air out of your body. It does not mean that the exhalation should be uncomfortable for you in any way.
3.
4. 5.
Touch your chin to your chest and suck in your stomach completely. The goal is to leave a hollow below your ribcage, making it look like the front muscle wall of your abdomen is pressed against the back. Hold this position -- and your breath -- for as long as is comfortable. Lift your chin and breathe in slowly. Allow your lungs to completely fill with air. Repeat 3 to 5 times.
Bhramari Pranayam: Bee Breath
1. 2. 3. 4. 5. 6. Close your eyes. Focus on your breathing. Place your thumbs in your ears, your index fingers above your eyebrows, and your remaining along the sides of your nose. Keep each pinky finger near a nostril Breath in deeply through the nose. First, feel the diaphragm move down, allowing the lungs to expand and forcing the abdomen out; then feel your chest expand with your collar bones rising last Use your pinkies to partially close each nostril. Keep your lungs filled. Breathe out through the nose while humming. Note that the humming sound should originate in your throat, not as a result of your partially-blocked nostrils. Repeat three times.
Udgeeth Pranayam: Chanting Breath
1. 2. 3. Breathe in deeply through the nose. First, feel the diaphragm move down, allowing the lungs to expand and forcing the abdomen out; then feel your chest expand with your collar bones rising last. Exhale very slowly while saying Om. Allow the syllable to draw out as slowly as you can. Make sure to keep the O long and the M short. (OOOOOOm.) Repeat 3 times.
A very good refreshment for the eyes (and for the whole body) is beet juice. You may even mix up all three of them half a glass of carrot and beet juice and 1 table spoon of parsley juice. Ayurveda believes that eyes are the most important of all sense organs. In fact, experienced, expert Ayurvedacharyas can diagnose the general health condition of a patient, and certain kinds of illnesses by examining the patients eyes. Therefore, Ayurvedacharyas emphasize that utmost priority should be given in taking care of your eyes. Among the eight branches of Ashtanga Ayurveda, Shalakya, the ENT with Ophthalmology is the one that deals with eye problems. According to Ayurveda, all eye diseases occur due to imbalances in tridoshas. Ayurveda points out that certain lifestyle factors such as irregular food habits, excess intake of sour and spicy food, foods that lead to excess heat in the body, napping during daytime, insomnia, long travel, skin tanning due to sun rays, eye strain due to work that requires looking into a minute object for long time, smoking and alcohol, physical and mental stress, are all harmful to eyes, and can lead to several kinds of eye diseases.
Eyes Stretch Astigmatism Vision Exercise
Here is what you need to do to perform the Eyes Stretch Astigmatism Vision Exercise: 1. Sit comfortably on a chair and relax your body. 2. Start by performing Palming for about a minute. 3. Imagine your face is a clock 12 oclock is at your forehead, 6 oclock at your chin and 3 and 9 oclock on your left and right cheeks. 4. Start rotating your eyes clockwise: Move them up and look at number 12, then slowly move them to 1,2,3 oclock until you reach number 6. Keep on rotating your eyes until you reach upward position. 5. Repeat the above 10 times and make a short break. 6. Do the same 10 times but in counterclockwise direction. 7. Finish the Eyes Stretch exercise with Palming for another minute.
How to Increase the Benefits of Wearing Glasses in a Natural Way?
1. 2. 3.
If you are shortsighted (unable to see distant objects) you are putting yourself at risk of injuries by not wearing your glasses or lenses outside your home and even while moving around your house. If you are unable to see up-close objects, not wearing glasses actually diminished your possibility to read or do any up-close work. Some eye conditions and diseases require wearing glasses or contacts because else your vision will deteriorate even more.
Lets now explore some of the things you can do to help your eyesight while you are still wearing your glasses. 1. Bilberry extract. 2. Cut down the sugar and the salt. 3. Dedicate a few minutes to your eyes.
Computer Eyesight Problems and How to Avoid Them Easily
Saving your eyesight at the computer is not only related to the way you will adjust your computer screen and where and how you will situate it. There are a number of other things you can do to protect your vision. Blink regularly. Improve the quality of air in your working place. Relax your eyes.
How Well Do You See? Want To See Better? Yoga eye strengthening exercises can help you improve vision, reducing the need to wear spectacles and contact lenses. They can also prolongstrong and healthy vision as you age. The eyes are the "window to the soul", and looking after them is particularly important. Yoga eye strengthening exercises are a simple and effective way of doing this. The benefits of yoga eye exercises are numerous; better and clearer vision, fewer headaches, better sleep, deeper appreciation of life, better overall health, greater confidence and ability to concentrate amongst others. According to yogic knowledge, 50% of all energy (prana) utilised by the body is in the activity of the eyes (yes, 50%). More than digestion, respiration, elimination, mental activity or anything else. As such eye care is a particularly important part of the yoga system. In fact eyestrain and lack of proper rest of the eyes has a knock-on effect on your general health so paying attention to your eyes pays huge dividends. With our modern lifestyle we can spend many hours per day looking at illuminated TV and computer screens, during which the eyeballs don't have to change focus. "Use it or lose it", is a phrase we are all familiar with, and this applies to your eyes. So let's take a look at some simple yoga eye exercises to improve vision... Trataka Trataka is one of the greatest eye strengthening exercises, as well as being an aid in helping build our powers of concentration. This yoga eye exercise is very simple. Pick a simple object (I'm going to use a lit candle as an example), and place it about three feet in front of you. Sit in a comfortable position and gaze steadily at the flame, without strain and without blinking. After a period your eyes will begin to water. At this point close and rest them, continuing to "see" the flame in your mind's eye. When this image fades, repreat the process. Continue for as long as you feel comfortable, building up to about 15 minutes if so desired.
Sun and Moon Gazing Just as air is healthful to the lungs, light is to the eyes. The practice of sun-gazing (suryadhyana) is best performed at sunrise and as the sun sets in the evening (don't do it at midday!). It is best to begin slowly, perhaps for a minute or so, and build up to around 10 minutes. The technique is very simple: look at the sun with relaxed, wide-open eyes. Do not strain, and if your eyes start to water then it's time to stop. If you find this too intense then begin by looking in the direction of the sun rather than straight at it, and when comfortable you can progress to the full exercise. Moon-gazing (chandradhyana) is even more comfortable. Simply look at the moon, or stars, with relaxed, wide-open eyes. Other yoga eye exercises to improve vision Do these 4 together, spending about 1 or 2 minutes on each. Be sure not to use undue strain, and spend 30 seconds between each part with the eyes closed and rested. Sit upright for the duration. Nasal gazing. This involves gazing slightly downwards to the tip of the nose. Eyebrow gazing. This involves gazing slightly upwards to the point between the eyebrows. Right shoulder gazing. Facing straight ahead, fix the gaze on the end of the right shoulder. Left shoulder gazing. Take a wild guess. Yep, that's it ;-) Palming After doing the eye strengthening exercises vigorously rub your hands together and place your warm palms over your closed eyes. Allow the heat to be absorbed into the eyes. Hold for 30 seconds. And you thought only physical body requires exercise. There are instances when your eyes get strained and stressed. Like the days you spent staring at the computer screen and felt drained and tired. The toll is taken by not only your body but also your eyes. The natural state of the body is to be at peace. When we read to understand and learn new information, the mind becomes tense and tries to catch hold. This agitation strains the entire body, including the eyes. This is precisely the reason why people often feel drained after studying or working, even though they have not physically exerted themselves. Like physical exercise strengthens and de-stresses the body from fatigue, similarly a few simple exercises go a long way in strengthening eye muscles and provide relaxation. The following recommended exercises help counterbalance the effects of eyestrain. The key to doing these exercises is to completely relax and empty the mind as in meditation or yoga. The following eye exercises are frequently suggested by most health care providers: The yoga practitioners attach special importance to eye exercises, for two reasons. Firstly, a lot of eye problems in later life are due to a loss of tone in the eye muscles. These muscles become rigid, and this loss of elasticity reduces the ability of the lens of the eye to focus at different distances. It also causes the eyesight to become weaker. These exercises tone the eye muscles up and keep them elastic. If you already have eye problems when you begin these exercises, you will find your eyesight improving after a few months. Secondly, any eye tension present will tend to produce a general feeling of tension, due to the eye's connection to the brain via the optic nerve. What happens is that eye tension produces an increase in the nerve impulses in the eye muscles. This increase in nerve impulses travels along the optic nerve and bombards the brain, causing a general feeling of tension and anxiety. The eye exercises will reduce tension in the eye muscles, as well as reduce general tension. It is best to do these eye exercises while lying down after you've finished the asanas. This way you're resting after the asanas and doing the eye exercises at the same time, thus reducing the time taken to do your yoga routine. When doing the eye exercises keep your eyes open and don't move your head.
Sitting (as in the exercises for the neck given above), open your eyes, then check on your posture. Is your spine erect? Hands on the knees? Body relaxed? Head straight? That is how you should always remain while doing eye exercises. The whole body must be motionless; nothing must move except the eyes. Raise your eyes and find a small point that you can see clearly without straining, without frowning, without becoming tense and, of course, without moving your head. While doing this exercise look at this point each time you raise your eyes. Next, lower your eyes to find a small point on the floor which you can see clearly when glancing down. Look at it each time you lower your eyes. Breathing should be normal. In other words, you don't have to do deep breathing. Exercise 1 Move your eyes upwards as far as you can, and then downwards as far as you can. Repeat four more times. Blink quickly a few times 1 to relax the eye muscles. Exercise 2 Now do the same using points to your right and to your left, at eye level. Keep your raised fingers or two pencils on each side as guides and adjust them so that you can see them clearly when moving the eyes to the right and to the left, but without straining. Keeping the fingers at eye level, and moving only the eyes, look to the right at your chosen point, then to the left. Repeat four times. Blink several times, then close your eyes and rest. Exercise 3 Choose a point you can see from the right corner of your eyes when you raise them, and another that you can see from the left corner of your eyes when you lower them, half closing the lids. Remember to retain your original posture: spine erect, hands on knees, head straight and motionless. Look at your chosen point in right corner up, then to the one in left corner down. Repeat four times. Blink several times. Close the eyes and rest. Now do the same exercise in reverse. That is, first look to the left corner up, then to the right corner down. Repeat four times. Blink several times. Close the eyes and rest. Exercise 4 This exercise should not be done until three or four days after you have begun eye exercises given here. Slowly roll your eyes first clockwise, then counterclockwise as follows: Lower your eyes and look at the floor, then slowly move the eyes to the left, higher and higher until you see the ceiling. Now continue circling to the right, lower and lower down, until you see the floor again. Do this slowly, making a full-vision circle. Blink, close your eyes and rest. Then repeat the same action counterclockwise. Do this five times then blink the eyes for at least five seconds. When rolling the eyes, make as large a circle as possible, so that you feet a little strain as you do the exercise. This stretches the eye muscles to the maximum extent, giving better results. Exercise 5 Next comes a changing-vision exercise. While doing it you alternately shift your vision from close to distant points several
times. Take a pencil, or use your finger, and hold it under the tip of your nose. Then start moving it away, without raising it, until you have fixed it at the closest possible distance where you can see it clearly without any blur. Then raise your eyes a little, look straight into the distance and there find a small point which you can also see very clearly. Now look at the closer point-the pencil or your finger tip then shift to the farther point in the distance. Repeat several times, blink, close your eyes and squeeze them tight. Exercise 6 Close your eyes as tightly as you possibly can. Really squeeze the eyes, so the eye muscles contract. Hold this contraction for three seconds, and then let go quickly. This exercise causes a deep relaxation of the eye muscles, and is especially beneficial after the slight strain caused by the eye exercises. Blink the eyes a few times. Exercise 7 This exercise is called 'palming' and is very relaxing to the eyes. It is also most important for preserving the eyesight. Palming also has a beneficial, relaxing effect on your nervous system. It's an ideal way to finish off the eye exercises. Remain seated on the floor. Draw up your knees, keeping your feet on the floor and slightly apart. Now briskly rub your palms to charge them with electricity and place the cupped palms over your closed eyes. The fingers of the right hand should be crossed over the fingers of the left hand on the forehead. The elbows should rest on your raised knees and the neck should be kept straight. Don't bend your head. Do the deep breathing while palming your eyes. If you are going to do the palming for longer than a few minutes, better sit down at a table, place some books or pillows in front of you to support your elbows so that you will be able to keep the neck straight, and palm the eyes in this position. If the palming is done for only a short period one can do deep breathing for half a minute or so at first, gradually increasing it every week. Benefits: This exercise helps to do away with eye strain, and tension. Your vision will get better and clearer as the ophthalmic, or eye, nerves receive a richer supply of blood. Some people use this to improve their vision. [Go To: Corpse Pose (savasana) ] If you are here, then you have eye problems and poor eyesight. I know how to start the process of improving eyesight in four days. All my knowledge and research is on this site, free for everybody to use. To read my personal story - continue reading on this page, to find out why eye exercises and eye relaxation, which is the core of the system, improve eyesight and solve eye problems including myopia, astigmatism, eye twitching, eye strain, cataract and more - go to Eye exercises and eye relaxation techniquies main page. I was researching different ways to improve eyesight naturally because I got fed up with glasses, contacts, different solutions and surgery debating. The average eyeglasses wearer spends more than $1000 on eye gadgets every two years. When I calculated that I lost more than $12 000 I was shocked. Honestly, I became too tired of losing money and I still had the same bad eyesight.
And I decided to do LASIK surgery, but guess what? I found so many hidden facts that are not revealed to the general public. I used to go to bed every night knowing that I always put my glasses in the reach of my hand. They were the first thing I would need in the morning. I was not able to walk without glasses even in my own house. But one day everything changed. By that time I was exercising my eyes for three months and I felt that I desperately need lower prescription for driving. I went to the optical store asking the optometrist to sell me the glasses with 1.5 diopters lower than my last prescription. As soon as the optometrist found out that I was doing eye exercises he started yelling at me for some reason explaining that these eye exercises may work only while I am doing them and I should not hope to improve eyesight permanently, that it will reverse back after I stop exercising my eyes. I walked out being completely depressed thinking that all of the research that I have done to improve eyesight naturally was a waste of my time. But in three months I needed to do some curtain sewing and I noticed that I was doing it WITHOUT GLASSES!!! This was me who could not even concentrate on the needle even with glasses on because of the highastigmatism and myopia. This was me who was not able to read a book without glasses. This was me with the stable eyesight improvement result that lasted even when I stopped eye exercises against all this optometrists explanations! I took off my glasses completely and resumed my experiments. My colleagues were laughing at me measuring the distance from my nose to the computer monitor. Imagine their surprise when this distance started to grow! Needless to say the same people that were laughing at me started to ask advice on how to fix eyesight problems. They all saw how the changes were happening to me I started to walk normally without glasses, my eyes cleared out, my face changed, my eye sockets widened, deep eye wrinkles and the bags under my eyes smoothed out, the redness of eyes disappeared, the colour of my eyes cleared, but most importantly my nose was not touching the monitor while I was working. I went from 2 inches from my nose to the monitor to 1 foot! And then it all started. The emails were coming from everywhere with questions related to my method ofimproving eyesight. There were my colleagues, my friends, colleagues wifes, husbands, friends of friends and others that I do not even know. I had to hurry and publish this book, because I was 8 month pregnant. I could not keep this knowledge to myself only. Please, treat this website that I put together as my gift to you I have been a yoga practitioner for over twenty years and yoga practitioners attach special importance to eye exercises, for two reasons. Many eye problems in later life are due to a loss of tone in the eye muscles. These muscles become rigid, and this loss of elasticity reduces the ability of the lens of the eye to focus at different distances. It also causes the eyesight to become weaker. These exercises tone the eye muscles up and keep them elastic. If you already have eye problems when you begin these exercises, you will find your eyesight improving after a few months. Any eye tension present will tend to produce a general feeling of tension, due to the eyes connection to the brain via the optic nerve. What happens is that eye tension produces an increase in the nerve impulses in the eye muscles. This increase in nerve impulses travels along the optic nerve and bombards the brain, causing a general feeling of tension and anxiety. The eye exercises will reduce tension in the eye muscles, as well as reduce general tension. Posture: When doing the eye exercises keep your eyes open and dont move your head, unless the instructions say otherwise. Start by checking on your posture. Is your spine erect? Body relaxed? Head straight? That is how you should always remain while doing eye exercises. The whole body must be motionless; nothing must move except the eyes. Up and down Raise your eyes and find a small point that you can see clearly without straining, without frowning, without becoming tense and, of course, without moving your head. While doing this exercise look at this point each time you raise
your eyes. Next, lower your eyes to find a small point on the floor which you can see clearly when glancing down. Look at it each time you lower your eyes. Breathing should be normal. Move your eyes upwards as far as you can, and then downwards as far as you can. Repeat four more times. Blink quickly a few times 1 to relax the eye muscles. Right and left Now do the same using points to your right and to your left, at eye level. Keep your raised fingers or two pencils on each side as guides and adjust them so that you can see them clearly when moving the eyes to the right and to the left, but without straining. Keeping the fingers at eye level, and moving only the eyes, look to the right at your chosen point, then to the left. Repeat four times. Blink several times, then close your eyes and rest. On point Choose a point you can see from the right corner of your eyes when you raise them, and another that you can see from the left corner of your eyes when you lower them, half closing the lids. Check your posture: spine erect, head straight and motionless. Look at your chosen point in right corner up, then to the one in left corner down. Repeat four times. Blink several times. Close the eyes and rest. Now do the same exercise in reverse. That is, first look to the left corner up, then to the right corner down. Repeat four times. Blink several times. Close the eyes and rest. Rolling This exercise should not be done until three or four days after you have begun eye exercises given here. Slowly roll your eyes first clockwise, then counterclockwise as follows: Lower your eyes and look at the floor, then slowly move the eyes to the left, higher and higher until you see the ceiling. Now continue circling to the right, lower and lower down, until you see the floor again. Do this slowly, making a full-vision circle. Blink, close your eyes and rest. Then repeat the same action counterclockwise. Do this five times then blink the eyes for at least five seconds. Tip: When rolling the eyes, make as large a circle as possible, so that you feet a little strain as you do the exercise. This stretches the eye muscles to the maximum extent, giving better results. Changing vision This is a changing-vision exercise. While doing it you alternately shift your vision from close to distant points several times. Use your finger (or a pencil), and hold it under the tip of your nose. Then start moving it away, without raising it, until you have fixed it at the closest possible distance where you can see it clearly without any blur. Then raise your eyes a little, look straight into the distance and there find a small point which you can also see very clearly. Now look at the closer point-the pencil or your finger tip then shift to the farther point in the distance. Repeat several times, blink, close your eyes and squeeze them tight. Contraction Close your eyes as tightly as you possibly can. Really squeeze the eyes, so the eye muscles contract. Hold this contraction for three seconds, and then let go quickly. Tip: This exercise causes a deep relaxation of the eye muscles, and is especially beneficial after the slight strain caused by the eye exercises. Blink the eyes a few times. Palming Use your hands so that your palms cup your eyes. This technique to improve and strengthen vision is called palming. You dont need to put any pressure on. Make it so that your eyes can blink if you want them to. Rub your hands together before you do this to help generate some energy and just let your hands warm your eyes. This really helps heal and nourish them, and takes out any tension in your eyes. It is said that the face is the index of the mind, and the eyes are the windows of the soul. There are five Karmendriyas and five Jnanendriyas. The hands, legs, genitals, anus, and speech are Karmendriyas. The eyes, nose, ears, skin and tongue are Jnanendriyas. We depend on sight more than any other of our senses to maneuver through the space around us. So, the importance of the eyes cant be overemphasized. The late physician, Swami Sivananda, considered sight the most abused of our five senses. Human eyes are a wonderful creation of nature, and these need care and attention. As years go by, the muscles around the eyes lose their tone. Eyesight becomes weak after the muscles around the eyes lose their elasticity and become rigid thereby reducing the power to focus different distances. In addition, tension around the eyes affects the brain causing stress and anxiety. There is a deep correlation between the eyes and the mind. It is said that vision occupies 40 percent of the brains capacity. Therefore, when we close our eyes, relaxation is induced in the brain. Eyesight is dramatically improved when the muscles of the eyes are relaxed. HOW OUR EYES WORK Our eyes are smaller than lemons. The eye has two parts inner and outer. Both parts are extremely delicate. The body has
several ways of protecting this vulnerable organ. The eyeball sits in the eye socket (also called the orbit) in a persons skull, where it is surrounded by bone. The skull bones always protect the eyes. The visible part of the eye is protected by the eyelids and the eyelashes which keep dirt, dust, and even harmful bright light, out of the eye. There are lacrimal glands located at the inner angle of the eyes. The tears are secreted from these glands only. The tears are salty in taste, free from germs, and are antiseptic. When we open and close the eyelids, these tears move from one end to the other end of the eye; it keeps the eye clean, wet, and free from communicable diseases. The tears are secreted more when we cry or when we are sorrowful. The tube, which connects the eyes and nose, (known as nasolacrimal duct) drains the tears. To see, the three pairs of muscles, called extra ocular muscles, surround the eyeball in the skull and work in co-ordination; and because of that, the eyes can rotate and move on all sides. There is a hole in the eyes center, which is called a pupil. We can see with the help of that. The size of pupil gets small and big by the muscles of the iris, due to which the light rays falling on the retina are controlled. These retinas are located on the backside of the eyes. After the light rays fall on the retina, the brain senses them through the optic nerve. We call it vision. There is an elastic lens located behind the pupil and iris. It is attached with a ciliary body. The muscles of the ciliary body change the curvature of lens, and make it thick or thin, to concentrate rays on the retina. On seeing the objects, the light rays enter into the eyes, and pass through the lens, to get concentrated on the retina. It is said that there are thirteen crores and seventy lakhs of sensory receptors in this retina. There are thirteen crores of rodshaped cells to differentiate black and white. The seventy lakhs of cells are triangular. These rods are wide spread in the retina. If there is a small glow-worm in the front of the eyes, on a dark night, or if a small insect strikes within the eyelashes, lakhs of waves originate in the retina. These impulses pass at the speed of 450 kilometers, per hour, from the eyes to the brain. The brain receives these impulses. If the mosquito or some insect is to be removed from the vicinity of the eyes, by the hand, it takes only 0.002 seconds for the brain to order it. 1. Coconut Milk - Massaging the hair roots with freshly extracted coconut milk is beneficial in treating hair loss. It should be left on for 15 to 20 minutes and rinsed off. You could follow up with a shampoo and condition. 2. Rubbing Scalp - An energetic rubbing of the scalp with only the pads of the fingers, after washing the hair with cold water is one of the most efficient home remedy for hair regrowth. But the rubbing of the scalp should be forceful enough to make it tingle with the heat. This will activate the sebaceous glands and energise blood circulation, helping in hair growth. 3. Amla Oil - Made by boiling dry pieces of amla in coconut oil, amla oil is regarded as a helpful hair tonic. A mixture of an equal amount of amla juice and freshly squeezed lemon juice used as a shampoo also improves hair growth. 4. Fenugreek Soak fenugreek in a pot of water overnight and use the solution the next morning to rub onto the scalp. Wrap a towel on the head for a few hours and rinse with clean water afterwards. This hair loss treatment should be repeated for three to four weeks. 5. Egg Yolk Before hair washing, apply the egg yolk onto the scalp and massage gently for forty-five minutes two to three times a week. 6. The oil can be utilized on the hair in many ways. It can be applied on the hair like a hot oil treatment. First, the hair is prepared by shampooing thoroughly. Then the hair is left to dry for about 5 minutes. After which, the coconut oil is applied on the scalp with the use of the fingertips. The oil should be massaged on the scalp in a circular motion to promote circulation of the blood. 7. A little bit of the oil is spread on the palms of the hands then applied to the tips of wet hair. It is important not to put too much of the oil on the hair since this can cause it to look greasy. Applying the oil on the hair shaft is also generally avoided unless used as a styling gel or cream. The oil can help lock in moisture at the tips, preventing split ends and hair fall. 8. Almond and castor oil be oils should mixed in equal parts. The oil should then be massaged onto the scalp and left on the hair for 15 minutes or so. Then, the hair should be rinsed and washed using a mild shampoo then towel dried. 9. mixing 4-10 drops of jojoba oil with one ounce of almond oil plus one egg yolk. This should be mixed well then added to warm water. The water should not be too hot to avoid cooking the egg yolk. The hair should then be washed thoroughly and the mixture should be applied to the scalp. The solution can be left on the hair for 15-30 minutes. Shampooing again is optional. 10. Eat healthy and drink plenty of water, try to avoid fatty, salty or sugary food. 11. Avoid stressing your hair with excessive blow drying, curling irons, too hot water or too much brushing. 12. Trim your hair regularly, 13. When drying your hair, try to squeeze it instead of ruffling it.
14. 15. 16. 17. 18. 19. 20. 21. 22. 23. 24. 25. 26. 27. 28. 29. 30. 31. 32. 33.
34. 35. 36. 37.
38. 39. 40. 41. 42.
43. 44. 45. 46. 47. 48. 49. 50.
use a mild organic brand to avoid chemicals. Avoid prolonged exposure to direct sunlight Avoid stress factors Dont comb the hair while it is still wet. This practice weakens the hair. The best way to do it is to dry the hair first, and gently remove the tangles with hair oil or in any way that prevents stress or pressure. Use a soft brush with bristles that have wide spaces in between them. To increase hair growth, constantly massage the scalp daily to promote circulation in the scalp. Never over-style the hair. Eat a healthy diet at all times. Use essential oils for the hair. This could be a mixture of castor oil, coconut oil, grape seed oil and more. Always condition and moisturize the hair. Deep conditioning treatments such as hot oils may also be done once a week. Eating a Healthy Diet Using Supplements Constant Massage Try Relaxation Techniques Use Natural Hair Growth Remedies Products such as lemon juice, onions, oils, and even potatoes can be applied on the hair to produce various results. Onion: : Add minced onion to your shampoo. Let stand for fifteen days and use the shampoo regularly. Not only will it accelerate hair growth but it will give your hair glacial shine. Another one with onion: Cut a red onion in half, add four cloves of garlic and two cinnamon sticks. Put everything in a pot and bring to a boil for 15 minutes. Rinse hair with this infusion for four days in a row. Lemon juice and onions for thicker hair: In a bowl, put equal parts of lemon juice and onion. Mix and give yourself a massage on the scalp. Pepper shampoo: This shampoo is sold in stores (I purchased mine in K-Mart). Another remedy with pepper: In a ceramic cup, chop 1 large jalapeo pepper into very small pieces and add 1/2 cup of vodka. Let it stand for several days. Then strain and discard the jalapeo pieces. Add 2 tablespoons of castor oil and pour in a clean bottle. Shake before using. Massage some into your scalp before going to bed. Grapeseed oil: Grapeseed oil is believed to enhance hair growth. Give your scalp a massage using this oil before bedtime. Reflexology: With hands in a semi fist, place the fingernails of each hand towards each other and buff nails against each other briskly back and forth for five minutes everyday. Birth Control Pills:. Grind four or five birth control pills and add them to your regular shampoo. home-remediessite.com Not only will your hair grow faster but also healthier and more abundant Sleeping with braids: Before going to bed at night wash your hair. Tie your hair in two braids while its still wet. Sleep with the braids all night. Repeat the following night. After two or three days, you will notice that your hair is longer. The moon: Trim hair tips each month during a waxing crescent moon. Aloe Vera and honey: Cut three aloe vera leaves and scrape off the gel. Mix the gel with honey, and apply it to the scalp. Let it work for 20 minutes and rinse. Potato water: When cooking potatoes do not throw away the water. Let it cool, and rinse your hair with it. This rinse accelerates hair growth. Cactus or aloe: Cut some cactus or aloe leaves in small pieces and leave them in water overnight. Apply the water to the hair and leave it for as long as possible. Energetic breakfast: 1 tablespoon of wheat germ, 1 tablespoon of brewers yeast, 1 tablespoon soy lecithin, 1 tablespoon honey, and one cup of yogurt. home-remedies-site.com Combine all ingredients in the yogurt and eat it every day before breakfast. In one week you will see results; a hair full of strength and growing faster. Nutrition for your hair: 1 egg, 1 trickle of olive oil, 2 tablespoons honey. Apply to the scalp with a vigorous massage. Cover the head with a towel for 30 minutes. Wash normally. Barrys Tricopherous: This is a preparation sold in stores and said to make hair grow faster and more plentiful. Rosemary water: A daily rinse with rosemary water will make hair grow faster. Apply oil to your hair every day, it helps to prevent hair fall. Use kunkudu, seekakaya powder to head bath, it will help to prevent hair fall problem. While having head bath add some salt to water, which will helps to remove dandruff and stops hair fall. This is very natural home remedy for hair fall. Fenugreek (Menthi) paste applied regularly on the scalp an hour before taking bath helps to overcome hair fall problem. Hibiscus leaves boiled in small quantity of water and along with Shikakai as a hair wash instead of soap,shampoo
helps in controlling hair fall problem. This is also a natural hair conditioner. 51. Neem paste applied regularly on the scalp before taking bath also reduces hair fall problem. 52. Durva (dub,a grass used to worship lord Ganesha) paste applied refularly on the scalp before taking bath helps to control hair fall. 53. Fenugreek paste mixed with Castor oil (Erand) applied regularly before taking bath helps to overcome hair fall problam. 54. Betel leaves (pan) grinded and mixed with Gingery (Til) oil or Betel leaves(Pan) grinded and mixed with Coconut oil applied on the scalp before taking bath helps to overcome hair fall problem. 55. Eating Gooseberry (Amla)everyday and applying Gooseberry paste on the scalp regularly before taking bath helps to control hair fall. 56. Applying Lemon juice on the scalp 10 minutes before bath helps to control hair fall problem. 57. Soap nut powder used as a hair wash or soap nut leaves paste applied on the scalp before taking bath helps to reduce hair fall problem. 58. Henna paste (mehendi) mixed with yellow portion of egg or henna paste with lemon juice applied on the scalp regularly before taking bath helps to reduce hair fall. 59. Beet root leaves grinded with henna leaves applied regularly on the scalp before taking helps to reduce hair fall problem. 60. Drinking wheat grass juice every morning for one and half month cures hair fall problem. 61. Basil (tulsi) paste mixed with Gooseberry (Amla) powder applied 10 minutes before taking bath helps to control hair fall problem. 62. Tea powder boiled in water can be used as a hair wash,which helps in reducing hair fall problem 63. Eating Amaranth (Cholayi),Cabbage (patta gobi) regularly helps to overcome hair fall problem. 64. You can make a hair oil of your own like this. Boil Fenugreek menthi seeds Neem or Sweet neem (Curry patta) leaves Gooseberry (amla),Henna leaves (Mehandi) some Basil (tulsi) leaves in Coconut oil or Gingery oil for 20 minutes in slow flame and store it.Use this regularly to Overcome all hair related problem. 65. Gram flour (Besan) Mixed with curd or gram flour mixed Milk used as a hair wash helps to overcome hair fall problem. 66. Applying Crushed raw papaya (Papita) paste on the scalp 10 minutes before taking bath is very helpful.This process assists in the exfoliation of dandruff flakes and slow down fungal Growth.Papaya contains enzyme papain which is very helpful in controlling hair fall. 67. Massage the scalp frequently with a little almond oil. 68. Wash hair with the decoction of Neem leaves to stop hair fall. It will not only stop hair fall but it also rejuvenates hair 69. Apply oil to your hair before going to sleep everyday. And wash it next morning to keep it completely oil free. Regular application of oil keeps the hair roots strong. 70. Do not ever let your hair to get wet in rains. 71. Always try to cover your hair with something or the other while riding on bike. It protects your hair from dangerous pollution. 72. Avoid combing wet hair immediately after bath. 73. Do not use hair driers to dry your hair as it can damage your hair and make it too dry. 74. Do not ever wash your hair with too cold or too hot water. It can damage your scalp and hair as well. 75. Massage the scalp with Aloe vera gel or juice. This is an excellent remedy to fight hair fall. 76. Mix honey with egg yolk and apply it on the scalp. Leave it 30 minutes and wash it off with a gentle shampoo. 77. Trim your mane regularly to get rid of split ends. 78. Soak a handful of gooseberries in a cup of milk for two hours. Make a paste and apply on the scalp and hair. 79. Mixing juice extracted from aloe vera with some triphala and then applying it to the scalp to the tips of the hair can give great strengthening value for your hair. Leave this great baldness remedy for two to three hours, and then rinse it off. Practicing this for three to six months can greatly increase the hair volume, as well as strengthen it. 80. Massaging the coconut milk into your scalp with your fingers for ten to fifteen minutes will really get the blood flowing. Leave it on your hair for half an hour, then rinse off with warm water. Doing this twice a week for baldness treatment can have obvious results in just a few months time 81. one egg yolk, about 20 grams of vegetable oil, 20 grams of lemon juice, and four tablespoons of carrot juice. It would be much better if the carrot juice was genuine carrots as opposed to canned ones. Mix them all together until they develop a certain texture that can now be used as an effective hair loss remedies. 82. Try massaging your scalp with Indian gooseberry oil mixed with a portion of coconut oil. This isnt complicated at all. All you need to do is boil the Indian gooseberry to extract the oil. Mix this extract with coconut oil. This hair tonic is sure to enhance your hair growth.
83. Consuming lettuce and spinach juice will increase your hair growth. Following a healthy diet is the best way to enhance your hair growth. When you eat right, your body absorbs all the essential nutrients and hair growth automatically happens. 84. Grind some lime seeds and pepper in equal proportions and apply the resulting paste to your hair. Apply the paste as a thin layer on your scalp on a daily basis. Rinse your hair after ten to fifteen minutes. 85. Grind fenugreek seeds with water and prepare a smooth paste. Apply it on your scalp and leave it on for a few minutes. Wash your hair thoroughly to remove the paste. 86. Avoid washing your hair with hot water as it may spoil the hair strands and may cause them to break. 87. Trimming your hair every eight to ten months helps in enhancing hair growth as the spilt ends and dead ends of your hair are removed. 88. Drink plenty of water as it helps in hair growth. 89. Include fresh vegetables and fruits in your daily diet as this will promote good hair growth. 90. Avoid using chemical based shampoo and other hair products as they tend to take away the health of your hair. 91. Maintaining good hygiene is a must. Set a cleaning routine for your hair to promote hair growth. 92. Applying egg yolk on your scalp is a good way to treat dry hair as dry hair breaks easily and hair growth may stop. 93. Massaging with warm oil, say hot coconut oil or almond oil can impart a good health to the scalp and re-grow lost hair. It helps to maintain the hairs natural moisture, and does away with problems like dullness, dryness and dandruff. 94. One may boil together Indian goose berry oil and coconut oil to prepare a massaging tonic. This induces growth. 95. Indian gooseberry, rich in Vitamin C, may be consumed raw. This also grows hair well and improves its health. 96. A drink of a mixture of lettuce and spinach juice promotes growth of hair. 97. Application of beaten egg on scalp and leaving it for 30 minutes before hair wash, can improve growth. 98. Application of a hair mask of curd and leaving it for 30 minutes before hair wash also improves growth. 99. Application of coconut milk on scalp and leaving it for 30 minutes before hair wash is a treatment conducive to growth. 100. A paste of pigeon pea and red gram may be applied on scalp. This is a good homemade remedy for hair growth. 101. One may mix the juice of Indian gooseberry and juice of lemon, apply on hair and scalp and leave it for 40 minutes before head wash. This induces hair growth. 102. One may soak fenugreek seeds over night; mash them in the morning to prepare a fine paste to be applied on hair on scalp. This treatment if followed twice a week; can bring about good hair growth. 103. One may apply onion juice on scalp and hair, and leave for 3-4 hours. This remedy encourages much hair growth. 104. Regular application of castor oil combats hair fall and baldness. It is very good home remedy to treat baldness/hair loss naturally. 105. Apply a fine paste made from pigeon pea or red gram; it is an effective home remedy in curing hair loss baldness naturally at home . 106. Massaging the scalp with aloe vera gel or coconut oil prevents hair loss and helps in growth of new hair naturally .Try this home remedy to treat baldness/hair loss at home. 107. Seeds of lime and black pepper ground to fine paste when applied on a daily basis on the scalp helps in curing baldness/ hair loss naturally at home. 108. Take fenugreek; grind it to make a fine paste, and apply it on the bald patches, and let the hair absorb the paste of fenugreek for one hour .This baldness/hair fall treatment helps in treating hair fall/baldness. 109. Home remedy of beetroot leaves when mixed with henna can do wonder in curing baldness/ hair loss naturally at home. 110. Make a hair pack at home mixing hot olive oil, honey, and one teaspoon of cinnamon powder, and apply it on the scalp before bath for 15 minutes. It is very effective home remedy in treating hair loss and baldness at home. 111. Take elephant tusk; heat it on a pan, and burn it to ashes, then apply the dust of elephant tusk mixed with pure honey or ghee on the bald patches at night, and leave it on overnight. In the morning, wash it off completely. This remedy is age old home remedy of curing baldness. Do try this at home for sure and quick results. 112. Honey mixed with onion massaged on the bald patches helps in hair growth. This home remedy is hassle free and very useful in treating baldness /hair fall at home naturally. 113. Take equal amount of camphor and curd , and apply it on the bald patches , and let it dry for 2-3 hours .It is very effective baldness/hair loss treatment at home for fighting baldness and hair loss.. 114. Take fresh coriander leaves, and make a paste of it. Apply it on the scalp; it is very easy and effective home remedy to treat baldness/hair loss naturally at home. 115. Grind liquorice with milk and a pinch of saffron. This baldness/hair fall treatment promotes hair growth. 116. Juice of spinach and lettuce when taken orally promotes hair growth. 117. Scrub a half of lemon on the bald patches continuously for 1-2 months; this home remedy helps in fighting baldness and hair fall naturally at home.
118. Coconut oil mixed with lime juice is effective in curing hair loss/baldness. 119. Application of coconut milk is very helpful home remedy in treating baldness/ hair loss at home. 120. Juice of Indian gooseberry mixed with lime juice in equal amount fosters hair growth. Try this home remedy to cure baldness/hair loss naturally at home. 121. The oil prepared at home by boiling Indian gooseberry in coconut oil is very easy andeffective home remedy for treating hair fall and baldness at home. 122. Boil 250 grams of mustard oil with 100 grams of henna leaves to make a concoction to combat hair loss. Ever tried this home remedy to cure baldness/hair loss at home? Try it. 123. Use amla oil (Indian gooseberry) with lime juice to make a shampoo to treat baldness/hair loss naturally at home. 124. Mix few drops of kanta-karika juice with honey .Apply it on the scalp to cure baldness/hair loss .This baldness/hair loss treatment must be followed regularly. 125. You can use mixture of both castor oil and almond oil to treat hair loss .Regular use of this home remedy will result in hair growth. 126. You can apply red henna to cure hair loss and have a beautiful hair.Try this home remedy to fight baldness/hair loss at home naturally. 127. Make a concoction of 2 eggs, 2 tea spoons of amla(Indian gooseberry),shikakai(acacia concinna),soap nut(reetha).Massage for 30 minutes on your scalp with this mixture, and wash off with a mild shampoo .You can use this home remedy 3-4 times a week to treat baldness/hair loss. 128. You can use egg yolk with honey as a home remedy to cure hair fall/baldness, and get silky hair. 129. Amla mixed with honey also arrests hair loss. 130. Coconut oil in which a mango has been preserved for one year treats baldness/hair loss. This home remedy stimulates hair follicles to regrow hair. 131. Boil hibiscus in a glass of water,and strain this mixture to apply with lime juice on your bald patches to cure them naturaly at home.You can use this treatment after shampooing your hair. 132. You can rinse your hair with the water in which geranium leaves had been boiled to cure hair fall and baldness naturally at home. 133. Use aloe vera with herbal powder triphala for 3- 6 months on a regular basis to treat baldness/hair loss. 134. Take 4 parts bhringraj, 3 parts jatamansi, 5 parts dashamoola , and mix all with goat milk. This home remedy when taken orally cures hair loss and promotes hair growth. 135. You can use juice of amaranth to treat baldness/hair loss naturally at home .Many people have benefited from this home remedy. 136. Ash gourd helps in treating baldness problem .Use this baldness/hair fall treatment to deal with falling hair naturally. 137. Curry leaves as a home remedy to treat baldness/hair loss naturally is excellent. 138. Rinse your hair with water in which rosemary leaves had been boiled to get rid of baldness and hair loss. Try this easy baldness and hair fall treatment at home for sure. 139. Take 1/2 cup of olive oil with 1 tea spoon of cumin seeds to rub on your bald patches to treat baldness and hair fall. Try this home remedy. 140. Juice of alfalfa with spinach or coriander taken orally promotes hair growth and treats baldness naturally. You must try this home remedy for beautiful hair. 141. Rinse your hair with apple cider vinegar and sage tea to cure baldness and hair fall naturally at home. 142. You can drink the mixture of banana , honey, yogurt, skimmed milk to take as a home remedy to fight hair fall and baldness naturally at home. 143. Arnica oil is very helpful for combating hair fall.Arnica oil is extracted from the dried arnica leaves and has full of anti-inflammatory properties.This treatment is very helpful in curing premature graying of hair also. 144. Do not forget to drink at least 2-3 liters of water daily. 145. Home Remedies for Hair Growth with Onions:Let it stay on hair for fifteen minutes, and then wash it off. You can also apply minced or grinded onion after mixing it with your shampoo. It adds shine too. 146. Onion-Garlic-Cinnamon Hair Pack: Take a half onion, four garlic and two sticks of cinnamon. Boil water in a pot by infusing garlic cloves, cinnamon sticks and onion. Rinse your hair with this water (when it is lukewarm) for four consecutive days to get faster hair growth. 147. Massage with Grape Seed Oil: Grape seed oil can boost hair growth. Massage your scalp with grape seed oil before you go to bed and wash it off in the next morning. 148. Plaits at Night: Make two braids of damp hair after a night hair wash and sleep with those at night. This will protect hair from entangling and will enhance hair growth within a week. 149. Trimming your hair in the first quarter of a moon phase will enhance hair growth. 150. Home Remedies with Reflexology for Hair Growth: Bring hands into a semi-fist and rub fingernails of one hand with the other together. Do this backward and forward for five minutes every day to improve hair growth.
151. Birth Control Pills: Take five birth control pills and make a powder, then mix with yourshampoo and wash it off to increase hair growth. It also makes hair healthier. 152. Aloe Vera for Hair Growth: Extract some aloe vera gel and mix it with honey. Apply this on scalp and leave it for twenty minutes. 153. Rinsing with rosemary water will bring remarkable changes on your hair. 154. Soak small pieces of aloe vera or cactus in cool water and wash hair with this solution in the next morning. 155. Do not throw away water after boiling potatoes. Wait for it to cool and rinse hair with this. This is one of the excellent home remedies for hair growth.
Yoga Sun Gazing: In yoga sun gazing was used as a means to completely fill the body, mind and soul with the healing solar light and meditate. The most appropriate way to do so was to go outside at sunrise or sunset when the solar light is orange or reddish orange in color and rays coming out are a bit weaker in strength one must open his eyes wide taking in nine deep breaths (inhaling and exhaling gently) while looking towards the sun. Feel the energy of sun traveling through your body into various systems and Chakras. After this now gently cover your eyes with your palms for a few minutes. Relaxing your eyes and releasing out the stress and tension in your mind, and eyes. But while performing this gaze one must take care to not to gaze to long and also the strength of sun rays should be appropriate to gaze on (sunset or sunrise). Sun Gazing The subject should sit on a bench, facing the rising sun with his eyes closed, and gently sway sideways several times for ten minutes. He should then open his eyes and blink about ten times at the sun and look at some greenery. Splashing Plain cold water should be splashed several times over closed eyes. The closed lids should then be rubbed briskly for a minute with a clean towel. This cools the eyes and boosts blood supply. Swinging The subject should stand with his feet twelve inches apart, hands held loosely at his sides, his whole body and mind relaxed. He should sway his body from side to side gently, slowly, and steadily, with the heels rising alternately but not the rest of the foot. This movement may be likened to the slow moving of the pendulum of a clock. Swinging should be done in front of a window or a picture, so that the window or picture appears to be moving in the opposite direction of the swing. When facing one end of the window or object, the subject should blink once. Our eyeball comprises three layerssclerotic or the outer layer, choroid or the middle layer and retina or the inner layer. The sclerotic layer is white and opalescent, with a transparent center called the cornea. Light is transmitted to the eye through the cornea. The choroid layer is called the iris, with the pupil in its center. Directly behind the iris lies the crystalline lens, which focuses light passing through it upon the retina. Around this lens lie the ciliary muscles that control its contraction and expansion. The retina or the inner layer is like a screen that receives the projected images of external objects. You see something when the pupil lets light pass through the cornea onto the crystalline lens. Brightness is controlled by the pupil through contraction or dilation. These rays converge upon the retina via the convex crystalline lens, forming an inverse image. The optic nerve then transmits this image to the brain, producing the final sense of vision.
Sight can be adversely affected by various things, ranging from malnutrition to a recurring cough and cold. Perhaps the three most common defects of eyesight are myopia (short-sightedness), hypermetropia (long-sightedness) and presbyopia (failing eyesight due to age). While in myopia, the image is formed short of the retina, in hypermetropia or presbyopia the image is formed beyond the retina. These conditions are the result of faulty eye muscle action or imperfect accommodation. Generally, such disorders are corrected by introducing artificial lenses such as spectacles. These lenses bring the image onto the retina. But this amounts to treating the symptom, not the disorder of imperfect accommodation. Yoga offers a host of corrective measures for defective eyesight. In fact, the best way of improving your eyesight is to stop using spectacles and follow the methods described here. Although for many it will not be possible to get rid of spectacles abruptly, they can be phased out gradually. Do not wear spectacles while doing the exercises.
JAL NETI Jal neti (nasal irrigation with water) keeps the sinuses, nasal tract and the throat free from infection. This, in turn, keeps the eyes free from congestion and strain, and improves vision. A special pot forjal neti, with a pointed spout rising from its base, is easily available and its use can be learned from any yoga instructor. Neti should be practiced in the morning before pranayama. Use lukewarm water, slightly above body temperature, adding a little table salt. Salted water is more soothing than plain water, which hurts the nasal tract. If the habit of jal neti is inculcated in childhood, the person would never need spectacles. Even if it is practiced regularly at a later stage with other exercises and precautions, it will definitely help in getting rid of spectacles. PRANAYAMA To correct your eyesight, practice nadi shodhan (alternate breathing) pranayama. Always start and end with the left nostril. Start practicing with five cycles of nadi shodhan. Although it is not possible to explain the full pranayama here, you can learn it from a qualified yoga trainer. This pranayama should be practiced in the mornings and evenings on an empty stomach. EYE RELAXATION 1. 2. Practice these methods to relax your eyes effectively: Sit comfortably, close your eyes and cover them with your palms. Be sure that both palms are cupped and do not press on the eyes. Imagine the blackness getting darker and darker. Rest in this manner for five minutes at a time, at least thrice a day. Stand upright in front of an open window, preferably overlooking greenery. Keep your feet a foot apart, let your arms hang loosely at the sides and be as relaxed as possible. Gently oscillate your body from side to side like a pendulum. Raise your heels alternately, keeping toes firmly on the ground. Gently swing the whole body to and fro without bending at the waist or hips. Start the exercise with eyes open. Swing like this for a minute and then close your eyes gently, while still swinging. Imagine the apparent movement of the window as clearly as possible. Open the eyes after a minute and continue this exercise for 10 minutes, alternately closing and opening the eyes. Repeat this exercise at least thrice a day. Close your eyes and, facing the sun, move your head slowly from side to side. Sun rays cause a rushing of blood to the eyes, relaxing optical muscles and nerves. Do this exercise for 10 minutes thrice a day. Take a handful of cold water and, bending forward, splash your eyes rapidly, several times. Do not forget to hold water in your mouth while splashing eyes as this cools them down to their nerve ends and freshens them a great deal.
3.
4.
5. 6. 7.
EXERCISES FOR EYE MUSCLES 1. Sit erect in a comfortable position. Keep your head and neck as relaxed as possible. Gently move your eyes up and down 10 times. The motion should be very slow, uniform and effortless, without moving the head or neck. Let your eyes see as far up and as far down as possible without causing strain. As the eye muscles relax, you will be able to look lower and higher. Repeat this exercise five to six times in a sitting. You can add to the relaxation by resting your eyes in your palms in-between. 2. Sitting in the same posture as before, move your eyes from side to side. Repeat 10 times. The motion should be very slow, uniform and effortless without moving the head or neck. As in the earlier exercise, you will able to move them farther and more easily with practice. Repeat this exercise five to six times. 3. Move your eyes gently and slowly around in a circle five times, alternating between clockwise and anti-clockwise motions. Rest for a second and repeat the process five times. Remember that it should be done slowly and effortlessly. 4. Sit on a terrace where you can see far off objects on the horizon. Look at a distant object and then look at the tip of your nose. Look from one to the other object 10 times. Close your eyes for a second and resume the exercise. Repeat five times and rest your eyes. Some useful tips to get rid of eye glasses are as under:-
1. 2. 3. 4. 5. 6. 7. 8. 9. 10. 11.
Drink carrot or beetroot juice daily. Make coriander juice, pour couple of drops in both eyes and keep them closed for 5-10 minutes. Eat lots of fruits and green leafy vegetables like Spinach, Coriander,Methi, etc. Try some yoga and meditation exercise for the eyes. For 10 minutes daily, keep your eyes focussed on the flame of a candle (or tip of a pencil/pen) from some distance. Eat salad regularly. Sprinkle water on your eyes atleast 4-5 times a day. Neti- Jal Neti & Sutra Neti Kapalbhati Kriya for 15 Min. Anuloma Viloma Pranayama for 15 min. Eye movement exercise for 5 min. - It is to move your eyes in all direction concentrating a thing one feet away from your eyes preferabaly your thumb.
12. Acupressure point for eye which is laid between your first and second finger. 13. Practice of Tratak (to see continusely at a candle or some other thing) 14. Certainly there are exercises that can be treated for the eyes.Iam giving here information which i read in my
grandfathers book bought from aurobindo ashram.First diet is very important and certain exercises should be adopted. be daily food.
15. Balanced diet which includes vegetable salad,green vegetables,wheat grass juice,leafy vegetables and fruits should 16. no spicy foods,meat. 17. drink enough water adn avoid drinking inbetween.
Yoga for eyes:
1. 2. 3.
Suryanamaskar Asana Trikonasana Shava asana
Eye exercies Do's for Eye vision improvement:
1. 2. 3. 4.
Carrot juice, Milk and Vitamin A related food to intakes. You have to change the direction of your eyes view often Make sure consult with Doctor to know what is actual eye issue you have, some has + or - with one or two eyes differently. Prescribed Eye drops helps, at the same time, you can use laser treatment if it is beyond the control or huge plus or minus.
5. 6. 7. 8.
Rub your palms for 2 minutes and place them on your eyes gently, not pressing the eye balls. The warmth from the palms will relax the nerves in the eyes and help in blood circulation. Keep your eyes closed inside and see to it that minimal light passes through your palms. Eye stretching; close both eyes firmly and open them suddenly stretching your face too. Shut your eyes and rotate them in all the directions slowly and steadily concentrating on one eye at a time. Sun bath is also good for eyes. Dont look directly in the sun. Concentrate on your eyes while performing this exercise. Look both sides, up to down, diagonally and try to stretch your eyes to allow more sunlight in your eye.
9. All these exercises should be performed several times a day with patience for maximum benefits. 10. Along with exercises try to include foods rich in vitamin A, beta carotene and other foods good for improving
vision. These includes Carrots, dark green leafy vegetables (especially spinach), turnip, tomatoes, lettuce, soya bean, orange, papaya, mango, cucumber, apples and grapes.
Dont's for Eye vision
1. 2. 3. 4.
Do not see over brighten things like light or TV or Computer screen Do not look or observe in one direction for a long duration Do not shower with very hot water Do not use huge salt and fat items
Natural Cure for Blurred Vision
1. 2. 3. 4. 5. 6. 7. 8. 9.
There are many effective cures for blurred vision. If you have blurred vision and feeling of film over the eyes, then try some of the following home and natural remedies: Carrot is an excellent cure for vision. This is helpful in treating various eye disorders including blurred vision. Carrots contain bet carotene that is beneficial for eye sight and vision. Spinach is another good food for treating eye problem. This food contains carotenes that help in soothing and relaxing eyes. Soak almond in water overnight and eat them the next morning. This will help in treating the disorder and improving vision. Grated potato can also prove to be effective for curing eye problems including blurred vision. This is most beneficial if the condition is associated with pain and swelling of the eye. Take a cotton bud and dip in cucumber juice. Apply the soaked cotton bud on closed eyelids to treat the condition. Rosewater is also a good cure for eye vision. Dip a cotton bud in rosewater and apply over your eyes. Avoid consumption of jams, tea, White bread, coffee, meat and eggs as these food substances may aggravate the condition. These food substances often play havoc with the overall body system and hamper the normal functioning of vital body organs.
Natural and Effective Eye Care Tips improve eyesight the natural way and keep your eyes healthy - One should not strain eye continuously for a long time particularly by watching T.V. or playing video games (more specific in kids) & surfing on net / working on PC (as seen commonly in adults). - If there is blurring of vision, one must not waste time & seek help of an eye consultant. Do not use any other persons glasses for use or even just for fun as well. It may cause infection to your eye if that persons eye is infected, or if not then also by using wrong numbered glasses you may strain your eyes & may invite glasses for you ! - Let us have good intake of number of leafy vegetables, carrot (fresh & not Gajar ka halwa), milk, ghee (preferably home made) in our diet so as to maintain good ocular health. - Let us avoid insufficient sleep or excessive sleep. - Do not see directly towards welding light or even at sun, at the time of solar eclipse, without taking proper specified precautions. Home Remedies for Eyes natural home remedies, herbal home remedies, ayurvedic home remedies
- Amla a day keeps eyes healthy. Try to eat a fresh Amla fruit, if not available then may take Amla powder or Jam of Amla (Morawala / Amla Murabba). - Take Triphala powder (a powder of combination of three myrobalans, i.e. Amlaki (Phyllanthus embelicus), Haritaki(Terminalia chebula) & Bibhitaki (Terminalia bellerica), should be consumed with honey & pure ghee (Ghee & Honey must be consumed in an unequal proportion) at night time. In Ayurveda this combination has been advocated as Netrya rasayana. - You can also use Isotine eye drops, an excellent eye tonic. - Keep cold waters pack or rose water pack on closed eyes especially in summer.
Eye Exercises Yoga improve eyesight and vision Eye Rotation - Keep the eyes open. - Lift your eyes up and then lower them. - Continue to do this 10- 12 times without blinking. The movements of the eyes should be steady and relaxed. Trataka (gazing) This technique is capable of obliterating the diseases of the eye. This kriya also improves vision, aids in concentration and purifies the mind. Steps 1. Sit on the floor in a comfortable position with the spine erect. 2. Keep the eyes open and fix your gaze on any object like a candle or a picture of 'Om'. 3. Without blinking, gaze steadily at the object till tears flow from the eyes. Do not strain the eyes and breathe deeply. Pranayama and Meditation After Trataka, one can try to concentrate on the tip of the nose or on the point between the eyebrows. The point between the eyebrows is called the third eye center or ajna chakra. According to yogis, concentrating on this chakra prepares the mind for meditation. The period of meditation is preceded by pranayama. This means simple breathing exercises that involve drawing in the breath to a count of 4, holding the breath to a count of 4 and releasing the breath to a count of 4, which marks as one practice; 4:4:4 is the ratio to be maintained for this breathing exercise. Inhalation: 4 counts Retention: 4 counts Exhalation: 4 counts After pranayama, one can start to meditate on the divine within. Restless thoughts must be gently pushed away; concentration on the sound of 'Om' produces peace and tranquility in the mind of the practitioner. Eye Nutrition eye nutrition for your eyes In various studies and clinical trials antioxidant vitamins found in certain foods have been linked with eye health. They help to maintain healthy cells and tissues in the eye. The main focus has been on the anti-oxidant vitamins A, C and E. These vitamins can be found in many different sources of fruit and vegetables such as oranges, kiwis, grapefruit, dried apricots, tomatoes, peppers, raw carrots, green leafy vegetables including kale and spinach, green peas, green beans and brussel sprouts. They can also be found in nuts, seeds,
dairy products and eggs. These are only a few of the food types in which antioxidant vitamins can be found there are many more other fruits and vegetables. More recently it has been suggested that two types of antioxidants, known as carotenoids, called Lutein (pronounced Looteen) and Zeaxanthin (pronounced Zay-a-za-thin) may also help with eye health. Some studies have found that people who have a good diet rich in carotenoids, particularly lutein and zeaxanthin, have a lower risk of developing AMD. Lutein and Zeaxanthin can be found naturally in vegetables and fruit. For example, Lutein can be found in yellow peppers, mango, bilberries, and green leafy vegetables such as kale, spinach, chard and broccoli. Zeaxanthin can be found in orange sweet peppers, broccoli, corn, lettuce (not iceberg), spinach, tangerines, oranges and eggs. Many of these overlap with food types in which vitamins A, E and C are present.
A large research trial, called the Age-Related Eye Disease Study(AREDS), showed that high quantities of the antioxidant vitamins A, C, E, beta-carotene and the minerals zinc as zinc oxide, and copper as cupric oxide, can help to slow down the progression of AMD. It would be very hard to obtain the large quantity of vitamins used in the trial from your diet. Therefore some people who have AMD may consider supplementation with vitamins and anti-oxidants. Such high dosages of vitamins and minerals might have possible side effects on the body. For this reason it is very important to consult your doctor first before taking a supplement. Dampen wads of cottonwool with pure Organic Rose Water and place over closed eyes. Relax for 10 minutes that way. The cooling effect of organic rose water helps cool tired eyes. Splash your face and eyes 10-15 times in the morning using warm water. Avoid abrupt temperature changes. Focus on particular diet to strengthen your vision, such as stewed apple, raw carrot, cabbage, and sprouted chick-peas. Winter Cherry (Ashwagandha) also helps strengthen vision. You could also consider drinking a cup of warm milk with a mix of half a teaspoon of ground almonds, raw sugar, anise seeds and add half a teaspoon a day. Drink plenty of water through the day, as constipation or internal dryness can have adverse effect on the eye. Stay away from caffeinated drinks. In case you have access to Triphala, put a teaspoonful of Triphala powder in a glass of water and let it stay overnight. Strain the water and wash the eyes with it. These remedies can help you keeping your eyes healthy and beautiful, and can be used by everyone, in general.
Constipation as we know is the root cause of most disorders in our body. This holds no less true in eye health. Since constipation causes retention of waste products for a longer period in our intestines, the released toxins find their way to the tissues and cause a variety of health problems. Hence do not allow yourself to get constipated. Ayurveda recommends that during bath time we should make it a practice to bathe our eyes in pure water. To do this fill a bucket with water, dip the face in the water and open and close the eyes a few times. At night, before going to sleep, wash the hands, feet and eyes. Swish some water around in your mouth to clean it too (even if you have brushed your teeth). Then massage the soles of your feet with mustard oil. This keeps the eyes healthy and prevents many eye afflictions. Apply mustard oil to the head and massage it well. Also walking barefoot on lawn grass, early in the morning especially, when it is covered with dew helps in keeping the eyesight strong. When eyes are tired or tensed, close the eyes for a few minutes and relax. Consume nutritious food and reduce consumption of junk food as much as possible to maintain eyesight. Never watch a solar eclipse with naked eyes. Green is a soothing color and helps in increasing eyesight. During hours of computer usage it benefits to look at greenery or green color every once in a while. Fill your mouth with water before washing your face with cold water. If possible do this three times a day. Sprinkling cold water on eyes is also beneficial to the eyes. If eyes are red, have pain or are swollen, keep a cold water compress on the eyes. Keep replacing as soon as it gets a bit warm. In winter, this should be done with hot water.
After meals, wash hands and rub the wet hands together for a while and keep on the eyes. This prevents simple infections of the eyes. Cup your palms over both eyes to prevent light from reaching them. Open the eyes for a minute to absorb the darkness. Do this a number of times. It removes eye fatigue, pain and redness. Redness of eyes can occur due to excessive smoking and drinks. Dark circles are the result of stress and anemia. Put thin cucumber slices on both the eyes after lying down to get relief. In many cases the practice of looking straight cures mild cases of squint. To do this, get glasses without any number. Keep the central portion of the glass transparent while darkening the surrounding area with black paint or black paper. Wear this regularly while working. It helps in correcting mild cases of squint. One more simple remedy for mild squint is ; Keep the tip of the index finger on the tip of the nose. Practice focussing both the eyes on the tip of the finger. After a while move the finger towards the right temple, then between the eyebrows and the to the left temple. Follow the movement of the finger with your eyes. Tips for Eye Beauty, Vision Care and Eye Health Care Eyes are one of the most important organ in the human body and vision is one of the most wonderful gift. But often many people neglect the importance of eye care and do not pay proper attention towards eye care. Given below are some eye care tips for beautiful and attractive eyes. Dip a cotton pad in a cup of water overnight. Strain this in the morning and add 1 cup of plain water to this. Splash the eyes with this water or wash them with the help of an eyecup. Dip a pad of cotton wool in rose water to which 2-3 drops of Castor oil is mixed. Place these soaked pads on the eyelids for 15-20 minutes. Eye burns and other problems will be reduced. Splash the eyes with a weak n very liter tea solution, thoroughly strained and cooled for 2 to 3 minutes. Place Cotton pads dipped in a cold tea solution for an hour on the eyelids for 10 to 15 minutes and relax.
When the eyesight gets worse the optometrists prescribe eyeglasses. But before wearing them everyday try yogic eye exercises that existed for centuries and helped millions to get perfect vision back. Here is the short version of yogic eye exercises described in the book of Yogi Ramanantata. Neck Exercise 1. Sit with the back straight. Turn the tongue inside towards the throat and touch it against the upper palate. 2. Bend the head downwards, and press the chin to the chest, then head up looking backwards. Inhale when the head moves upwards, and exhale when the head moves downwards. Do it four to five times. 3. Very slowly rotate the head first on the right side, and then on the left side. Inhale deeply when the neck moves on the right side and comes in the line of right shoulder, and exhale when it returns to front side position. Inhale when it moves on the left side, and exhale when it returns to front side gradually. Repeat this exercise eight to ten times; that is, four to five times each side. Now, relax the neck. 4. Thereafter, bring the right ear up to the right shoulder, and then the left ear to the left shoulder. Repeat this exercise eight to ten times, in total; that is, four to five times each side. Now, relax the neck. 5. Now, rotate the head and neck from right side. In this tilt the head first on the right side, then on the back side, then on the left side, and in front last. This would complete one rotation. Repeat four to five times very gently and without any stress. Do it in the reverse direction; also that is; starting it from the left side. Repeat four to five times without hurrying. 6. Rub the hands and massage the neck, with warm hands, nicely. 7. You can do shoulder rotation and arm rotation exercises, also, to remove stress from the shoulders and arms. Do clockwise for eight to ten times, and then anti clockwise for eight to ten times.
Yoga Sun Gazing: In yoga sun gazing was used as a means to completely fill the body, mind and soul with the healing solar light and meditate. The most appropriate way to do so was to go outside at sunrise or sunset when the solar light is orange or reddish orange in color and rays coming out are a bit weaker in strength one must open his eyes wide taking in nine deep breaths (inhaling and exhaling gently) while looking towards the sun. Feel the energy of sun traveling through your body into various systems and Chakras. After this now gently cover your eyes with your palms for a few minutes. Relaxing your eyes and releasing out the
stress and tension in your mind, and eyes. But while performing this gaze one must take care to not to gaze to long and also the strength of sun rays should be appropriate to gaze on (sunset or sunrise). Up and down: 1. Raise your eyes and find a small point that you can see clearly without straining, without frowning, without becoming tense and, of course, without moving your head. 2. While doing this exercise look at this point each time you raise your eyes. 3. Next, lower your eyes to find a small point on the floor which you can see clearly when glancing down. 4. Look at it each time you lower your eyes. Breathing should be normal. 5. Move your eyes upwards as far as you can, and then downwards as far as you can. Repeat four more times. 6. Blink quickly a few times 1 to relax the eye muscles. Right and left: 1. Now do the same using points to your right and to your left, at eye level. 2. Keep your raised fingers or two pencils on each side as guides and adjust them so that you can see them clearly when moving the eyes to the right and to the left, but without straining. 3. Keeping the fingers at eye level, and moving only the eyes, look to the right at your chosen point, then to the left. Repeat four times. 4. Blink several times, then close your eyes and rest. Eyes Stretch Astigmatism Vision Exercise Here is what you need to do to perform the Eyes Stretch Astigmatism Vision Exercise: 1. Sit comfortably on a chair and relax your body. 2. Start by performing Palming for about a minute. 3. Imagine your face is a clock 12 oclock is at your forehead, 6 oclock at your chin and 3 and 9 oclock on your left and right cheeks. 4. Start rotating your eyes clockwise: Move them up and look at number 12, then slowly move them to 1,2,3 oclock until you reach number 6. Keep on rotating your eyes until you reach upward position. 5. Repeat the above 10 times and make a short break. 6. Do the same 10 times but in counterclockwise direction. 7. Finish the Eyes Stretch exercise with Palming for another minute. Eye Relaxation technique - Close your eyes as tight as possible squeeze them as much as you can and then suddenly open up unexpectedly wide. Execute this type of blinking until the tears bust out of your eyes. As soon as this happens you may count your goal achieved. Lion Pose 1. Kneel on the floor and then sit down on your heels, or sit on the edge of a chair. Rest your hands on your knees with your fingers spread apart. Imagine that you are a regal lion, fierce and powerful. Take a deep breath in through your nose as you lengthen your spine. Lean forward slightly as you exhale through your mouth, extending your tongue out as far as you can, opening your eyes and mouth wide, and roaring "Aaah!" At the same time, lift your hands off your knees and spread your fingers wide, pretending they are claws. When you have exhaled completely, sit back, return your hands to your knees, and relax. Take two full, deep breaths. And then take another deep breath in through your nose as you lengthen your spine. Repeat steps 2 to 3 three more times. When you're done, sit for a moment and notice how you feel. Forward Elbow Pose Stand with your feet about hip width apart and your arms at your sides. Keep your feet rooted to the floor as you fold forward from your hips, keeping your back flat. Continue until your torso is hanging from your hips, and then grasp each elbow with the opposite hand. If you feel unsteady, stand a few inches away from a wall and lean your buttocks against the wall. Keep your legs strong and allow your torso to spill out of your waist like a waterfall, noticing the weight of your head. Gaze through your legs to the wall behind you. Hold for 3 to 10 breaths. Imagine that you are bowing to your inner beauty. To release, lift your abdominal muscles toward your spine and keep your back flat as you raise your torso to an upright position. Unhook your elbows and pause to notice how you feel. If you are lightheaded, sit or lie down for a moment.
2.
3. 4. 5. 6. 7.
8.
Which Yoga Asanas Are Effective In Getting Skin Glow? Shavasana (corpse pose) 1. Lie down on the floor with eyes closed. 2. Relax your body and push out negative thoughts and tensions. 3. Next, stand firmly with your legs apart; cover face with your hands, take 10 quick breaths. 4. Rub the skin on your eyes, forehead and face, take 10 quick breaths. Rub your entire face with your fingers, take 10 quick breaths. 5. Meditation in the mornings releases stress and negative thoughts. Sirsasana (head stand) 1. Interlock your fingers and place forearms on the floor. 2. Place the crown of your head in between the interlocked hands. 3. Raise hips and knees slowly off the ground; straighten your legs, pressing down on toes. 4. Transfer your body weight to the interlocked hands and head while balancing. 5. Lift legs off the ground and bring it in a straight line with your trunk.
Viparitakarani Kriya (shoulder stand) 1. 2. 3. Lie on the floor and lift your legs to 90 degrees. Lift your waist and trunk off the floor by supporting with your hands. Close your eyes and breathe normally.
The Kapilbhati Kriya (breathing) 1. Sit comfortably and exhale forcefully. 2. Building the pressure in your abdomen, inhale normally. 3. Do this for 10 minutes. Yoga For Beauty Asanas (yoga postures) help stimulate blood circulation through the entire body, some of them are specially designed to reduce tension and prevent you from stress. 1. 2. 3. 4. 5. 6. 7. 8. 9. 10. 11. 12. 13. 14. 15. 16. 17. 18. 19. 20. Suryanamaskar Trikonasana Pawanmuktasana Bhujangasana Ushtrasana Sarvanghasana Halasana Rhythmic deep breathing Alom Vilom Kapalabhati Bhastrika Bhramri Standing Forward Bend, Camel pose, Cobra pose and Cow Pose Headstand pose Viparita Karani (Legs-Up-the-Wall Pose) Bow Pose. Shitli Kumbhaka pranayama
21. Tadasana (Mountain Pose) 22. Uttanasana (Standing Forward Bend)
23. 24. 25. 26. 27. 28. 29. 30. 31. 32.
Bharadvajas Twist (Seated Twist) Utkatasana (Chair Pose) Balasana (Child Pose), Uttanasana (Forward Bending Pose), Setu Bandhasana (Bridge Pose), and Standing forward bends Vajrasana (Diamond Pose) Bending straight forward pose (Uttanasana) Downward facing dog pose (Adho Mukha Svanasana) Sasangasana (Rabbit Pose)
Downward facing dog:
At first bend your hands on floor. Locate your knees directly underneath your hips with your hands to some extent forward of your shoulders. Stretch your palms, index fingers parallel and turn your toes below. Breathe out and pick up your knees away from the floor. Then bent your knees slightly while, lifting your heels away from the floor. Elongate your coccyx away from the back of your pelvis and compress it calmly near the pubis. Raise the sitting bones toward the ceiling, and from your inner ankles draw the inner legs up into the groins. While inhalation, move forward your top thighs back and stretch your heels onto then Straighten your knees but dont lock them. Compact the outer thighs and roll the upper thighs inward slightly with front pelvis in narrow position. Firm the outer arms and force down the basis of the index fingers energetically on the floor. With the help of these two points pick up along your inner arms from the wrists to the tops of the shoulders. Stiff your shoulder blades alongside your back, then expand them and draw them toward the tailbone. Keep the head between the upper arms and see to it that it doesnt hang.
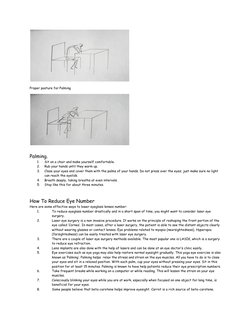
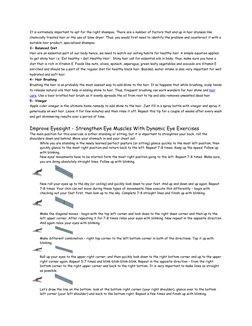
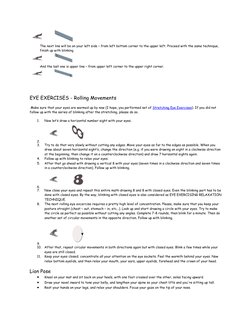

You might also like
- Eyezercise Free E-Book: 10 Supplemental Eye Exercises100% (1)Eyezercise Free E-Book: 10 Supplemental Eye Exercises15 pages
- Yoga Teachings - Sun Salutation / Surya NamaskarNo ratings yetYoga Teachings - Sun Salutation / Surya Namaskar3 pages
- Breathing Exercises and - or Retraining Techniques in The Treatment of AsthmaNo ratings yetBreathing Exercises and - or Retraining Techniques in The Treatment of Asthma219 pages
- Amanita Muscaria: Hallucinogen to AcetylcholineNo ratings yetAmanita Muscaria: Hallucinogen to Acetylcholine7 pages
- Experimental Confirmation of The Reich Orgone Accumulator Thermal Anomaly James DemeoNo ratings yetExperimental Confirmation of The Reich Orgone Accumulator Thermal Anomaly James Demeo16 pages
- Workout PDF Gainsmiths FS v19 CompressedNo ratings yetWorkout PDF Gainsmiths FS v19 Compressed19 pages
- EPI/GDV Image Patterns & InterpretationsNo ratings yetEPI/GDV Image Patterns & Interpretations5 pages
- FREE REPORT - Alternative Therapies For Multiple Sclerosis - 11-11-11No ratings yetFREE REPORT - Alternative Therapies For Multiple Sclerosis - 11-11-1134 pages
- Tips On Healthy Eyes - Better Vision For The Future100% (1)Tips On Healthy Eyes - Better Vision For The Future7 pages
- Better Vision Class: Eyesight Improvement Through AwarenessNo ratings yetBetter Vision Class: Eyesight Improvement Through Awareness22 pages
- Leo Angart - Vision - The Mind Side - Materials PDFNo ratings yetLeo Angart - Vision - The Mind Side - Materials PDF13 pages
- AEFI Reporting Concise Guide Small DigitalOnly 100725No ratings yetAEFI Reporting Concise Guide Small DigitalOnly 10072556 pages
- TP-Link TL-SG116E Switch Installation GuideNo ratings yetTP-Link TL-SG116E Switch Installation Guide2 pages
- Scopus Preview - Scopus - NeuroQuantologyNo ratings yetScopus Preview - Scopus - NeuroQuantology2 pages
- Understanding Credit: Types and ImpactsNo ratings yetUnderstanding Credit: Types and Impacts20 pages
- Jaguar Spatial Organization in PantanalNo ratings yetJaguar Spatial Organization in Pantanal12 pages
- Torsion Mechanics in Structural EngineeringNo ratings yetTorsion Mechanics in Structural Engineering44 pages
- E-Turo: A Study On The Impacts of Online Learning Approach Among The Grade 7 Students of Judge Feliciano Belmonte Sr. High SchoolNo ratings yetE-Turo: A Study On The Impacts of Online Learning Approach Among The Grade 7 Students of Judge Feliciano Belmonte Sr. High School8 pages
- Corporate Governance Mechanisms and EnviNo ratings yetCorporate Governance Mechanisms and Envi5 pages
- Good Med B Cert Facho Manual 160.121ec0575medb0000210No ratings yetGood Med B Cert Facho Manual 160.121ec0575medb00002102 pages
- Barbarian 1 Outlander Orso Neutral: Lizardfolk (Blackscale)No ratings yetBarbarian 1 Outlander Orso Neutral: Lizardfolk (Blackscale)3 pages
- Grade 12 Pe Mock (Standard) With AnswersNo ratings yetGrade 12 Pe Mock (Standard) With Answers19 pages
- Quantum Nonlinear Optics Course SyllabusNo ratings yetQuantum Nonlinear Optics Course Syllabus2 pages


