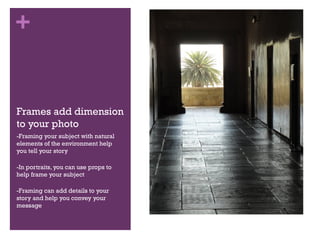
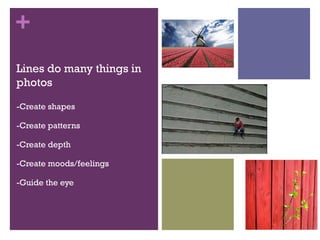
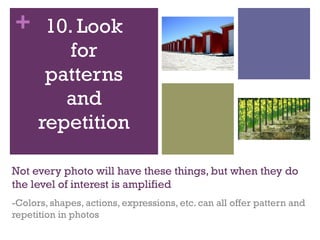
+
1. Fill your
frame
Ask yourself: ā€œWould this look better if I were closer?ā€
-Start further away and move closer to your subject
-Fill your frame with elements that ā€œfitā€
+

Don’t be afraid to get close
-If you’re not slightly uncomfortable and feeling like you
are invading your subject’s personal space, you’re
probably not close enough.
+
2. Look for
clean
backgrounds
Be aware of the environment around your subject
-You can adjust your angles and your perspective to eliminate or include details from your
photos
-Don’t be afraid to move around and take lots of pictures to get the kind of background that you
want
-You can’t –always– control your background, but you can do things to keep it from being
distracting
+
Adjust your focus to
erase a distracting
background
-Changing the settings on your
camera can help you blur out things
behind or in front of your subject that
could distract your viewer
+
3. Find
good light

Good light can create depth, shape, perspective
and texture in photos
-The right lighting can make just about anyone look good
-Bad lighting can just as easily make very attractive things… not so attractive
-Be aware of your light and what it is doing to your subject
+
You can use natural
light to highlight your
subject
-Once you start noticing how the light
can impact your pictures, you will
start to notice it everywhere
-Natural light is the most flattering
light
-The worst light is what we deal with
everyday—the kinds of lights that are
in buildings and classrooms
-In most cases, the FLASH is NOT
YOUR FRIEND. The camera flash
unnaturally illuminates your focal
point and can make people look
pasty, diseased, etc. If at all possible,
shoot without a flash!
+
4. KISS
(Keep It
Simple, Stupid)
Your photos don’t have to be amazing action shots or high
definition macro images to be interesting
-You don’t have to have a $900 lens to be able to take gorgeous, interesting and
creative photos
-Simple things can tell amazing stories
-Don’t complicate your pictures by trying to do too much
+
5. Use the
Rule of
Thirds
You focal point should not be in the exact center of your
picture
-Photos are divided into thirds, both horizontal and vertically
-The most interesting composition places the subject in the cross
sections of the thirds
+
+
6. Find
Frames

Being aware of your environment can help you find
natural frames for your pictures
-Schools are filled with frames—windows, doors, lockers, the arch of a tree branch, etc.
-Absorb your surroundings and take note of how simple things can lend frames to your
subjects
+

Frames add dimension
to your photo
-Framing your subject with natural
elements of the environment help
you tell your story
-In portraits, you can use props to
help frame your subject
-Framing can add details to your
story and help you convey your
message
+
7. Achieve
Balance
Color, size, symmetry and focus can impact the balance in
photos
-Pictures don’t have to be perfectly symmetrical, but if they are wildly out of
balance it confuses the viewer and the picture is not as effective
+
8. Use
Lines &
Shapes
Geometry is your friend! Lines, shapes, curves and
angles can all make your photos more interesting
-An interesting shape or line in a photo will help your viewer know
where to look
-Shapes and lines can add impact and dimension to your pictures
+
Lines do many things in
photos
-Create shapes
-Create patterns
-Create depth
-Create moods/feelings
-Guide the eye
+
9. Avoid
Mergers

Mergers occur when elements from the environment, the
cropping of the photo or the balance of color detracts from the
impact of the photo
-The best way to avoid mergers is to be very observant about what is going
on in and around your subject in a photo
+

Mergers are bad and look
awkward!
Notice the tree growing out of his head?

Cropping body parts/portions of people=bad
+
How do you avoid mergers?
-Never crop a person at their joins; instead, crop mid-limb if
you cannot get all of them in the picture
-Whenever possible, always include entire bodies
-Watch your background for things that may sprout out of
people’s heads
-Don’t shoot with poor color balance; look for contrasting
colors
+ 10. Look
for
patterns
and
repetition
Not every photo will have these things, but when they do
the level of interest is amplified
-Colors, shapes, actions, expressions, etc. can all offer pattern and
repetition in photos
+

Patterns and colors don’t have to
repeat perfectly to be interesting
+

Disruption in Repetition
A break in expected repetition can also be visually
interesting
Recap: Guidelines for Photography
1. Fill your frame
2. 2. Look for clean backgrounds
3. 3. Find good light
4. 4. KISS
5. 5. Use the Rule of Thirds
+ 6. 6. Find frames
7. 7. Achieve Balance
8. 8. Use lines & shapes
9. 9. Avoid mergers
10.10. Find repeating patterns and colors
1.

Once you master these guidelines, you can start breaking them!

Photography Basics

  • 1.
    + 1. Fill your frame Askyourself: ā€œWould this look better if I were closer?ā€ -Start further away and move closer to your subject -Fill your frame with elements that ā€œfitā€
  • 2.
    + Don’t be afraidto get close -If you’re not slightly uncomfortable and feeling like you are invading your subject’s personal space, you’re probably not close enough.
  • 3.
    + 2. Look for clean backgrounds Beaware of the environment around your subject -You can adjust your angles and your perspective to eliminate or include details from your photos -Don’t be afraid to move around and take lots of pictures to get the kind of background that you want -You can’t –always– control your background, but you can do things to keep it from being distracting
  • 4.
    + Adjust your focusto erase a distracting background -Changing the settings on your camera can help you blur out things behind or in front of your subject that could distract your viewer
  • 5.
    + 3. Find good light Goodlight can create depth, shape, perspective and texture in photos -The right lighting can make just about anyone look good -Bad lighting can just as easily make very attractive things… not so attractive -Be aware of your light and what it is doing to your subject
  • 6.
    + You can usenatural light to highlight your subject -Once you start noticing how the light can impact your pictures, you will start to notice it everywhere -Natural light is the most flattering light -The worst light is what we deal with everyday—the kinds of lights that are in buildings and classrooms -In most cases, the FLASH is NOT YOUR FRIEND. The camera flash unnaturally illuminates your focal point and can make people look pasty, diseased, etc. If at all possible, shoot without a flash!
  • 7.
    + 4. KISS (Keep It Simple,Stupid) Your photos don’t have to be amazing action shots or high definition macro images to be interesting -You don’t have to have a $900 lens to be able to take gorgeous, interesting and creative photos -Simple things can tell amazing stories -Don’t complicate your pictures by trying to do too much
  • 8.
    + 5. Use the Ruleof Thirds You focal point should not be in the exact center of your picture -Photos are divided into thirds, both horizontal and vertically -The most interesting composition places the subject in the cross sections of the thirds
  • 9.
  • 10.
    + 6. Find Frames Being awareof your environment can help you find natural frames for your pictures -Schools are filled with frames—windows, doors, lockers, the arch of a tree branch, etc. -Absorb your surroundings and take note of how simple things can lend frames to your subjects
  • 11.
    + Frames add dimension toyour photo -Framing your subject with natural elements of the environment help you tell your story -In portraits, you can use props to help frame your subject -Framing can add details to your story and help you convey your message
  • 12.
    + 7. Achieve Balance Color, size,symmetry and focus can impact the balance in photos -Pictures don’t have to be perfectly symmetrical, but if they are wildly out of balance it confuses the viewer and the picture is not as effective
  • 13.
    + 8. Use Lines & Shapes Geometryis your friend! Lines, shapes, curves and angles can all make your photos more interesting -An interesting shape or line in a photo will help your viewer know where to look -Shapes and lines can add impact and dimension to your pictures
  • 14.
    + Lines do manythings in photos -Create shapes -Create patterns -Create depth -Create moods/feelings -Guide the eye
  • 15.
    + 9. Avoid Mergers Mergers occurwhen elements from the environment, the cropping of the photo or the balance of color detracts from the impact of the photo -The best way to avoid mergers is to be very observant about what is going on in and around your subject in a photo
  • 16.
    + Mergers are badand look awkward! Notice the tree growing out of his head? Cropping body parts/portions of people=bad
  • 17.
    + How do youavoid mergers? -Never crop a person at their joins; instead, crop mid-limb if you cannot get all of them in the picture -Whenever possible, always include entire bodies -Watch your background for things that may sprout out of people’s heads -Don’t shoot with poor color balance; look for contrasting colors
  • 18.
    + 10. Look for patterns and repetition Notevery photo will have these things, but when they do the level of interest is amplified -Colors, shapes, actions, expressions, etc. can all offer pattern and repetition in photos
  • 19.
    + Patterns and colorsdon’t have to repeat perfectly to be interesting
  • 20.
    + Disruption in Repetition Abreak in expected repetition can also be visually interesting
  • 21.
    Recap: Guidelines forPhotography 1. Fill your frame 2. 2. Look for clean backgrounds 3. 3. Find good light 4. 4. KISS 5. 5. Use the Rule of Thirds + 6. 6. Find frames 7. 7. Achieve Balance 8. 8. Use lines & shapes 9. 9. Avoid mergers 10.10. Find repeating patterns and colors 1. Once you master these guidelines, you can start breaking them!