


![SPI Communication (Serial Peripheral Interface)
// Slave Code
#include <SPI.h>
char buff [50];
volatile byte indx;
volatile boolean process;
void setup (void) {
Serial.begin (115200);
pinMode(MISO, OUTPUT); // have to send on master in so it set as output
SPCR |= _BV(SPE); // turn on SPI in slave mode
indx = 0; // buffer empty
process = false;
SPI.attachInterrupt(); // turn on interrupt
}
ISR (SPI_STC_vect) // SPI interrupt routine {
byte c = SPDR; // read byte from SPI Data Register
if (indx < sizeof buff) {
buff [indx++] = c; // save data in the next index in the array buff
if (c == 'r') //check for the end of the word
process = true;](https://image.slidesharecdn.com/presentation2-250309125720-35f45153/85/Sensors-and-Actuators-in-Arduino-Introduction-33-320.jpg)


More Related Content
Similar to Sensors and Actuators in Arduino, Introduction (20)
Recently uploaded (20)


Sensors and Actuators in Arduino, Introduction
- 1. Input/Output (Sensor and Actuators) Workshop on Arduino
- 2. Input/Output (Sensor and Actuators) • Input and Output State Input Output Data Input Output • Sensors • Actuators
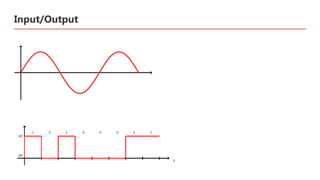
- 3. Input/Output
- 4. Input/Output
- 6. Input/Output • Example Code // Switch test program int ledPin = 12; // LED is connected to pin 12 int switchPin = 2; // Switch connected to digital pin 2 int val; // variable for reading the pin status void setup() { pinMode(ledPin, OUTPUT); // Set the LED pin as output pinMode(switchPin, INPUT); // Set the switch pin as input } void loop(){ val = digitalRead(switchPin); // read input value and store it in val if (val == HIGH) { // check if the button is pressed digitalWrite(ledPin, HIGH); // turn LED on } if (val == LOW) { // check if the button is not pressed digitalWrite(ledPin, LOW); // turn LED off } }
- 7. State input • Pull Down and Pull up
- 8. State input • Example code /* * Switch and LED test program */ int ledPin = 12; // LED is connected to pin 12 int switchPin = 2; // switch is connected to pin 2 int val; // variable for reading the pin status void setup() { pinMode(ledPin, OUTPUT); // Set the LED pin as output pinMode(switchPin, INPUT); // Set the switch pin as input } void loop(){ val = digitalRead(switchPin); // read input value and store it in val if (val == LOW) { // check if the button is pressed digitalWrite(ledPin, HIGH); // turn LED on } if (val == HIGH) { // check if the button is not pressed digitalWrite(ledPin, LOW); // turn LED off } }
- 10. State Output
- 12. Data Input Output #include <dht.h> #include <LiquidCrystal_I2C.h> LiquidCrystal_I2C lcd(0x27, 16, 2); dht DHT; #define DHT11_PIN 2 void setup() { lcd.init(); lcd.clear(); lcd.backlight(); // Make sure backlight is on } void loop() { DHT.read11(DHT11_PIN); int current_temp = DHT.temperature; int current_humi = DHT.humidity; lcd.setCursor(0, 0); lcd.print("Temp: "); lcd.print(current_temp); lcd.print((char)223); //Shows degrees character lcd.print("C"); lcd.setCursor(0, 1); lcd.print("Humidity: "); lcd.print(current_humi); lcd.print("%"); delay(1000); }
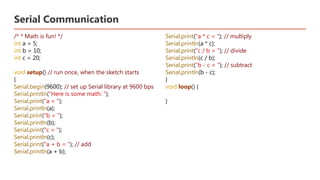
- 13. Serial Library
- 14. Serial Library /* * Hello World! * * This is the Hello World! for Arduino. * It shows how to send data to the computer */ void setup() // run once, when the sketch starts { Serial.begin(9600); // set up Serial library at 9600 bps } void loop() // run over and over again { Serial.println("Hello world!"); // prints hello with ending line break delay(1000); }
- 15. Sensors
- 16. Sensors
- 17. Actuators
- 18. Serial Communication (UART communication)
- 19. Serial Communication /* * Hello World! * * This is the Hello World! for Arduino. * It shows how to send data to the computer */ void setup() // run once, when the sketch starts { Serial.begin(9600); // set up Serial library at 9600 bps } void loop() // run over and over again { Serial.println("Hello world!"); // prints hello with ending line break delay(1000); }
- 20. Serial Communication /* * Math is fun! */ int a = 5; int b = 10; int c = 20; void setup() // run once, when the sketch starts { Serial.begin(9600); // set up Serial library at 9600 bps Serial.println("Here is some math: "); Serial.print("a = "); Serial.println(a); Serial.print("b = "); Serial.println(b); Serial.print("c = "); Serial.println(c); Serial.print("a + b = "); // add Serial.println(a + b); Serial.print("a * c = "); // multiply Serial.println(a * c); Serial.print("c / b = "); // divide Serial.println(c / b); Serial.print("b - c = "); // subtract Serial.println(b - c); } void loop() { }
- 21. Serial Communication /* * Drive size calculator! */ int drive_gb = 5; int drive_mb; void setup() // run once, when the sketch starts { Serial.begin(9600); // set up Serial library at 9600 bps Serial.print("Your HD is "); Serial.print(drive_gb); Serial.println(" GB large."); drive_mb = 1024 * drive_gb; Serial.print("It can store "); Serial.print(drive_mb); Serial.println(" Megabytes!"); } void loop() // we need this to be here even though its empty { }
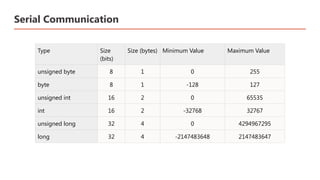
- 22. Serial Communication Type Size (bits) Size (bytes) Minimum Value Maximum Value unsigned byte 8 1 0 255 byte 8 1 -128 127 unsigned int 16 2 0 65535 int 16 2 -32768 32767 unsigned long 32 4 0 4294967295 long 32 4 -2147483648 2147483647
- 23. Serial Communication /* * Drive size calculator! */ int drive_gb = 100; long drive_mb; long drive_kb; long real_drive_mb; long real_drive_kb; void setup() // run once, when the sketch starts { Serial.begin(9600); // set up Serial library at 9600 bps Serial.print("Your HD is "); Serial.print(drive_gb); Serial.println(" GB large."); drive_mb = drive_gb; drive_mb = drive_mb * 1024; drive_kb = drive_mb * 1024; Serial.print("In theory, it can store "); Serial.print(drive_mb); Serial.print(" Megabytes, "); Serial.print(drive_kb); Serial.println(" Kilobytes."); real_drive_mb = drive_gb; real_drive_mb = real_drive_mb * 1000; real_drive_kb = real_drive_mb * 1000; Serial.print("But it really only stores "); Serial.print(real_drive_mb); Serial.print(" Megabytes, "); Serial.print(real_drive_kb); Serial.println(" Kilobytes."); Serial.print("You are missing "); Serial.print(drive_kb - real_drive_kb); Serial.println(" Kilobytes!"); } void loop() // run over and over again { }
- 24. Serial Communication (UART communication)
- 25. Serial Communication (UART communication) //Transmitter and Recevier int button = 7; int LED = 8; char message; // message character void setup() { Serial.begin(9600); // start communication pinMode(button, INPUT); // input button 1 pinMode(LED, OUTPUT); // input button 2 } void loop() { digitalWrite(LED,LOW); if (Serial.available()) // while message received { message = Serial.read(); // read message if (message == '1') // if the message contain character one { digitalWrite(LED, HIGH); // switch led one ON } } if (digitalRead(button)==HIGH) // while button is pushed { Serial.write('1'); // send this Character } delay(20); // delay before sending next message }
- 28. I2C Communication // Master Code #include <wire.h> int x = 0; void setup() { // Start the I2C Bus as Master Wire.begin(); } void loop() { Wire.beginTransmission(9); // transmit to device #9 Wire.write(x); // sends x Wire.endTransmission(); // stop transmitting x++; // Increment x if (x > 5) x = 0; // `reset x once it gets 6 delay(500); }
- 29. I2C Communication // Slave Code #include <Wire.h> int LED = 13; int x = 0; void setup() { pinMode (LED, OUTPUT); // Define the LED pin as Output Wire.begin(9); // Start the I2C Bus as Slave on address 9 // Attach a function to trigger when something is received. Wire.onReceive(receiveEvent); } void receiveEvent(int bytes) { x = Wire.read(); // read one character from the I2C } void loop() { if (x == '0') { //If value received is 0 blink LED for 200 ms digitalWrite(LED, HIGH); delay(200); digitalWrite(LED, LOW); delay(200); } //If value received is 3 blink LED for 400 ms if (x == '3') { digitalWrite(LED, HIGH); delay(400); digitalWrite(LED, LOW); delay(400); } }
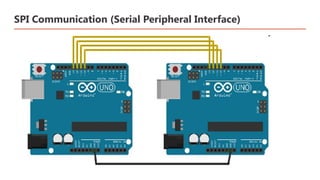
- 30. SPI Communication (Serial Peripheral Interface)
- 31. SPI Communication (Serial Peripheral Interface)
- 32. SPI Communication (Serial Peripheral Interface) // Master Code #include <SPI.h> void setup (void) { Serial.begin(115200); //set baud rate to 115200 for usart digitalWrite(SS, HIGH); // disable Slave Select SPI.begin (); SPI.setClockDivider(SPI_CLOCK_DIV8);//divide the clock by 8 } void loop (void) { char c; digitalWrite(SS, LOW); // enable Slave Select // send test string for (const char * p = "Hello, world!r" ; c = *p; p++) { SPI.transfer (c); Serial.print(c); } digitalWrite(SS, HIGH); // disable Slave Select delay(2000); }
- 33. SPI Communication (Serial Peripheral Interface) // Slave Code #include <SPI.h> char buff [50]; volatile byte indx; volatile boolean process; void setup (void) { Serial.begin (115200); pinMode(MISO, OUTPUT); // have to send on master in so it set as output SPCR |= _BV(SPE); // turn on SPI in slave mode indx = 0; // buffer empty process = false; SPI.attachInterrupt(); // turn on interrupt } ISR (SPI_STC_vect) // SPI interrupt routine { byte c = SPDR; // read byte from SPI Data Register if (indx < sizeof buff) { buff [indx++] = c; // save data in the next index in the array buff if (c == 'r') //check for the end of the word process = true;
- 34. SPI Communication (Serial Peripheral Interface) } } void loop (void) { if (process) { process = false; //reset the process Serial.println (buff); //print the array on serial monitor indx= 0; //reset button to zero } }
- 35. Some Arduino Projects 1) Arduino-based Home Automation System 2) Smart Irrigation Project 3) Human Following Robot 4) Fire Fighter Robot 5) Medicine Reminder using Arduino 6) Arduino-based Weather Station 7) Digital Thermometer using Arduino 8) Arduino-based Security System 9) LED Light Device using Arduino 10) Soil Moisture Monitoring Arduino 1. Automation Systems using Arduino 2. Arduino-based Clock with Alaram 3. Door Lock System with Arduino 4. Arduino Nano BLE 33 Sense Game Controller 5. Color Detection using TCS-3200 and LCD Display 6. Touch Dimmer circuit 7. Precise Motor speed measurement 8. Gas Detector Arduino project 9. Security System using Ultrasonic Sensor 10.Water flow and volume measurement