


![Code
The code below uses an extra file, pitches.h. This file contains all the pitch values for typical notes. For
example, NOTE_C4 is middle C. NOTE_FS4 is F sharp, and so forth. This note table was originally
written by Brett Hagman, on whose work the tone() command was based. You may find it useful for
whenever you want to make musical notes.
The main sketch is as follows:
/*
Melody
Plays a melody
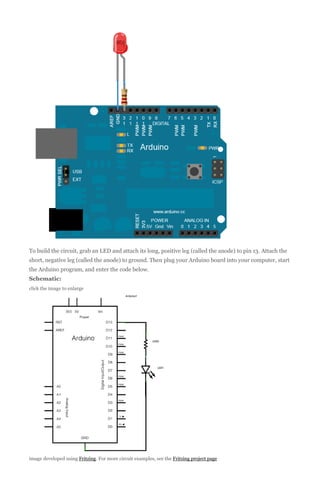
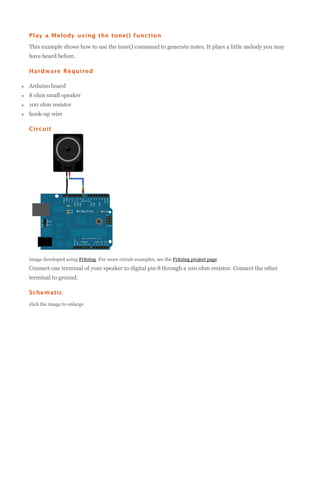
circuit:
* 8-ohm speaker on digital pin 8
created 21 Jan 2010
modified 30 Aug 2011
by Tom Igoe
This example code is in the public domain.
http://arduino.cc/en/Tutorial/Tone
*/
#include "pitches.h"
// notes in the melody:
int melody[] = {
NOTE_C4, NOTE_G3,NOTE_G3, NOTE_A3, NOTE_G3,0, NOTE_B3, NOTE_C4};
// note durations: 4 = quarter note, 8 = eighth note, etc.:
int noteDurations[] = {
4, 8, 8, 4,4,4,4,4 };
void setup() {
// iterate over the notes of the melody:
for (int thisNote = 0; thisNote < 8; thisNote++) {
// to calculate the note duration, take one second
// divided by the note type.
//e.g. quarter note = 1000 / 4, eighth note = 1000/8, etc.
int noteDuration = 1000/noteDurations[thisNote];
tone(8, melody[thisNote],noteDuration);](https://image.slidesharecdn.com/whatisarduino-140128055527-phpapp02/85/What-is-arduino-33-320.jpg)
![// to distinguish the notes, set a minimum time between them.
// the note's duration + 30% seems to work well:
int pauseBetweenNotes = noteDuration * 1.30;
delay(pauseBetweenNotes);
// stop the tone playing:
noTone(8);
}
}
void loop() {
// no need to repeat the melody.
}
[Get Code]
To make the pitches.h file, click on the "new Tab" button in the upper right hand corner of the window. It
looks like this:
The paste in the following code:
/*************************************************
* Public Constants
*************************************************/
#define
#define
#define
#define
#define
#define
#define
#define
#define
#define
#define
#define
#define
#define
#define
#define
#define
#define
#define
#define
#define
#define
#define
#define
#define
#define
#define
#define
#define
#define
#define
#define
#define
#define
#define
#define
#define
#define
#define
#define
#define
#define
#define
#define
#define
#define
#define
#define
#define
#define
#define
#define
#define
#define
NOTE_B0
NOTE_C1
NOTE_CS1
NOTE_D1
NOTE_DS1
NOTE_E1
NOTE_F1
NOTE_FS1
NOTE_G1
NOTE_GS1
NOTE_A1
NOTE_AS1
NOTE_B1
NOTE_C2
NOTE_CS2
NOTE_D2
NOTE_DS2
NOTE_E2
NOTE_F2
NOTE_FS2
NOTE_G2
NOTE_GS2
NOTE_A2
NOTE_AS2
NOTE_B2
NOTE_C3
NOTE_CS3
NOTE_D3
NOTE_DS3
NOTE_E3
NOTE_F3
NOTE_FS3
NOTE_G3
NOTE_GS3
NOTE_A3
NOTE_AS3
NOTE_B3
NOTE_C4
NOTE_CS4
NOTE_D4
NOTE_DS4
NOTE_E4
NOTE_F4
NOTE_FS4
NOTE_G4
NOTE_GS4
NOTE_A4
NOTE_AS4
NOTE_B4
NOTE_C5
NOTE_CS5
NOTE_D5
NOTE_DS5
NOTE_E5
31
33
35
37
39
41
44
46
49
52
55
58
62
65
69
73
78
82
87
93
98
104
110
117
123
131
139
147
156
165
175
185
196
208
220
233
247
262
277
294
311
330
349
370
392
415
440
466
494
523
554
587
622
659](https://image.slidesharecdn.com/whatisarduino-140128055527-phpapp02/85/What-is-arduino-34-320.jpg)


![Code
The sketch below reads three analog sensors. Each corresponds to a note value in an array of notes. IF
any of the sensors is above a given threshold, the corresponding note is played.
Here's the main sketch:
/*
keyboard
Plays a pitch that changes based on a changing analog input
circuit:
* 3 force-sensing resistors from +5V to analog in 0 through 5
* 3 10K resistors from analog in 0 through 5 to ground
* 8-ohm speaker on digital pin 8
created 21 Jan 2010
modified 9 Apr 2012
by Tom Igoe
This example code is in the public domain.
http://arduino.cc/en/Tutorial/Tone3
*/
#include "pitches.h"
const int threshold = 10;
// minimum reading of the sensors that generates a note
// notes to play, corresponding to the 3 sensors:
int notes[] = {
NOTE_A4, NOTE_B4,NOTE_C3 };
void setup() {
}
void loop() {
for (int thisSensor = 0; thisSensor < 3; thisSensor++) {
// get a sensor reading:](https://image.slidesharecdn.com/whatisarduino-140128055527-phpapp02/85/What-is-arduino-39-320.jpg)
![int sensorReading = analogRead(thisSensor);
// if the sensor is pressed hard enough:
if (sensorReading > threshold) {
// play the note corresponding to this sensor:
tone(8, notes[thisSensor], 20);
}
}
}
[Get Code]
The sketch uses an extra file, pitches.h. This file contains all the pitch values for typical notes. For
example, NOTE_C4 is middle C. NOTE_FS4 is F sharp, and so forth. This note table was originally
written by Brett Hagman, on whose work the tone() command was based. You may find it useful for
whenever you want to make musical notes.
To make this file, click on the "new Tab" button in the upper right hand corner of the window. It looks
like this:
The paste in the following code:
/*************************************************
* Public Constants
*************************************************/
#define
#define
#define
#define
#define
#define
#define
#define
#define
#define
#define
#define
#define
#define
#define
#define
#define
#define
#define
#define
#define
#define
#define
#define
#define
#define
#define
#define
#define
#define
#define
#define
#define
#define
#define
#define
#define
#define
#define
#define
#define
#define
#define
#define
#define
#define
#define
#define
#define
#define
#define
NOTE_B0
NOTE_C1
NOTE_CS1
NOTE_D1
NOTE_DS1
NOTE_E1
NOTE_F1
NOTE_FS1
NOTE_G1
NOTE_GS1
NOTE_A1
NOTE_AS1
NOTE_B1
NOTE_C2
NOTE_CS2
NOTE_D2
NOTE_DS2
NOTE_E2
NOTE_F2
NOTE_FS2
NOTE_G2
NOTE_GS2
NOTE_A2
NOTE_AS2
NOTE_B2
NOTE_C3
NOTE_CS3
NOTE_D3
NOTE_DS3
NOTE_E3
NOTE_F3
NOTE_FS3
NOTE_G3
NOTE_GS3
NOTE_A3
NOTE_AS3
NOTE_B3
NOTE_C4
NOTE_CS4
NOTE_D4
NOTE_DS4
NOTE_E4
NOTE_F4
NOTE_FS4
NOTE_G4
NOTE_GS4
NOTE_A4
NOTE_AS4
NOTE_B4
NOTE_C5
NOTE_CS5
31
33
35
37
39
41
44
46
49
52
55
58
62
65
69
73
78
82
87
93
98
104
110
117
123
131
139
147
156
165
175
185
196
208
220
233
247
262
277
294
311
330
349
370
392
415
440
466
494
523
554](https://image.slidesharecdn.com/whatisarduino-140128055527-phpapp02/85/What-is-arduino-40-320.jpg)


![Next, in the main loop of the code, sensorValue is assigned to store the raw analog value coming in from
the potentiometer. Because the Arduino has an analogRead resolution of 0-1023, and
an analogWrite resolution of only 0-255, this raw data from the potentiometer needs to be scaled before
using it to dim the LED.
In order to scale this value, use a function called map()
outputValue = map(sensorValue, 0, 1023, 0, 255);
[Get Code]
outputValue
is assigned to equal the scaled value from the potentiometer. map() accepts five arguments:
The value to be mapped, the low range and high range of the raw data, and the low and high values for
that data to be scaled too. In this case, the sensor data is mapped down from its original range of 0 to
1023 to 0 to 255.
The newly mapped sensor data is then output to the analogOutPin dimming or brightening the LED as the
potentiometer is turned. Finally, both the raw and scaled sensor values are sent to the Arduino serial
window in a steady stream of data.
/*
Analog input, analog output, serial output
Reads an analog input pin, maps the result to a range from 0 to 255
and uses the result to set the pulsewidth modulation (PWM) of an output pin.
Also prints the results to the serial monitor.
The circuit:
* potentiometer connected to analog pin 0.
Center pin of the potentiometer goes to the analog pin.
side pins of the potentiometer go to +5V and ground
* LED connected from digital pin 9 to ground
created 29 Dec. 2008
modified 9 Apr 2012
by Tom Igoe
This example code is in the public domain.
*/
// These constants won't change. They're used to give names
// to the pins used:
const int analogInPin = A0; // Analog input pin that the potentiometer is attached to
const int analogOutPin = 9; // Analog output pin that the LED is attached to
int sensorValue = 0;
int outputValue = 0;
// value read from the pot
// value output to the PWM (analog out)
void setup() {
// initialize serial communications at 9600 bps:
Serial.begin(9600);
}
void loop() {
// read the analog in value:
sensorValue = analogRead(analogInPin);
// map it to the range of the analog out:
outputValue = map(sensorValue, 0, 1023, 0, 255);
// change the analog out value:
analogWrite(analogOutPin, outputValue);
// print the results to the serial monitor:
Serial.print("sensor = " );
Serial.print(sensorValue);
Serial.print("t output = ");
Serial.println(outputValue);
// wait 2 milliseconds before the next loop
// for the analog-to-digital converter to settle
// after the last reading:
delay(2);
}](https://image.slidesharecdn.com/whatisarduino-140128055527-phpapp02/85/What-is-arduino-45-320.jpg)


![Code
In the setup() function of the code below, a for() loop is used to assign digital pins 2-13 of the Mega as
outputs.
Next, in the loop() function of the program below, a trio of nested for() loops are used.
The first of these loops,
for (int thisPin =lowestPin; thisPin <= highestPin; thisPin++)
[Get Code]
moves through each of the LEDS one by one, from the lowest pin to the highest. Before this loop is
allowed to move from one pin to the next, two things must be accomplished. First, you brighten the
individual LED through these lines of code:
for (int brightness = 0; brightness < 255; brightness++) {
analogWrite(thisPin, brightness);
delay(2);
}
[Get Code]
With each pass through the loop above, the variable brightness increases by one point, and that value is
written to the pin currently selected to the main loop. One that pin reaches the maximum PWM value
(255), the following loop kicks in:
for (int brightness = 255; brightness >= 0; brightness--) {
analogWrite(thisPin, brightness);
delay(2);
}
[Get Code]
This loop subtracts a point from the brightness variable, dimming the LED back down to 0. Once zero is
reached, the mainfor() loop kicks in, and the program moves on to the next LED pin, repeating all the
steps mentioned above.
/*
Mega analogWrite() test
This sketch fades LEDs up and down one at a time on digital pins 2 through 13.
This sketch was written for the Arduino Mega, and will not work on previous boards.
The circuit:
* LEDs attached from pins 2 through 13 to ground.
created 8 Feb 2009
by Tom Igoe
This example code is in the public domain.
*/
// These constants won't change.
// to the pins used:
const int lowestPin = 2;
const int highestPin = 13;
They're used to give names
void setup() {
// set pins 2 through 13 as outputs:
for (int thisPin =lowestPin; thisPin <= highestPin; thisPin++) {
pinMode(thisPin, OUTPUT);
}
}
void loop() {
// iterate over the pins:
for (int thisPin =lowestPin; thisPin <= highestPin; thisPin++) {
// fade the LED on thisPin from off to brightest:
for (int brightness = 0; brightness < 255; brightness++) {
analogWrite(thisPin, brightness);
delay(2);
}
// fade the LED on thisPin from brithstest to off:
for (int brightness = 255; brightness >= 0; brightness--) {
analogWrite(thisPin, brightness);
delay(2);
}](https://image.slidesharecdn.com/whatisarduino-140128055527-phpapp02/85/What-is-arduino-50-320.jpg)

![Code
Before the setup, you set initial values for the minimum and maximum like so:
int sensorMin = 1023;
int sensorMax = 0;
// minimum sensor value
// maximum sensor value
[Get Code]
These may seem backwards. Initially, you set the minimum high and read for anything lower than that,
saving it as the new minimum. Likewise, you set the maximum low and read for anything higher as the
new maximum, like so:
// calibrate during the first five seconds
while (millis() < 5000) {
sensorValue = analogRead(sensorPin);
// record the maximum sensor value
if (sensorValue > sensorMax) {
sensorMax = sensorValue;
}
// record the minimum sensor value
if (sensorValue < sensorMin) {
sensorMin = sensorValue;
}
}
[Get Code]
This way, any further readings you take can be mapped to the range between this minimum and
maximum like so:
// apply the calibration to the sensor reading
sensorValue = map(sensorValue, sensorMin, sensorMax, 0, 255);
[Get Code]
Here's the whole program:
/*
Calibration
Demonstrates one technique for calibrating sensor input. The
sensor readings during the first five seconds of the sketch
execution define the minimum and maximum of expected values](https://image.slidesharecdn.com/whatisarduino-140128055527-phpapp02/85/What-is-arduino-52-320.jpg)


![Code
The code below sequentially stores 10 readings from your analog sensor into an arrays, one by one. With
each new value, the sum of all the numbers is generated and divided, producing an average value which
then be used to smooth outlying data. Because this averaging takes place each time a new value is added
to the array (rather then waiting for 10 new values, for instance) there is no lag time in calculating this
running average.
Altering the size of the array used, by changing numReadings to a larger value will smooth the data collected
even further.
/*
Smoothing
Reads repeatedly from an analog input, calculating a running average
and printing it to the computer. Keeps ten readings in an array and
continually averages them.
The circuit:
* Analog sensor (potentiometer will do) attached to analog input 0
Created 22 April 2007
By David A. Mellis <dam@mellis.org>
modified 9 Apr 2012
by Tom Igoe
http://www.arduino.cc/en/Tutorial/Smoothing
This example code is in the public domain.
*/
// Define the number of samples to keep track of. The higher the number,
// the more the readings will be smoothed, but the slower the output will
// respond to the input. Using a constant rather than a normal variable lets
// use this value to determine the size of the readings array.
const int numReadings = 10;
int readings[numReadings];
// the readings from the analog input](https://image.slidesharecdn.com/whatisarduino-140128055527-phpapp02/85/What-is-arduino-57-320.jpg)
![int index = 0;
int total = 0;
int average = 0;
// the index of the current reading
// the running total
// the average
int inputPin = A0;
void setup()
{
// initialize serial communication with computer:
Serial.begin(9600);
// initialize all the readings to 0:
for (int thisReading = 0; thisReading < numReadings; thisReading++)
readings[thisReading] = 0;
}
void loop() {
// subtract the last reading:
total= total - readings[index];
// read from the sensor:
readings[index] = analogRead(inputPin);
// add the reading to the total:
total= total + readings[index];
// advance to the next position in the array:
index = index + 1;
// if we're at the end of the array...
if (index >= numReadings)
// ...wrap around to the beginning:
index = 0;
// calculate the average:
average = total / numReadings;
// send it to the computer as ASCII digits
Serial.println(average);
delay(1);
// delay in between reads for stability
}
4.Communication
Read ASCII String
Read ASCII String
This sketch uses the Serial.parseInt() function to locate values separated by a non-alphanumeric
character. Often people use a comma to indicate different pieces of information (this format is commonly
referred to as comma-separated-values), but other characters like a space or a period will work too.](https://image.slidesharecdn.com/whatisarduino-140128055527-phpapp02/85/What-is-arduino-58-320.jpg)


![// so no modifier is needed:
Serial.print(thisByte);
// But you can declare the modifier for decimal if you want to.
//this also works if you uncomment it:
// Serial.print(thisByte, DEC);
Serial.print(", hex: ");
// prints value as string in hexadecimal (base 16):
Serial.print(thisByte, HEX);
Serial.print(", oct: ");
// prints value as string in octal (base 8);
Serial.print(thisByte, OCT);
Serial.print(", bin: ");
// prints value as string in binary (base 2)
// also prints ending line break:
Serial.println(thisByte, BIN);
// if printed last visible character '~' or 126, stop:
if(thisByte == 126) {
// you could also use if (thisByte == '~') {
// This loop loops forever and does nothing
while(true) {
continue;
}
}
// go on to the next character
thisByte++;
}
[Get Code]
Output
ASCII Table ~ Character Map
!, dec: 33, hex: 21, oct: 41, bin
4, decúASCII Table ~ Character Map
!, dec: 33, hex: 21, oct: 41, bin: 100001
", dec: 34, hex: 22, oct: 42, bin: 100010
#, dec: 35, hex: 23, oct: 43, bin: 100011
$, dec: 36, hex: 24, oct: 44, bin: 100100
%, dec: 37, hex: 25, oct: 45, bin: 100101
&, dec: 38, hex: 26, oct: 46, bin: 100110
', dec: 39, hex: 27, oct: 47, bin: 100111
(, dec: 40, hex: 28, oct: 50, bin: 101000
), dec: 41, hex: 29, oct: 51, bin: 101001
*, dec: 42, hex: 2A, oct: 52, bin: 101010
+, dec: 43, hex: 2B, oct: 53, bin: 101011
,, dec: 44, hex: 2C, oct: 54, bin: 101100
-, dec: 45, hex: 2D, oct: 55, bin: 101101
., dec: 46, hex: 2E, oct: 56, bin: 101110
/, dec: 47, hex: 2F, oct: 57, bin: 101111
0, dec: 48, hex: 30, oct: 60, bin: 110000
1, dec: 49, hex: 31, oct: 61, bin: 110001
2, dec: 50, hex: 32, oct: 62, bin: 110010
3, dec: 51, hex: 33, oct: 63, bin: 110011
4, dec: 52, hex: 34, oct: 64, bin: 110100
5, dec: 53, hex: 35, oct: 65, bin: 110101
6, dec: 54, hex: 36, oct: 66, bin: 110110
7, dec: 55, hex: 37, oct: 67, bin: 110111
8, dec: 56, hex: 38, oct: 70, bin: 111000
9, dec: 57, hex: 39, oct: 71, bin: 111001
:, dec: 58, hex: 3A, oct: 72, bin: 111010
;, dec: 59, hex: 3B, oct: 73, bin: 111011
<, dec: 60, hex: 3C, oct: 74, bin: 111100
=, dec: 61, hex: 3D, oct: 75, bin: 111101
>, dec: 62, hex: 3E, oct: 76, bin: 111110
?, dec: 63, hex: 3F, oct: 77, bin: 111111
@, dec: 64, hex: 40, oct: 100, bin: 1000000
A, dec: 65, hex: 41, oct: 101, bin: 1000001
B, dec: 66, hex: 42, oct: 102, bin: 1000010
C, dec: 67, hex: 43, oct: 103, bin: 1000011
D, dec: 68, hex: 44, oct: 104, bin: 1000100
E, dec: 69, hex: 45, oct: 105, bin: 1000101
...](https://image.slidesharecdn.com/whatisarduino-140128055527-phpapp02/85/What-is-arduino-63-320.jpg)


![// by David A. Mellis
//This example code is in the public domain.
import processing.serial.*;
Serial port;
void setup() {
size(256, 150);
println("Available serial ports:");
println(Serial.list());
// Uses the first port in this list (number 0). Change this to
// select the port corresponding to your Arduino board. The last
// parameter (e.g. 9600) is the speed of the communication. It
// has to correspond to the value passed to Serial.begin() in your
// Arduino sketch.
port = new Serial(this, Serial.list()[0], 9600);
// If you know the name of the port used by the Arduino board, you
// can specify it directly like this.
//port = new Serial(this, "COM1", 9600);
}
void draw() {
// draw a gradient from black to white
for (int i = 0; i < 256; i++) {
stroke(i);
line(i, 0, i, 150);
}
// write the current X-position of the mouse to the serial port as
// a single byte
port.write(mouseX);
}
*/
/* Max/MSP v5 patch for this example
----------begin_max5_patcher---------1008.3ocuXszaiaCD9r8uhA5rqAeHIa0aAMaAVf1S6hdoYQAsDiL6JQZHQ2M
YWr+2KeX4vjnjXKKkKhhiGQ9MeyCNz+X9rnMp63sQvuB+MLa1OlOalSjUvrC
ymEUytKuh05TKJWUWyk5nE9eSyuS6jesvHu4F4MxOuUzB6X57sPKWVzBLXiP
xZtGj6q2vafaaT0.BzJfjj.p8ZPukazsQvpfcpFs8mXR3plh8BoBxURIOWyK
rxspZ0YI.eTCEh5Vqp+wGtFXZMKe6CZc3yWZwTdCmYW.BBkdiby8v0r+ST.W
sD9SdUkn8FYspPbqvnBNFtZWiUyLmleJWo0vuKzeuj2vpJLaWA7YiE7wREui
FpDFDp1KcbAFcP5sJoVxp4NB5Jq40ougIDxJt1wo3GDZHiNocKhiIExx+owv
AdOEAksDs.RRrOoww1Arc.9RvN2J9tamwjkcqknvAE0l+8WnjHqreNet8whK
z6mukIK4d+Xknv3jstvJs8EirMMhxsZIusET25jXbX8xczIl5xPVxhPcTGFu
xNDu9rXtUCg37g9Q8Yc+EuofIYmg8QdkPCrOnXsaHwYs3rWx9PGsO+pqueG2
uNQBqWFh1X7qQG+3.VHcHrfO1nyR2TlqpTM9MDsLKNCQVz6KO.+Sfc5j1Ykj
jzkn2jwNDRP7LVb3d9LtoWBAOnvB92Le6yRmZ4UF7YpQhiFi7A5Ka8zXhKdA
4r9TRGG7V4COiSbAJKdXrWNhhF0hNUh7uBa4Mba0l7JUK+omjDMwkSn95Izr
TOwkdp7W.oPRmNRQsiKeu4j3CkfVgt.NYPEYqMGvvJ48vIlPiyzrIuZskWIS
xGJPcmPiWOfLodybH3wjPbMYwlbFIMNHPHFOtLBNaLSa9sGk1TxMzCX5KTa6
WIH2ocxSdngM0QPqFRxyPHFsprrhGc9Gy9xoBjz0NWdR2yW9DUa2F85jG2v9
FgTO4Q8qiC7fzzQNpmNpsY3BrYPVJBMJQ1uVmoItRhw9NrVGO3NMNzYZ+zS7
3WTvTOnUydG5kHMKLqAOjTe7fN2bGSxOZDkMrBrGQ9J1gONBEy0k4gVo8qHc
cxmfxVihWz6a3yqY9NazzUYkua9UnynadOtogW.JfsVGRVNEbWF8I+eHtcwJ
+wLXqZeSdWLo+FQF6731Tva0BISKTx.cLwmgJsUTTvkg1YsnXmxDge.CDR7x
D6YmX6fMznaF7kdczmJXwm.XSOOrdoHhNA7GMiZYLZZR.+4lconMaJP6JOZ8
ftCs1YWHZI3o.sIXezX5ihMSuXzZtk3ai1mXRSczoCS32hAydeyXNEu5SHyS
xqZqbd3ZLdera1iPqYxOm++v7SUSz
-----------end_max5_patcher----------*/
[Get Code]
Processing Code
The Processing sketch in the code sample above will send bytes out the serial port to the Arduino to dim
the LED.
Max code
The Max/MSP patch in the code sample above looks like the image below. Copy it and paste it into a new
patch window.](https://image.slidesharecdn.com/whatisarduino-140128055527-phpapp02/85/What-is-arduino-66-320.jpg)


![// Graphing sketch
// This program takes ASCII-encoded strings
// from the serial port at 9600 baud and graphs them. It expects values in the
// range 0 to 1023, followed by a newline, or newline and carriage return
//
//
//
//
Created 20 Apr 2005
Updated 18 Jan 2008
by Tom Igoe
This example code is in the public domain.
import processing.serial.*;
Serial myPort;
int xPos = 1;
// The serial port
// horizontal position of the graph
void setup () {
// set the window size:
size(400, 300);
// List all the available serial ports
println(Serial.list());
// I know that the first port in the serial list on my mac
// is always my Arduino, so I open Serial.list()[0].
// Open whatever port is the one you're using.
myPort = new Serial(this, Serial.list()[0], 9600);
// don't generate a serialEvent() unless you get a newline character:
myPort.bufferUntil('n');
// set inital background:
background(0);
}
void draw () {
// everything happens in the serialEvent()
}
void serialEvent (Serial myPort) {
// get the ASCII string:
String inString = myPort.readStringUntil('n');
if (inString != null) {
// trim off any whitespace:
inString = trim(inString);
// convert to an int and map to the screen height:
float inByte = float(inString);
inByte = map(inByte, 0, 1023, 0, height);
// draw the line:
stroke(127,34,255);
line(xPos, height, xPos, height - inByte);
// at the edge of the screen, go back to the beginning:
if (xPos >= width) {
xPos = 0;
background(0);
}
else {
// increment the horizontal position:
xPos++;
}
}
}
*/
/* Max/MSP v5 patch for this example
----------begin_max5_patcher---------1591.3oc0YszbaaCD9r7uBL5RalQUAO3CvdyS5zVenWZxs5NcfHgjPCIfJIT
RTxj+6AOHkoTDooroUs0AQPR73a+1cwtK3WtZxzEpOwqlB9YveAlL4KWMYh6
Q1GLo99ISKXeJMmU451zTUQAWpmNy+NM+SZ2y+sR1l02JuU9t0hJvFlNcMPy
dOuBv.U5Rgb0LPpRpYBooM3529latArTUVvzZdFPtsXAuDrrTU.f.sBffXxL
vGE50lIHkUVJXq3fRtdaoDvjYfbgjujaFJSCzq4.tLaN.bi1tJefWpqbO0uz
1IjIABoluxrJ1guxh2JfPO2B5zRNyBCLDFcqbwNvuv9fHCb8bvevyyEU2JKT
YhkBSWPAfq2TZ6YhqmuMUo0feUn+rYpY4YtY+cFw3lUJdCMYAapZqzwUHX8S
crjAd+SIOU6UBAwIygy.Q1+HAA1KH6EveWOFQlitUK92ehfal9kFhUxJ3tWc
sgpxadigWExbt1o7Ps5dk3yttivyg20W0VcSmg1G90qtx92rAZbH4ez.ruy1
nhmaDPidE07J+5n2sg6E6oKXxUSmc20o6E3SPRDbrkXnPGUYE.i5nCNB9TxQ
jG.G0kCTZtH88f07Rt0ZMMWUw8VvbKVAaTk6GyoraPdZff7rQTejBN54lgyv](https://image.slidesharecdn.com/whatisarduino-140128055527-phpapp02/85/What-is-arduino-70-320.jpg)
![HE0Ft7AvIvvgvIwO23jBdUkYOuSvIFSiNcjFhiSsUBwsUCh1AgfNSBAeNDBZ
DIDqY.f8.YjfjV1HAn9XDTxyNFYatVTkKx3kcK9GraZpI5jv7GOx+Z37Xh82
LSKHIDmDXaESoXRngIZQDKVkpxUkMCyXCQhcCK1z.G457gi3TzMz4RFD515F
G3bIQQwcP3SOF0zlkGhiCBQ1kOHHFFlXaEBQIQnCwv9QF1LxPZ.A4jR5cyQs
vbvHMJsLll01We+rE2LazX6zYmCraRrsPFwKg1ANBZFY.IAihr8Ox.aH0oAL
hB8nQVw0FSJiZeunOykbT6t3r.NP8.iL+bnwNiXuVMNJH9H9YCm89CFXPBER
bz422p8.O4dg6kRxdyjDqRwMIHTbT3QFLskxJ8tbmQK4tm0XGeZWF7wKKtYY
aTAF.XPNFaaQBinQMJ4QLF0aNHF0JtYuHSxoUZfZY6.UU2ejJTb8lQw8Fo5k
Rv6e2PI+fOM71o2ecY1VgTYdCSxxUqLokuYq9jYJi6lxPgD2NIPePLB0mwbG
YA9Rgxdiu1k5xiLlSU6JVnx6wzg3sYHwTesB8Z5D7RiGZpXyvDNJY.DQX3.H
hvmcUN4bP1yCkhpTle2P37jtBsKrLWcMScEmltOPv22ZfAqQAdKr9HzATQwZ
q18PrUGt6Tst2XMCRUfGuhXs6ccn23YloomMqcTiC5iMGPsHsHRWhWFlaenV
XcqwgCQiGGJzptyS2ZMODBz6fGza0bzmXBj7+DA94bvpR01MffAlueO7HwcI
pWCwmzJdvi9ILgflLAFmyXB6O7ML0YbD26lenmcGxjVsZUN+A6pUK7AtTrPg
M+eRYG0qD9j4I7eEbco8Xh6WcO.or9XDC6UCiewbXHkh6xm5LiPEkzpJDRTu
mEB44Fgz4NCtJvX.SM1vo2SlTCZGAe7GZu6ahdRyzFOhYZ+mbVVSYptBw.K1
tboIkatIA7c1cTKD1u.honLYV04VkluHsXe0szv9pQCE9Ro3jaVB1o15pz2X
zYoBvO5KXCAe0LCYJybE8ZODf4fV8t9qW0zYxq.YJfTosj1bv0xc.SaC0+AV
9V9L.KKyV3SyTcRtmzi6rO.O16USvts4B5xe9EymDvebK0eMfW6+NIsNlE2m
eqRyJ0utRq13+RjmqYKN1e.4d61jjdsauXe3.2p6jgi9hsNIv97CoyJ01xzl
c3ZhUCtSHx3UZgjoEJYqNY+hYs5zZQVFW19L3JDYaTlMLqAAt1G2yXlnFg9a
53L1FJVcv.cOX0dh7mCVGCLce7GFcQwDdH5Ta3nyAS0pQbHxegr+tGIZORgM
RnMj5vGl1Fs16drnk7Tf1XOLgv1n0d2iEsCxR.eQsNOZ4FGF7whofgfI3kES
1kCeOX5L2rifbdu0A9ae2X.V33B1Z+.Bj1FrP5iFrCYCG5EUWSG.hhunHJd.
HJ5hhnng3h9HPj4lud02.1bxGw.
-----------end_max5_patcher----------*/
[Get Code]
Processing Sketch
Using the Processing sketch in the code sample above, you'll get a graph of the sensor's value. As you
change the value of the analog sensor, you'll get a graph something like this:
Max Code
The max patch looks like this. The text of the patch is in the code sample above. Copy the text and paste
it into a new Max window to see the sketch.](https://image.slidesharecdn.com/whatisarduino-140128055527-phpapp02/85/What-is-arduino-71-320.jpg)


![}
}
}
/* Processing code for this example
// mouseover serial
// Demonstrates how to send data to the Arduino I/O board, in order to
// turn ON a light if the mouse is over a square and turn it off
// if the mouse is not.
//
//
//
//
//
created 2003-4
based on examples by Casey Reas and Hernando Barragan
modified 30 Aug 2011
by Tom Igoe
This example code is in the public domain.
import processing.serial.*;
float boxX;
float boxY;
int boxSize = 20;
boolean mouseOverBox = false;
Serial port;
void setup() {
size(200, 200);
boxX = width/2.0;
boxY = height/2.0;
rectMode(RADIUS);
// List all the available serial ports in the output pane.
// You will need to choose the port that the Arduino board is
// connected to from this list. The first port in the list is
// port #0 and the third port in the list is port #2.
println(Serial.list());
// Open the port that the Arduino board is connected to (in this case #0)
// Make sure to open the port at the same speed Arduino is using (9600bps)
port = new Serial(this, Serial.list()[0], 9600);
}
void draw()
{
background(0);
// Test if the cursor is over the box
if (mouseX > boxX-boxSize && mouseX < boxX+boxSize &&
mouseY > boxY-boxSize && mouseY < boxY+boxSize) {
mouseOverBox = true;
// draw a line around the box and change its color:
stroke(255);
fill(153);
// send an 'H' to indicate mouse is over square:
port.write('H');
}
else {
// return the box to it's inactive state:
stroke(153);
fill(153);
// send an 'L' to turn the LED off:
port.write('L');
mouseOverBox = false;
}
// Draw the box
rect(boxX, boxY, boxSize, boxSize);
}
*/
/*
Max/MSP version 5 patch to run with this example:](https://image.slidesharecdn.com/whatisarduino-140128055527-phpapp02/85/What-is-arduino-75-320.jpg)
![----------begin_max5_patcher---------1672.3oc2ZszaaiCD9ryuBBebQVCQRYao8xhf1cQCPVfBzh8RRQ.sDsM2HSZ
HQmlzh9eu7gjsjsEk7y0oWjiHoHm4aluYHGlueUmtiDuPy5B9Cv8fNc99Uc5
XZR2Pm726zcF4knDRlYXciDylQ4xtWa6SReQZZ+iSeMiEQR.ej8BM4A9C7OO
kkAlSjQSAYTdbFfvA27o2c6sfO.Doqd6NfXgDHmRUCKkolg4hT06BfbQJGH3
5Qd2e8d.QJIQSow5tzebZ7BFW.FIHow8.2JAQpVIIYByxo9KIMkSjL9D0BRT
sbGHZJIkDoZOSMuQT.8YZ5qpgGI3locF4IpQRzq2nDF+odZMIJkRjpEF44M3
A9nWAum7LKFbSOv+PSRXYOvmIhYiYpg.8A2LOUOxPyH+TjPJA+MS9sIzTRRr
QP9rXF31IBZAHpVHkHrfaPRHLuUCzoj9GSoQRqIB52y6Z.tu8o4EX+fddfuj
+MrXiwPL5+9cXwrOVvkbxLpomazHbQO7EyX7DpzXYgkFdF6algCQpkX4XUlo
hA6oa7GWck9w0Gnmy6RXQOoQeCfWwlzsdnHLTq8n9PCHLv7Cxa6PAN3RCKjh
ISRVZ+sSl704Tqt0kocE9R8J+P+RJOZ4ysp6gN0vppBbOTEN8qp0YCq5bq47
PUwfA5e766z7NbGMuncw7VgNRSyQhbnPMGrDsGaFSvKM5NcWoIVdZn44.eOi
9DTRUT.7jDQzSTiF4UzXLc7tLGh4T9pwaFQkGUGIiOOkpBSJUwGsBd40krHQ
9XEvwq2V6eLIhV6GuzP7uzzXBmzsXPSRYwBtVLp7s5lKVv6UN2VW7xRtYDbx
7s7wRgHYDI8YVFaTBshkP49R3rYpH3RlUhTQmK5jMadJyF3cYaTNQMGSyhRE
IIUlJaOOukdhoOyhnekEKmZlqU3UkLrk7bpPrpztKBVUR1uorLddk6xIOqNt
lBOroRrNVFJGLrDxudpET4kzkstNp2lzuUHVMgk5TDZx9GWumnoQTbhXsEtF
tzCcM+z0QKXsngCUtTOEIN0SX2iHTTIIz968.Kf.uhfzUCUuAd3UKd.OKt.N
HTynxTQyjpQD9jlwEXeKQxfHCBahUge6RprSa2V4m3aYOMyaP6gah2Yf1zbD
jVwZVGFZHHxINFxpjr5CiTS9JiZn6e6nTlXQZTAFj6QCppQwzL0AxVtoi6WE
QXsANkEGWMEuwNvhmKTnat7A9RqLq6pXuEwY6xM5xRraoTiurj51J1vKLzFs
CvM7HI14Mpje6YRxHOSieTsJpvJORjxT1nERK6s7YTN7sr6rylNwf5zMiHI4
meZ4rTYt2PpVettZERbjJ6PjfqN2loPSrUcusH01CegsGEE5467rnCdqT1ES
QxtCvFq.cvGz+BaAHXKzRSfP+2Jf.KCvj5ZLJRAhwi+SWHvPyN3vXiaPn6JR
3eoA.0TkFhTvpsDMIrL20nAkCI4EoYfSHAuiPBdmJRyd.IynYYjIzMvjOTKf
3DLvnvRLDLpWeEOYXMfAZqfQ0.qsnlUdmA33t8CNJ7MZEb.u7fiZHLYzDkJp
R7CqEVLGN75U+1JXxFUY.xEEBcRCqhOEkz2bENEWnh4pbh0wY25EefbD6EmW
UA6Ip8wFLyuFXx+Wrp8m6iff1B86W7bqJO9+mx8er4E3.abCLrYdA16sBuHx
vKT6BlpIGQIhL55W7oicf3ayv3ixQCm4aQuY1HZUPQWY+cASx2WZ3f1fICuz
vj5R5ZbM1y8gXYN4dIXaYGq4NhQvS5MmcDADy+S.j8CQ78vk7Q7gtPDX3kFh
3NGaAsYBUAO.8N1U4WKycxbQdrWxJdXd10gNIO+hkUMmm.CZwknu7JbNUYUq
0sOsTsI1QudDtjw0t+xZ85wWZd80tMCiiMADNX4UzrcSeK23su87IANqmA7j
tiRzoXi2YRh67ldAk79gPmTe3YKuoY0qdEDV3X8xylCJMTN45JIakB7uY8XW
uVr3PO8wWwEoTW8lsfraX7ZqzZDDXCRqNkztHsGCYpIDDAOqxDpMVUMKcOrp
942acPvx2NPocMC1wQZ8glRn3myTykVaEUNLoEeJjVaAevA4EAZnsNgkeyO+
3rEZB7f0DTazDcQTNmdt8aACGi1QOWnMmd+.6YjMHH19OB5gKsMF877x8wsJ
hN97JSnSfLUXGUoj6ujWXd6Pk1SAC+Pkogm.tZ.1lX1qL.pe6PE11DPeMMZ2
.P0K+3peBt3NskC
-----------end_max5_patcher----------*/
[Get Code]
Processing Code
Copy the Processing code from the code sample above. As you mouse over the center square, the LED on
pin 13 should turn on and off. The Processing applet looks like this:
Mouse over the square to turn the LED on and off.
Max patch
The Max/MSP patch looks like the image below. Copy it from the code sample above and paste it into a
new patch window.](https://image.slidesharecdn.com/whatisarduino-140128055527-phpapp02/85/What-is-arduino-76-320.jpg)


![Serial.print(",");
Serial.println(analogRead(bluePin));
}
/* Processing code for this example
//
This example code is in the public domain.
import processing.serial.*;
float redValue = 0;
float greenValue = 0;
float blueValue = 0;
// red value
// green value
// blue value
Serial myPort;
void setup() {
size(200, 200);
// List all the available serial ports
println(Serial.list());
// I know that the first port in the serial list on my mac
// is always my Arduino, so I open Serial.list()[0].
// Open whatever port is the one you're using.
myPort = new Serial(this, Serial.list()[0], 9600);
// don't generate a serialEvent() unless you get a newline character:
myPort.bufferUntil('n');
}
void draw() {
// set the background color with the color values:
background(redValue, greenValue, blueValue);
}
void serialEvent(Serial myPort) {
// get the ASCII string:
String inString = myPort.readStringUntil('n');
if (inString != null) {
// trim off any whitespace:
inString = trim(inString);
// split the string on the commas and convert the
// resulting substrings into an integer array:
float[] colors = float(split(inString, ","));
// if the array has at least three elements, you know
// you got the whole thing. Put the numbers in the
// color variables:
if (colors.length >=3) {
// map them to the range 0-255:
redValue = map(colors[0], 0, 1023, 0, 255);
greenValue = map(colors[1], 0, 1023, 0, 255);
blueValue = map(colors[2], 0, 1023, 0, 255);
}
}
}
*/
/* Max/MSP patch for this example
----------begin_max5_patcher---------1512.3oc4Z00aaaCE8YmeED9ktB35xOjrj1aAsXX4g8xZQeYoXfVh1gqRjdT
TsIsn+2K+PJUovVVJ1VMdCAvxThV7bO7b48dIyWtXxzkxaYkSA+J3u.Sl7kK
lLwcK6MlT2dxzB5so4zRW2lJXeRt7elNy+HM6Vs61uDDzbOYkNmo02sg4euS
4BSede8S2P0o2vEq+aEKU66PPP7b3LPHDauPvyCmAvv4v6+M7L2XXF2WfCaF
lURgVPKbCxzKUbZdySDUEbgABN.ia08R9mccGYGn66qGutNir27qWbg8iY+7
HDRx.Hjf+OPHCQgPdpQHoxhBlwB+QF4cbkthlCRk4REnfeKScs3ZwaugWBbj
.PS+.qDPAkZkgPlY5oPS4By2A5aTLFv9pounjsgpnZVF3x27pqtBrRpJnZaa
C3WxTkfUJYA.BzR.BhIy.ehquw7dSoJCsrlATLckR.nhLPNWvVwL+Vp1LHL.
SjMG.tRaG7OxT5R2c8Hx9B8.wLCxVaGI6qnpj45Ug84kL+6YIM8CqUxJyycF
7bqsBRULGvwfWyRMyovElat7NvqoejaLm4f+fkmyKuVTHy3q3ldhB.WtQY6Z
x0BSOeSpTqA+FW+Yy3SyybH3sFy8p0RVCmaMpTyX6HdDZ2JsPbfSogbBMueH
JLd6RMBdfRMzPjZvimuWIK2XgFA.ZmtfKoh0Sm88qc6OF4bDQ3P6kEtF6xej
.OkjD4H5OllyS+.3FlhY0so4xRlWqyrXErQpt+2rsnXgQNZHZgmMVzEofW7T
S4zORQtgIdDbRHrObRzSMNofUVZVcbKbhQZrSOo934TqRHIN2ncr7BF8TKR1
tHDqL.PejLRRPKMR.pKFAkbtDa+UOvsYsIFH0DYsTCjqZ66T1CmGeDILLpSm
myk0SdkOKh5LUr4GbWwRYdW7fm.BvDmzHnSdH3biGpSbxxDNJoGDAD1ChH7L
I0DaloOTBLvkO7zPs5HJnKNoGAXbol5eytUhfyiSfnjE1uAq+Fp0a+wygGwR
q3ZI8.psJpkpJnyPzwmXBj7Sh.+bNvVZxlcKAm0OYHIxcIjzEKdRChgO5UMf
LkMPNN0MfiS7Ev6TYQct.F5IWcCZ4504rGsiVswGWWSYyma01QcZgmL+f+sf](https://image.slidesharecdn.com/whatisarduino-140128055527-phpapp02/85/What-is-arduino-80-320.jpg)
![oU18Hn6o6dXkMkFF14TL9rIAWE+6wvGV.p.TPqz3HK5L+VxYxl4UmBKEjr.B
6zinuKI3C+D2Y7azIM6N7QL6t+jQyZxymK1ToAKqVsxjlGyjz2c1kTK3180h
kJEYkacWpv6lyp2VJTjWK47wHA6fyBOWxH9pUf6jUtZkLpNKW.9EeUBH3ymY
XSQlaqGrkQMGzp20adYSmIOGjIABo1xZyAWJtCX9tg6+HMuhMCPyx76ao+Us
UxmzUE79H8d2ZB1m1ztbnOa1mGeAq0awyK8a9UqBUc6pZolpzurTK232e5gp
aInVw8QIIcpaiNSJfY4Z+92Cs+Mc+mgg2cEsvGlLY6V+1kMuioxnB5VM+fsY
9vSu4WI1PMBGXye6KXvNuzmZTh7U9h5j6vvASdngPdgOFxycNL6ia1axUMmT
JIzebXcQCn3SKMf+4QCMmOZung+6xBCPLfwO8ngcEI52YJ1y7mx3CN9xKUYU
bg7Y1yXjlKW6SrZnguQdsSfOSSDItqv2jwJFjavc1vO7OigyBr2+gDYorRk1
HXZpVFfu2FxXkZtfp4RQqNkX5y2sya3YYL2iavWAOaizH+pw.Ibg8f1I9h3Z
2B79sNeOHvBOtfEalWsvyu0KMf015.AaROvZ7vv5AhnndfHLbTgjcCK1KlHv
gOk5B26OqrXjcJ005.QqCHn8fVTxnxfj93SfQiJlv8YV0VT9fVUwOOhSV3uD
eeqCUClbBPa.j3vWDoMZssNTzRNEnE6gYPXazZaMF921syaLWyAeBXvCESA8
ASi6Zyw8.RQi65J8ZsNx3ho93OhGWENtWpowepae4YhCFeLErOLENtXJrOSc
iadi39rf4hwc8xdhHz3gn3dBI7iDRlFe8huAfIZhq
-----------end_max5_patcher----------*/
[Get Code]
Processing Code
Copy the Processing sketch from the code sample above. As you change the value of the analog sensors,
the background color will change:
Max Code
The max patch looks like this. Copy the text of it from the code sample above and paste into a new Max
window.](https://image.slidesharecdn.com/whatisarduino-140128055527-phpapp02/85/What-is-arduino-81-320.jpg)


![}
void loop()
{
// if we get a valid byte, read analog ins:
if (Serial.available() > 0) {
// get incoming byte:
inByte = Serial.read();
// read first analog input, divide by 4 to make the range 0-255:
firstSensor = analogRead(A0)/4;
// delay 10ms to let the ADC recover:
delay(10);
// read second analog input, divide by 4 to make the range 0-255:
secondSensor = analogRead(1)/4;
// read switch, map it to 0 or 255L
thirdSensor = map(digitalRead(2), 0, 1, 0, 255);
// send sensor values:
Serial.write(firstSensor);
Serial.write(secondSensor);
Serial.write(thirdSensor);
}
}
void establishContact() {
while (Serial.available() <= 0) {
Serial.print('A');
// send a capital A
delay(300);
}
}
/*
Processing sketch to run with this example:
// This example code is in the public domain.
import processing.serial.*;
int bgcolor;
// Background color
int fgcolor;
// Fill color
Serial myPort;
// The serial port
int[] serialInArray = new int[3];
// Where we'll put what we receive
int serialCount = 0;
// A count of how many bytes we receive
int xpos, ypos;
// Starting position of the ball
boolean firstContact = false;
// Whether we've heard from the microcontroller
void setup() {
size(256, 256);
noStroke();
// Stage size
// No border on the next thing drawn
// Set the starting position of the ball (middle of the stage)
xpos = width/2;
ypos = height/2;
// Print a list of the serial ports, for debugging purposes:
println(Serial.list());
// I know that the first port in the serial list on my mac
// is always my FTDI adaptor, so I open Serial.list()[0].
// On Windows machines, this generally opens COM1.
// Open whatever port is the one you're using.
String portName = Serial.list()[0];
myPort = new Serial(this, portName, 9600);
}
void draw() {
background(bgcolor);
fill(fgcolor);
// Draw the shape
ellipse(xpos, ypos, 20, 20);
}
void serialEvent(Serial myPort) {
// read a byte from the serial port:
int inByte = myPort.read();
// if this is the first byte received, and it's an A,
// clear the serial buffer and note that you've
// had first contact from the microcontroller.
// Otherwise, add the incoming byte to the array:
if (firstContact == false) {](https://image.slidesharecdn.com/whatisarduino-140128055527-phpapp02/85/What-is-arduino-85-320.jpg)
![if (inByte == 'A') {
myPort.clear();
firstContact = true;
myPort.write('A');
}
// clear the serial port buffer
// you've had first contact from the microcontroller
// ask for more
}
else {
// Add the latest byte from the serial port to array:
serialInArray[serialCount] = inByte;
serialCount++;
// If we have 3 bytes:
if (serialCount > 2 ) {
xpos = serialInArray[0];
ypos = serialInArray[1];
fgcolor = serialInArray[2];
// print the values (for debugging purposes only):
println(xpos + "t" + ypos + "t" + fgcolor);
// Send a capital A to request new sensor readings:
myPort.write('A');
// Reset serialCount:
serialCount = 0;
}
}
}
*/
/*
Max/MSP version 5 patch to run with this example:
----------begin_max5_patcher---------3908.3oc6ckziiaiE9b0+J3XjCIXpp.WzZNMURv.jCInQ5fYNjNngrDssRKK
4nkp6JA4+973hrkrsjncKu0SRiXasQ83G+dKj7QV+4qtaxzrOxKlf9Zzuft6
t+7U2cm7ThSbm936lrL3igIAExaaRJ+CYS+sI2qtTI+ikxSuBMKNojm+N3D4
Aua5KkPwpuoUAkgKhSm+tbdXo5cQXVOhuGwrohuHD4WT7iXzupen3HY4BuqG
rH0kzrrzxzfkb4kdJONHo9JoUKiSS3kRgjt4jYUk0mkznPJh+CYgHewpSqty
xWVwUh3jIqkEYEfmqQEMr.ETbB+YddQbVZix+tIAqV03z203QDX4ukIKHm6W
ep3T0ovqOUN+435m2Rcx+5U0E+FTzVBh9xOsHXIh5YuADg1x4IYgumG0r3mj
shmFmtJmWvSKCJ0um0WNhOKnJo7c6GmZe8YAg7Ne381Rc2j44wQYoBgn0SJN
c8qCHH1RhQqJi7NRCVsmGt.pGUESCxE31zDdCV.PRyxRZeo0MU.WOHMdYPIu
LVIrT75BMd4p73zxVuHdZ.TFKJByyRRZUTpq77dtRDzZFx+PbT4BYY0DJgaO
dUcSvj0XTT7bdQY6yUFLun8YZo71jl0TIt042RYNLa4RfCTWfsznKWDWfJpl
tJHrbgV6t.AZInfzWP.4INpJHA8za91u+6QN1nk7hh.PpQwonxEbTAWzpilV
MimilkmsDtPbo3TPiUdY0pGa9ZShS4gYUJz1pwE1iwCpxbAgJI9DGGwWNzFT
ksLf3z7M0MybG6Hj1WngsD7VEXS8j5q7Wu5U0+39ir8QJJS5GMHdtRimL4m1
0e1EVX0YsE2YssINriYRoFRyWVMoRRUGQvnkmms3pnXDYHbBKMPpIOL5i1s8
3rMPwFcRCsGRyPH780.8HBnpWz.vlEQBWJ+0CSunehJSmJxiIZRtNGhhDYrU
jt3ZQyA2fHJhZDifXIQHUHH8oGYgOREI5nqHIzhFWUndPyBdB3VzHJGwUhkV
rgvRl2UCVNMHcd234lf1DN16HFEIdHt99A5hrp7v5WWMSBQZgMP.Tkwoqig8
W1.Sn1f3h3nn1wLpBypPDzlJ7XinEGkLiMPloWOhrgR7dpZWJQV1faDy35Qj
MThMFkWFGsJChQPqrQp8iorV6Q28HBVF4nMVDJj7f1xyYACFScisg.ruLHOW
uMUS4Am4pI4PTnHi.6bi02HNzSYnDBe4cgAgKzRk1jc8PJLoH3Ydz6.Q.7K8
tfxx73oUkJq1MGuCy5TpAi.POWZ3AenidLOOIaZPhdjZVW3sdk6LXEGzHb7p
Mfr7SEy3SXHyBSxJ3J2ncNNYVJsXG6Me10nj4cfCRFdTFjLo7q3SiCpjjEDM
.nvra.GN39.E2CDTHWXPo8.xzfqrHCHKnf5QUYUVdoZPUjCSC7LU8.XtTUXl
X8vr51GjwFGLC2AlMdLkU4RiaRrnmJuiudnDk0ZW+9p6TuKBe433JUCzp6fU
iOF0SUk2UQYUPNTEkiZubvKa1tsmgL5SCTXGHnnG0CceLpkpR9Rs28IUESWl
EwWNKfHlg.zj6Ee7S+nE8A+m9F7Cu40u9gMm+aRp3kYYkKd3GDOz5y+c7b96
K9gfvuIK68uNO6g2vUUL80WxihCVFD9vlB30e2SOrmxUb527RZ3nZNrljGrR
70vs1J9suWuZ3zaHVdG3RIJLgGj2Gfn6TcGcstEfvtH.hpFLlnBndjOLGQAI
z98BXc6yQxghmOn6gZqj0ShPOXhynLOjzCESt+XwE8TxrCvrdXo16rqnLgvb
HaFmbh29QD+K0DyNdjDwvzQL.NXpoMvoOBxkger0HwMRQbpbCh91fjjG9Idw
prTH9SzaSea5a.GQEPnnh43WNefMlsOgx18n.vgUNO.tKl7tDyI3iHzafJHZ
VVNedVEbGgYIY42i93prB0i7B7KT1LnnCiyAiinpBnsPV7OG.tYKfBsrJOkG
UG5aq26iJw6GyJ4eM5mEgEKaNQPMEBUp.t8.krplOVTlZdJAW27bjvGK7p2p
HQPgLOSJDYv4E9gQBYBjMUselRxDy+4WplIzm9JQAWOEmfb.E364B43CAwp5
uRRDEv8hWXprjADMUOYpOg9.bVQpEfhKgGCnAnk.rghBJCdTVICA3sDvAhE5
oU4hf67ea5zWPuILqrD8uiK+i477fjHIt9y.V88yy3uMsZUj7wnxGKNAdPx5
fAZMErDZOcJU4M01WFQokix.pKa+JE1WacmnKFeYd7b.0PeIzB8Kk+5WIZpB
Ejt34KJeHgOCh4HK8Y3QiAkAfs8TRhhOkG7AAGQf0qxyfmQxa+PLb8Ex.2PS
4BdO5GB9Hvg+cfJCMofAIMu9Qz+UPCjckqVJlEmyA8Bf.rC6.3hAEuG8TdTU
bZljQ0nr1ayIqmTwQYfyRGafZhur5vfuyMSqYNWmtAPwWHalDSuUgT0Bosh.
JpAR89Y6Ez5QEfPTQO4J0DHLInIliz8BZV2JfV3Bd36qsQwAVVXbr1BGXp6s
Sd5sSDruo74wofx.HxUgxQwTnMLqTXvRmiGh2PUZr5pBynKChjl6feNUjSRn
hEUfRPT1GfG9Ik4TQBm.hEZZ.bc38HjAMKGzDRijEm1ifx1dbgzQyKh6FZc3
wOCkRJH+KUh0daWs6wzltWx1puXxlWW6NZWY2JiTBzzILRIANku02NourySM
VI1VJTvQZff32AJr+dS9e34QAoA6EGXlGFH9yk7yyQAlVd3SR94g+TxOu1sU](https://image.slidesharecdn.com/whatisarduino-140128055527-phpapp02/85/What-is-arduino-86-320.jpg)
![Flgd6ICI96LzazyPu1cgqsZ8r74SgF.65+efbMf4pGHT7lgHh30Sha3N5Ia.
oqjMf7nsuMwycf7iYDybiAAVr3eC.oTMjpzEr8GDRc9bFRGHYXDrzg.Tlx+q
NW8TY1IkzCfZ2IftkQstbB08HUezoDS+oFyI.cWIhWBaDiUo7qIrDO7f.L6n
AXqCmyNT9act.z+Iv.GR0uES0ZXfjdz.IczAxQOUR+zvRsUTigRxmyPYeNlj
yXv8Peef2ZFzuLzWPPeAE8ELzWXYlhe8WzAcUg+b1UkIoCLzIH60zwASGXau
a1Dq2nUY.sox4vng+m0nACePngC9lEMLZMBPodOxf+yx5d4uMCTHm3kJvIIG
jcLMedEQldkjpoBkQyjY1Hk.hmSY95Iwos8NDb9VSlIWOIntqgxryUjL6bCJ
y1lli5tWWxrQ7YmqGYlc6shK1iY2dr0wtNjYxgHyzaq0OznY235awCr8zSz6
EGd1QNUKf.74dADTBbTbeotjpW95IolY0WpKYONY8M83Rx2MChx3fL+iG5Mm
tXpdmvXj8uTvaAL1WjbbarQD4Z6kXBpnm6a69oKV2PY9WY174IbC3CaRQ9iK
Q4sYGQpwdtZ5wFrc7n569.M83OOR5ydSB1ZcAWCxdbKuavz9LILxfD.wWO.W
Nq+Zu4Es+AP6s5p9jDWH8ET+c85+XbW0.N1nDCTD7U4DGc6ohnU019fS7kQ0
o43luuOGjv5agHp0DT.CysOfgLR3xXlXTUKm16RivRsn3z0O6cl3YScAvtrb
hwekGB7BZuqESUzBJWmCvK7t9HF8Ts6cUAPoFWso3aP8ApWyJ3wqOPo2pJDC
BQ0NI0Pj8QCQ2r1L5vKaU5lDRYX7yRur1UYYZmJQ9iDHwN9dndB5n5ejflmm
UsBwLHnDkKXWRuAkb3NeuzqRstiQGP.fCQFdHNzaE.8u58Nz9svFE9SGIE1X
kv9Iwfl1BdNWjA7xcThsWCS847loyFD8pZq2E2F04lYULzBTDYhrFSDDJdjo
fisN2NUN26e4xRu51zD5ZseJ4HC63WyIX6jRqsp0jangBnK.Qlo58PCpWevt
ahzqK7fbKsdX6R64aao8LmWhBPh9jKVAPMzb5a2cV6opdWHneMmqMEmAGsPh
ieigIjV+4gF1GgbMNXg+NH44YaRYyd..S1ThHzKhFwwGRaWVITqyj9FvPqMT
d0pDuSqDrOGF.Uogf.juCFi9WAUkYR+rFPanDcPG8SbrtjyG03ZQ8m3AqC5H
NcUUoXSwVrqXKVcZu.5ZnkwIfIVdXVZTwAuTTUiYuxwjZDK6ZgnRtYV8tJmP
hEcuXgz2Goxyaiw35UkaWbpqtfzD02oUkkYqi.YQbZqIIWrIljFolsdmMKFR
wCJ2+DTn.9QlkOld+d9Qy9IJdpLfy05Ik2b8GsG9h8rdm1ZFx1FrmmlA2snw
qI9Mcdi2nr6q3Gc87nLawurbw1dda+tMyGJ9HaQmlkGwy6davisMgrkM65oz
eulfYCzG46am8tSDK144xV4cEvVMTRXq9CIX8+ALNWb6sttKNkiZetnbz+lx
cQnb1Nds2C0tvLNe14hwQtxYbxhqc17qHfamUcZZ3NYSWqjJuiDoizZ+ud2j
naRK4k3346IIVdR1kKiQjM39adMamvc6n+Xp36Yf3SIGh3uKbquqs1JksTII
kuJ7RrZSFb2Cn9j5a6DT8cMo0iczU+lsYaU8YNVh5k5uzJLU26ZcfuJE6XLY
0mcRp9NTCp+L+Ap+in7Xf3b9jFQBLtIY06PbrGhcrU6N00Qlaf9N0+QPo9nS
P6qsI7aYNLSNOHpsAxis0ggnZLjYqyyFkdSqinVsPaqSDZaYBZ6c93uLCjGm
iCroJVLzU45iNE.pIUfs3TWb.0FejHp9uANr0GcJPTroFDNOHpkIweLnI1QT
dHl3P7LhOF3Ahd9rnvLwAMy5JSdNezGlsIsW9mW44r26js+alhxjlkdhN0YE
YqiH5MTeWo6D4Qm.ieLS7OynmuVGSbmbFUlnWWhiQlhOeN+Yl35bq.tGo9JR
cj8AVqdz7nSgVB9zNj.FTOU68o5d9KO5TUOGxVMw+jTO8T6wqD0hEiHsOJO5
TTOMoS.zlqN0SpZjz6GcH05ylVM0jwuidlkmAif374ih5M5QPfccr8Hqifff
otN8pt3hUcaWu8nosBhwmD0Epw5KmoF.poxy4YHbnjqfPJqcM3Y2vun7nS.i
f3eETiqcRX2LR.4QmhZrkoCSGwzZrqKHrVR8caari+55d2caPqmq5n.ywe8Q
WrZL9fpwVXeaogMByE6y1SMdjk+gbavbN7fYvVtt1C2XwHJSzpk+tidUO25H
UB9onw9mlFQ10fhpZBaDatcMTTEGcJpwzqg92qqiVtM6Cu0IRQ0ndEdfCAqV
l0qYAUmPrctbxO4XCuPMa1asYzKDks1D52ZCne6Mednz9qW8+.vfqkDA
-----------end_max5_patcher-----------
*/
[Get Code]
Processing Code
Copy the Processing sketch from the code sample above. As you change the value of the analog sensor,
you'll get a ball moving onscreen something like this. When you turn the switch off, the ball will
disappear:
Max Code](https://image.slidesharecdn.com/whatisarduino-140128055527-phpapp02/85/What-is-arduino-87-320.jpg)


![}
pinMode(2, INPUT);
establishContact();
// digital sensor is on digital pin 2
// send a byte to establish contact until receiver responds
}
void loop()
{
// if we get a valid byte, read analog ins:
if (Serial.available() > 0) {
// get incoming byte:
inByte = Serial.read();
// read first analog input:
firstSensor = analogRead(A0);
// read second analog input:
secondSensor = analogRead(A1);
// read switch, map it to 0 or 255L
thirdSensor = map(digitalRead(2), 0, 1, 0, 255);
// send sensor values:
Serial.print(firstSensor);
Serial.print(",");
Serial.print(secondSensor);
Serial.print(",");
Serial.println(thirdSensor);
}
}
void establishContact() {
while (Serial.available() <= 0) {
Serial.println("0,0,0");
// send an initial string
delay(300);
}
}
/*
Processing code to run with this example:
// This example code is in the public domain.
import processing.serial.*;
Serial myPort;
float bgcolor;
float fgcolor;
float xpos, ypos;
// import the Processing serial library
// The serial port
// Background color
// Fill color
// Starting position of the ball
void setup() {
size(640,480);
// List all the available serial ports
println(Serial.list());
// I know that the first port in the serial list on my mac
// is always my Arduino module, so I open Serial.list()[0].
// Change the 0 to the appropriate number of the serial port
// that your microcontroller is attached to.
myPort = new Serial(this, Serial.list()[0], 9600);
// read bytes into a buffer until you get a linefeed (ASCII 10):
myPort.bufferUntil('n');
// draw with smooth edges:
smooth();
}
void draw() {
background(bgcolor);
fill(fgcolor);
// Draw the shape
ellipse(xpos, ypos, 20, 20);
}
// serialEvent method is run automatically by the Processing applet
// whenever the buffer reaches the byte value set in the bufferUntil()
// method in the setup():
void serialEvent(Serial myPort) {](https://image.slidesharecdn.com/whatisarduino-140128055527-phpapp02/85/What-is-arduino-91-320.jpg)
![// read the serial buffer:
String myString = myPort.readStringUntil('n');
// if you got any bytes other than the linefeed:
myString = trim(myString);
// split the string at the commas
// and convert the sections into integers:
int sensors[] = int(split(myString, ','));
// print out the values you got:
for (int sensorNum = 0; sensorNum < sensors.length; sensorNum++) {
print("Sensor " + sensorNum + ": " + sensors[sensorNum] + "t");
}
// add a linefeed after all the sensor values are printed:
println();
if (sensors.length > 1) {
xpos = map(sensors[0], 0,1023,0,width);
ypos = map(sensors[1], 0,1023,0,height);
fgcolor = sensors[2];
}
// send a byte to ask for more data:
myPort.write("A");
}
*/
/*
Max/MSP version 5 patch to run with this example:
----------begin_max5_patcher---------3640.3oc6cs0jZajE94Y9UzKkeHoVloTeSHkm1II0VkeHIthSs6C1obIjZ.E
KjHRhY7jT4+9d5KBj.jTCAXfoV6x.sj5VmyWet127ed6MCFm8EQw.z2f9.5l
a9yau4F0kjW3FS4aFLO3KgIAEpGaPX174hzxAC02qT7kR80mkkUHPAnBQdbP
BZQVdIZRd1bT4r3BDTmkU0YQPY3r3zoeJWDVpe2ttr6cFhvXt7KhyH8W26f9
USkhiTulrw+1czQUszjrzxzf4B0sdP9dqtS5x4woIhREQiWewrkkUW0oViTD
+GpFASt2Qd0+51akeLzRPIU7DPXagIFnH.4653f9WAKKyxVHRQNcfDXlih2w
puvbdWHAlcTPBRKHg4x5mr74EBMINHV1+iFL.8qG.VMWTTDLUrs.TBH+zAvP
nTEhvvxun9pBd6FWH38DWH6DWv6ItbX.RKBOJ7XbP5ztvDesvhBLb6VTwcOg
DmiBjnXfiIrjjED0CpP490PEmtPExwQA5EGUVjK.CKQJqtcYl0nCMRAJi76D
Z7dQflCCVV1i+ENiTy3AwYaghEA4.KVJx+jHMXbhntJPceO3iBpPOPKtZqtU
jUoXtw28fkEimmEIlOI.3Q4iMT9wO+iLxc9O7sN28928t6Ve8uMYo.7EUN6t
ePVoUW+6E4hOW7CAgeaV1meWd1cuWnYLy8mKhhClGDd25F3ce+C2si1Ud42+
bZ3IQJOXg7q96t80e50YvDjqHw7VvkRTXhHHuKEerRwmqfBFsS.g9h.HZN3X
hJf5Qd+xHZHgzc.mrqeYjbn4E84evfIDUjDtjNwD2iRHV6anmGdbmsfKxTTJ
dd93rjtBJ2U42foCwZDqKfYzKkrh4VgYIY4FxVRmN2646f8ck+xw7KrjzOlZ
ZYAVfdZgKlaWn29FzA8nfdR2quj.3ejflBJnKr.Dwpf13cZBm85P0rPj.rOB
6fvztPFGkVI0SAPi5NKHmih7E8Ph2e35uOtYN6x6JEQtJVWpV7gRtm2dZy9W
+YMCxLHrEvAknQktDVdY7v82SFosgmSGHO56BRRt6mEEKxRKDnGd+2812h9X
5GSeODOcAJ.M9YHHAfjPkyD0GIugn.Ht6bQ.7TTS8DoPtCQCQxWobX+jYPUJ
hPn3zgnx7kogphieFZ2j3TwDgH5dzaUscJ77kEnIY4hoYKglVYzcH5KKxJzu
qmgegxl.0MLNGBNDsr.5IUz0iAPZFE.0TtLOEdClQYrAAeORwW+XVo3aP+hb
DHUBCH.mfbEKfGOPyjQhGiCAdNUUBRcQjij4X.u5MZRDzHSyTDQFbcYdHHIM
AzlF1lnoLjKG8UZH5guV1vEkA4kKWbOPGPC9YgjNdJHVy+ZJQ1.Cq.FUWQpA
ke.8DbUwi.YEWBUCDhPyAXCEETFbuhICg9EIRiYnGVjKyt0+io.r+9vrxRz+
Nt7OlJxCRhT35u.X0amlI9X5xEQppQwneJrLarPVU7JkGYWVHz2njevz1UoX
XkoEWOkxDWO9kXYocoTwuzF611zXJyimB3F5qf9nOT9qesryJTJ1EOcV4cIh
IPVWYoOBUMFTl.4sGRRzRT4AOIkRjn8h7LnNJI2mhg6OSk5JZrPJ4i9gfu.R
w+NHLCcpfAMij88n+qTPPMt4UTwj3bAnY.h.aIe.RiAEeF8Pdzx3zLkLUs1Z
mcmczah0FH4ZmpLcp.rVbX3d0zalKhSiKAxBZ9BU2zTP3uPobgL1Q.U0.kl+
jcBZj1AMOpzsJYjdz0n53QXsfYrqELKblH7yUFoDfPVXbrwDGXqCjwjviT7a
rXZbpxOvxzXvpOnPH0GlTJMZog8l2UZJcdPjxjG7ywIYgeFULaInFDk8jpxZ
apvMA4cv9X.7.vaRRGFAcPYHMR0dF2BZC7wEJ2TOKeZnCRD+HzJo.OLWSW6r
qk2wfI6pGf.pdjC4rpfL2YeK8JYloVf93.ocJEvocv9wAcEiMQgBtl.lb0y9
heKnvtGRs+iHOJHM3uaZbN1jDrhED4FfwfLPCEmH8jV.BB0Z+aF.Vkqc4apU
EIb9a5zAcGt5Rf3WdsNJ3R4PXDU0mouHzIca0MWO.KpQjT8oq1SIyqV3mP24
ToxfHpdyOPNqgwoK.W.fxfRNtwsiDSBVlT9ociSMu+jfPQqUtk9paFLMONJK
URFMpq7xUuvOXF1HBuN6ndhzfE6nxPXQkKKFGjKQNyHtSptYYVVRyaspyBD3
CRiA0YQYrlbgHdptY77E4wZk5UWSOf9yJByyRRZzT5673NtiNrvmhiJmoZq5
fI73wKp5DFrBihhmBNxadsxfoEMuRiIbutfVcM4FWuyr.2bvrlNF5.3U+q9C
sKaa5jkMt70iSd8bC2ZbEFUuAa0DWqYF0tJ91p43649br2nZ2usLGuoxrnQq
6TArNx+1CjRLPpVWf62Kj59ZFRa38Y6D0kRo8AnT8b0g0e4p8+f6.P4sBnaX
TqMmPsOdOcjG+dMtOmdzcgLdIGqjX0J+FAVrmSu.L8fAX19Ky1C.e1.z+IB2
qpeCIUV+.I4fARxQGH0i.9ECVZrhZMTheMCkc4XRMsoCgbef2ZFjaF5MXzaH
n2PQugYmhe0WjdcU47Z1Ukhb6CwFISy2HNtcvtaNRWdshHNVgHcNMUlopRm4
tJByyLXfI0UN6GM7eUiFTm8BMbctZQC8atOegDu6oveXrgpeaGnfaETvsBJN
6AKuNsT4n+zRVXJtQd+ciEEYKyCq.8ptRTSdBRQrLNcUd5eXcjoa7fyhihZl
UrNQxBYZo5g.vpdt8klkJi1QyPvdH7UFMStbvYu8Amu1nY7ECMKGXBqnY2KH
Z18Jjl4aYNnEYiQWVzrUxytWNzL0VZ14xglI6isN5kAMi2GZlbYPyNma6FqC
aJRs9qEogO+ovfvYFxxjGV07cLnH3QQzm.R.BG7SAkk4wiWVpC2p9jwX23ka](https://image.slidesharecdn.com/whatisarduino-140128055527-phpapp02/85/What-is-arduino-92-320.jpg)
![0zSz4M6e1QZY.8mljMNHwLURqZ9FuzslMk8ZJXtcMPeblVut1XYDhdMCpmjZ
8BAqsU9DezKxJAa8Hmbbfi+wccuVv7c0qELrEHB+UAhHWzCfCbKPEyBki24Z
clythVwfkYSmlHrPdX8tC5v1iPb5ArPuOWc8NVrRZspq24UxhE0wBcAsMyt2
2LLuqvkKZRXjEq5CM6S3tq9Zm6HD+8Prm0F+jDWn1paUe+2ZuF259kxkiR5W
Qf6vzKBtMm+gFrMeuWsKW.6B61VyWOFjz0Zsmwza+.ikxQcAL3iDtbLWMTKm
OtyMEFcjWM9iu0rMa81D8kUl3v2ewcHWP5B2HX6kK7t7DL5fs6JVIrO0Z1l3
bEpOP3zih9.gbspPzKDYbRVAQ7CFhtZsYzhW1ko0WEJcG3oAC0aRIyxKsUEI
+iDPwOLfp0uNA68MmtSUSmRuNb8d1ttWya7sVWf5Iwf.1LQtZUnqNvT1bS6z
E5o2vfqNSH5bufQbuZV09M.E04Mj8XBUiBqNGl5FSt3NGlZaGRpV6wc4kiWi
q0twaaORhul1jjsIi7cMjQlJJUaQuhR495nlfRQWRJXkrgmMGXWjKM4jdGJH
yovkl4HUetutzWuY5tjFHneGn77rtG3iJ92whCVJxKhBwgGtRaFIzabfNrRn
WThd9q24vsZjf9JvHwOKBhprFDmtXYIZ7xISjaO1GE4OK2V9yiS.qFhvrznh
8cKyMZs7EVepT01FlCe0rIC0lUk6NX4N9syCyAE660+ovE9hyGqjaGurrLak
G0YwoMlFO4YMSZjd9DcWucsjUr1Yqgy8TluCY3N9Q8.+k0JCD3ZTS0CW8Qyb
s19nOxrgjw7VFU+3ooYviK66pCfimt8AAxHOOBkK+EajC2yayWtciMzgdvpM
NKORj29YyGcS4wFVlql0wcZTg1yw5wvMNiTpuUzpu.Y0miRlgO0w7wpZI2Em
SUBGayVM5eqU4C+rV4ZSPkvXqLJbAHlR3mKwT5ISL8+Kv0k.GWEKwpP3ewk3
7omKIN7EtDmp4ZtHk0BfatXgLhgasHgZrVYaY8AIO7fq8Pas1fFzjd4ibwpd
XO4GXOeOG+lcyasNh1R+wVx2yBxeTOT+wiZFYA0P48PNyiiVjAhJlNT4Qvpb
uj3aN2qYqJcBfSWhMbf+YCPcsfbNeTC2l9WNc+5eIlkST0RJgupzIn+kysgC
X6GGXnYpdYfP0GP6MKQXM3N1Ih6XVvcLuym7B0B5w8v.ahqBI49qJcJ.TaX.
N+xBP4NGHhhqYfkRNM9q1f3ZweqyYCQYdGCSZGQ5wBx47o.Ssw+CkcgQOmud
KZic4QKzCw+7ROm8nY2LfMsEDtdfeMKSn5Ev95IQhorcqJcBrzPsQUhRNe8M
1X6lhOezC4Bidv1nKcFs8YimJ9n8RWZXiO7aSCxDRLdjd91qU5TnmXCeRvmR
9jnm7b15RmJ9rO4Kr+IgO04BfczyOpqx9npzofOsIlaR8Mo0IUMR48i0mYly
lVMwlw6gbloGRezy4yKEw6BHBBWik.eRi3DNM5KDahS.SOE1EjmXl7Uyqo9T
AtQAO8fG3oLX3cZFxKh0FLNSRfDaoG74gdvW.ZDU9FMGSdFMBt+IQh.6eIvw
FujTkJREGKKcJ3X2WtXf7Ub1HywEqxh2tJnE.FcZhMByrcXQw1x+bOWJYjpy
lv8oq55aEHLcwD8hJjxbVU5EigcNtL7Ql76KVVp69Huhcb87vpoCkRYT+96v
Hd5Ay1rofMqm+FkLYvv0+GL3FkL6bLp21kL6QFNV8BNM48foWBV4zt1wXm5V
4jkNEbL45dtNw13Iltmi9sAyY0S0l8BR+3yWjVXax7eOmKrp4m0QKIal6VYo
SAf5XQxSrCa5l0qk45k5kAzqEgMNgzkz9FmL5abpnu4IhNzZ+0s+OKCSg0.
-----------end_max5_patcher----------*/
[Get Code]
Processing Code
Copy the Processing sketch from the code sample above. As you change the value of the analog sensor,
you'll get a ball moving onscreen something like this. When you turn the switch off, the ball will
disappear:
Max Code
The max patch looks like this. Copy the text from the code sample above and paste it into a new Max
window](https://image.slidesharecdn.com/whatisarduino-140128055527-phpapp02/85/What-is-arduino-93-320.jpg)


![Receives from serial port 1, sends to the main serial (Serial 0).
This example works only on the Arduino Mega
The circuit:
* Any serial device attached to Serial port 1
* Serial monitor open on Serial port 0:
created 30 Dec. 2008
modified 20 May 2012
by Tom Igoe & Jed Roach
This example code is in the public domain.
*/
void setup() {
// initialize both serial ports:
Serial.begin(9600);
Serial1.begin(9600);
}
void loop() {
// read from port 1, send to port 0:
if (Serial1.available()) {
int inByte = Serial1.read();
Serial.write(inByte);
}
// read from port 0, send to port 1:
if (Serial.available()) {
int inByte = Serial.read();
Serial1.write(inByte);
}
}
5.Control Structures
If Statement (Conditional Statement)
If Statement (Conditional Statement)
The if() statement is the most basic of all programming control structures. It allows you to make
something happen or not depending on whether a given condition is true or not. It looks like this:
if (someCondition) {
// do stuff if the condition is true
}
[Get Code]
There is a common variation called if-else that looks like this:](https://image.slidesharecdn.com/whatisarduino-140128055527-phpapp02/85/What-is-arduino-102-320.jpg)
![if (someCondition) {
// do stuff if the condition is true
} else {
// do stuff if the condition is false
}
[Get Code]
There's also the else-if, where you can check a second condition if the first is false:
if (someCondition) {
// do stuff if the condition is true
} else if (anotherCondition) {
// do stuff only if the first condition is false
// and the second condition is true
}
[Get Code]
You'll use if statements all the time. The example below turns on an LED on pin 13 (the built-in LED on
many Arduino boards) if the value read on an analog input goes above a certain threshold.
Hardware Required
Arduino Board
(1) Potentiometer or variable resistor
(1) 220 ohm resistor
(1) LED
hook-up wire
Circuit
click the image to enlarge
image developed using Fritzing. For more circuit examples, see the Fritzing project page
Schematic:
click the image to enlarge](https://image.slidesharecdn.com/whatisarduino-140128055527-phpapp02/85/What-is-arduino-103-320.jpg)


![Demonstrates the use of an array to hold pin numbers
in order to iterate over the pins in a sequence.
Lights multiple LEDs in sequence, then in reverse.
Unlike the For Loop tutorial, where the pins have to be
contiguous, here the pins can be in any random order.
The circuit:
* LEDs from pins 2 through 7 to ground
created 2006
by David A. Mellis
modified 30 Aug 2011
by Tom Igoe
This example code is in the public domain.
http://www.arduino.cc/en/Tutorial/Array
*/
int timer = 100;
int ledPins[] = {
2, 7, 4, 6, 5, 3 };
int pinCount = 6;
// The higher the number, the slower the timing.
// an array of pin numbers to which LEDs are attached
// the number of pins (i.e. the length of the array)
void setup() {
int thisPin;
// the array elements are numbered from 0 to (pinCount - 1).
// use a for loop to initialize each pin as an output:
for (int thisPin = 0; thisPin < pinCount; thisPin++) {
pinMode(ledPins[thisPin], OUTPUT);
}
}
void loop() {
// loop from the lowest pin to the highest:
for (int thisPin = 0; thisPin < pinCount; thisPin++) {
// turn the pin on:
digitalWrite(ledPins[thisPin], HIGH);
delay(timer);
// turn the pin off:
digitalWrite(ledPins[thisPin], LOW);
}
// loop from the highest pin to the lowest:
for (int thisPin = pinCount - 1; thisPin >= 0; thisPin--) {
// turn the pin on:
digitalWrite(ledPins[thisPin], HIGH);
delay(timer);
// turn the pin off:
digitalWrite(ledPins[thisPin], LOW);
}
}
While Loop
While Loop](https://image.slidesharecdn.com/whatisarduino-140128055527-phpapp02/85/What-is-arduino-107-320.jpg)


![analog
analog
analog
analog
2:
3:
4:
5:
y-axis
x-axis
ground
vcc
created 2 Jul 2008
by David A. Mellis
modified 30 Aug 2011
by Tom Igoe
This example code is in the public domain.
*/
// these constants describe the pins. They won't change:
const int groundpin = 18;
// analog input pin 4 -- ground
const int powerpin = 19;
// analog input pin 5 -- voltage
const int xpin = A3;
// x-axis of the accelerometer
const int ypin = A2;
// y-axis
const int zpin = A1;
// z-axis (only on 3-axis models)
void setup()
{
// initialize the serial communications:
Serial.begin(9600);
// Provide ground and power by using the analog inputs as normal
// digital pins. This makes it possible to directly connect the
// breakout board to the Arduino. If you use the normal 5V and
// GND pins on the Arduino, you can remove these lines.
pinMode(groundpin, OUTPUT);
pinMode(powerpin, OUTPUT);
digitalWrite(groundpin, LOW);
digitalWrite(powerpin, HIGH);
}
void loop()
{
// print the sensor values:
Serial.print(analogRead(xpin));
// print a tab between values:
Serial.print("t");
Serial.print(analogRead(ypin));
// print a tab between values:
Serial.print("t");
Serial.print(analogRead(zpin));
Serial.println();
// delay before next reading:
delay(100);
}
[Get Code]
Data
Here are some accelerometer readings collected by the positioning the y-axis of an ADXL322 2g
accelerometer at various angles from ground. Values should be the same for the other axes, but will vary
based on the sensitivity of the device. With the axis horizontal (i.e. parallel to ground or 0°), the
accelerometer reading should be around 512, but values at other angles will be different for a different
accelerometer (e.g. the ADXL302 5g one).
Angle
-90 -80 -70 -60 -50
40
-30 -20 -10 0
10
20 30 40
50
60 70 80 90
Acceleratio 66
66
65
64
62
61
58
56 53 51
48 45 43 40
39
37
36 35 35
n
0
4
2
8
0
9
3
5
0
4
3
2
7
0
5
3
8
7
5](https://image.slidesharecdn.com/whatisarduino-140128055527-phpapp02/85/What-is-arduino-120-320.jpg)


![Code
/*
LED bar graph
Turns on a series of LEDs based on the value of an analog sensor.
This is a simple way to make a bar graph display. Though this graph
uses 10 LEDs, you can use any number by changing the LED count
and the pins in the array.
This method can be used to control any series of digital outputs that
depends on an analog input.
The circuit:
* LEDs from pins 2 through 11 to ground
created 4 Sep 2010
by Tom Igoe
This example code is in the public domain.
http://www.arduino.cc/en/Tutorial/BarGraph
*/
// these constants won't change:
const int analogPin = A0;
// the pin that the potentiometer is attached to
const int ledCount = 10;
// the number of LEDs in the bar graph
int ledPins[] = {
2, 3, 4, 5, 6, 7,8,9,10,11 };
// an array of pin numbers to which LEDs are attached
void setup() {
// loop over the pin array and set them all to output:
for (int thisLed = 0; thisLed < ledCount; thisLed++) {
pinMode(ledPins[thisLed], OUTPUT);
}
}
void loop() {
// read the potentiometer:](https://image.slidesharecdn.com/whatisarduino-140128055527-phpapp02/85/What-is-arduino-134-320.jpg)
![int sensorReading = analogRead(analogPin);
// map the result to a range from 0 to the number of LEDs:
int ledLevel = map(sensorReading, 0, 1023, 0, ledCount);
// loop over the LED array:
for (int thisLed = 0; thisLed < ledCount; thisLed++) {
// if the array element's index is less than ledLevel,
// turn the pin for this element on:
if (thisLed < ledLevel) {
digitalWrite(ledPins[thisLed], HIGH);
}
// turn off all pins higher than the ledLevel:
else {
digitalWrite(ledPins[thisLed], LOW);
}
}
}
Row-columm Scanning to control an 8x8 LED Matrix
Row-columm Scanning to control an 8x8 LED Matrix
LED displays are often packaged as matrixes of LEDs arranged in rows of common anodes and columns
of common cathodes, or the reverse. Here's a typical example, and its schematic:](https://image.slidesharecdn.com/whatisarduino-140128055527-phpapp02/85/What-is-arduino-135-320.jpg)


![Code
/*
Row-Column Scanning an 8x8 LED matrix with X-Y input
This example controls an 8x8 LED matrix using two analog inputs
created 27 May 2009
modified 30 Aug 2011
by Tom Igoe
This example works for the Lumex LDM-24488NI Matrix. See
http://sigma.octopart.com/140413/datasheet/Lumex-LDM-24488NI.pdf
for the pin connections
For other LED cathode column matrixes, you should only need to change
the pin numbers in the row[] and column[] arrays
rows are the anodes
cols are the cathodes
--------Pin numbers:
Matrix:
* Digital pins 2 through 13,
* analog pins 2 through 5 used as digital 16 through 19
Potentiometers:
* center pins are attached to analog pins 0 and 1, respectively
* side pins attached to +5V and ground, respectively.
This example code is in the public domain.
http://www.arduino.cc/en/Tutorial/RowColumnScanning
see also http://www.tigoe.net/pcomp/code/category/arduinowiring/514 for more
*/](https://image.slidesharecdn.com/whatisarduino-140128055527-phpapp02/85/What-is-arduino-138-320.jpg)
![// 2-dimensional array of row pin numbers:
const int row[8] = {
2,7,19,5,13,18,12,16 };
// 2-dimensional array of column pin numbers:
const int col[8] = {
6,11,10,3,17,4,8,9 };
// 2-dimensional array of pixels:
int pixels[8][8];
// cursor position:
int x = 5;
int y = 5;
void setup() {
// initialize the I/O pins as outputs
// iterate over the pins:
for (int thisPin = 0; thisPin < 8; thisPin++) {
// initialize the output pins:
pinMode(col[thisPin], OUTPUT);
pinMode(row[thisPin], OUTPUT);
// take the col pins (i.e. the cathodes) high to ensure that
// the LEDS are off:
digitalWrite(col[thisPin], HIGH);
}
// initialize the pixel matrix:
for (int x = 0; x < 8; x++) {
for (int y = 0; y < 8; y++) {
pixels[x][y] = HIGH;
}
}
}
void loop() {
// read input:
readSensors();
// draw the screen:
refreshScreen();
}
void readSensors() {
// turn off the last position:
pixels[x][y] = HIGH;
// read the sensors for X and Y values:
x = 7 - map(analogRead(A0), 0, 1023, 0, 7);
y = map(analogRead(A1), 0, 1023, 0, 7);
// set the new pixel position low so that the LED will turn on
// in the next screen refresh:
pixels[x][y] = LOW;
}
void refreshScreen() {
// iterate over the rows (anodes):
for (int thisRow = 0; thisRow < 8; thisRow++) {
// take the row pin (anode) high:
digitalWrite(row[thisRow], HIGH);
// iterate over the cols (cathodes):
for (int thisCol = 0; thisCol < 8; thisCol++) {
// get the state of the current pixel;
int thisPixel = pixels[thisRow][thisCol];
// when the row is HIGH and the col is LOW,
// the LED where they meet turns on:
digitalWrite(col[thisCol], thisPixel);
// turn the pixel off:
if (thisPixel == LOW) {
digitalWrite(col[thisCol], HIGH);
}
}
// take the row pin low to turn off the whole row:
digitalWrite(row[thisRow], LOW);
}
}](https://image.slidesharecdn.com/whatisarduino-140128055527-phpapp02/85/What-is-arduino-139-320.jpg)
![8.Strings
String Addition Operator
String Addition Operator
You can add Strings together in a variety of ways. This is called concatenation and it results in the
original String being longer by the length of the String or character array with which you concatenate it.
The + operator allows you to combine a String with another String, with a constant character array, an
ASCII representation of a constant or variable number, or a constant character.
// adding a constant integer to a string:
stringThree = stringOne + 123;
// adding a constant long interger to a string:
stringThree = stringOne + 123456789;
// adding a constant character to a string:
stringThree = stringOne + 'A';
// adding a constant string to a string:
stringThree = stringOne + "abc";
// adding two Strings together:
stringThree = stringOne + stringTwo;
[Get Code]
You can also use the + operator to add the results of a function to a String, if the function returns one of
the allowed data types mentioned above. For example,
stringThree = stringOne + millis();
[Get Code]
This is allowable since the millis() function returns a long integer, which can be added to a String. You
could also do this:
stringThree = stringOne + analogRead(A0);
[Get Code]
because analogRead() returns an integer. String concatenation can be very useful when you need to display
a combination of values and the descriptions of those values into one String to display via serial
communication, on an LCD display, over an Ethernet connection, or anywhere that Strings are useful.
Caution: You should be careful about concatenating multiple variable types on the same line, as you
may get unexpected results. For example:
int sensorValue = analogRead(A0);
String stringOne = "Sensor value: ";
String stringThree = stringOne + sensorValue;
Serial.println(stringThree);
[Get Code]
results in "Sensor Value: 402" or whatever the analogRead() result is, but
int sensorValue = analogRead(A0);
String stringThree = "Sensor value: " + sensorValue;
Serial.println(stringThree);
[Get Code]
gives unpredictable results because stringThree never got an initial value before you started concatenating
different data types.
Here's another example where improper initialization will cause errors:
Serial.println("I want " + analogRead(A0) + " donuts");
[Get Code]](https://image.slidesharecdn.com/whatisarduino-140128055527-phpapp02/85/What-is-arduino-140-320.jpg)
![This won't compile because the compiler doesn't handle the operator precedence correctly. On the other
hand, the following will compile, but it won't run as expected:
int sensorValue = analogRead(A0);
String stringThree = "I want " + sensorValue;
Serial.println(stringThree + " donuts");
[Get Code]
It doesn't run correctly for the same reason as before: stringThree never got an initial value before you
started concatenating different data types.
For best results, initialize your Strings before you concatenate them.
Hardware Required:
Arduino Board
Circuit
There is no circuit for this example, though your Arduino must be connected to your computer via USB.
image developed using Fritzing. For more circuit examples, see the Fritzing project page
Code
Here's a working example of several different concatenation examples :
/*
Adding Strings together
Examples of how to add strings together
You can also add several different data types to string, as shown here:
created 27 July 2010
modified 2 Apr 2012
by Tom Igoe
http://arduino.cc/en/Tutorial/StringAdditionOperator
This example code is in the public domain.
*/
// declare three strings:
String stringOne, stringTwo, stringThree;
void setup() {
// initialize serial and wait for port to open:
Serial.begin(9600);
while (!Serial) {
; // wait for serial port to connect. Needed for Leonardo only
}
stringOne = String("stringThree = ");
stringTwo = String("this string");
stringThree = String ();
// send an intro:
Serial.println("nnAdding strings together (concatenation):");
Serial.println();
}
void loop() {
// adding a constant integer to a string:
stringThree = stringOne + 123;
Serial.println(stringThree);
// prints "stringThree = 123"](https://image.slidesharecdn.com/whatisarduino-140128055527-phpapp02/85/What-is-arduino-141-320.jpg)
![// adding a constant long interger to a string:
stringThree = stringOne + 123456789;
Serial.println(stringThree);
// prints " You added 123456789"
// adding a constant character to a string:
stringThree = stringOne + 'A';
Serial.println(stringThree);
// prints "You added A"
// adding a constant string to a string:
stringThree = stringOne + "abc";
Serial.println(stringThree);
// prints "You added abc"
stringThree = stringOne + stringTwo;
Serial.println(stringThree);
// prints "You added this string"
// adding a variable integer to a string:
int sensorValue = analogRead(A0);
stringOne = "Sensor value: ";
stringThree = stringOne + sensorValue;
Serial.println(stringThree);
// prints "Sensor Value: 401" or whatever value
analogRead(A0) has
// adding a variable long integer to a string:
long currentTime = millis();
stringOne="millis() value: ";
stringThree = stringOne + millis();
Serial.println(stringThree);
// prints "The millis: 345345" or whatever value
currentTime has
// do nothing while true:
while(true);
}
String Appending Operators
String Appending Operators
Just as you can concatenate Strings with other data objects using the StringAdditionOperator, you can
also use the +=operator and the cconcat() method to append things to Strings. The += operator and
the concat() method work the same way, it's just a matter of which style you prefer. The two examples
below illustrate both, and result in the same String:
String stringOne = "A long integer: ";
// using += to add a long variable to a string:
stringOne += 123456789;
[Get Code]
or
String stringOne = "A long integer: ";
// using concat() to add a long variable to a string:
stringTwo.concat(123456789);
[Get Code]
In both cases, stringOne equals "A long integer: 123456789". Like the + operator, these operators are
handy for assembling longer strings from a combination of data objects.
Hardware Required:](https://image.slidesharecdn.com/whatisarduino-140128055527-phpapp02/85/What-is-arduino-142-320.jpg)


![http://arduino.cc/en/Tutorial/StringCaseChanges
This example code is in the public domain.
*/
void setup() {
// Open serial communications and wait for port to open:
Serial.begin(9600);
while (!Serial) {
; // wait for serial port to connect. Needed for Leonardo only
}
// send an intro:
Serial.println("nnString
Serial.println();
case changes:");
}
void loop() {
// toUpperCase() changes all letters to upper case:
String stringOne = "<html><head><body>";
Serial.println(stringOne);
stringOne.toUpperCase();
Serial.println(stringOne);
// toLowerCase() changes all letters to lower case:
String stringTwo = "</BODY></HTML>";
Serial.println(stringTwo);
stringTwo.toLowerCase();
Serial.println(stringTwo);
// do nothing while true:
while(true);
}
String Character Functions
String Character Functions
The String functions charAt() and setCharAt() are used to get or set the value of a character at a given
position in a String.
At their simplest, these functions help you search and replace a given character. For example, the
following replaces the colon in a given String with an equals sign:
String reportString = "SensorReading: 456";
int colonPosition = reportString.indexOf(':');
reportString.setCharAt(colonPosition, '=');
[Get Code]
Here's an example that checks to see if the first letter of the second word is 'B':
String reportString = "Franklin, Benjamin";
int spacePosition = reportString.indexOf(' ');
if (reportString.charAt(spacePosition + 1) == 'B') {
Serial.println("You might have found the Benjamins.")
}
[Get Code]](https://image.slidesharecdn.com/whatisarduino-140128055527-phpapp02/85/What-is-arduino-145-320.jpg)

![String Comparison Operators
String Comparison Operators
The String comparison operators, ==, !=,>, < ,>=, <= , and the functionsequals() and equalsIgoreCase() allow
you to make alphabetic comparisons between Strings. They're useful for sorting and alphabetizing,
among other things.
The operator == and the function equals() perform identically. It's just a matter of which you prefer. So
if (stringOne.equals(stringTwo)) {
[Get Code]
is identical to
if (stringOne ==stringTwo) {
[Get Code]
The greater than and less than operators evaluate strings in alphabetical order, on the first character
where the two differ. So, for example "a"
< "b"
and "1"
< "2",
but "999">
"1000"
because 9 comes after 1.
Caution: String comparison operators can be confusing when you're comparing numeric strings,
because you're used to thinking of them as numbers, not strings. If you have to compare numbers,
compare them as ints, floats, or longs, and not as Strings.
Hardware Required
Arduino Board
Circuit
There is no circuit for this example, though your Arduino must be connected to your computer via USB.
image developed using Fritzing. For more circuit examples, see the Fritzing project page
Code
/*
Comparing Strings
Examples of how to compare strings using the comparison operators
created 27 July 2010
modified 2 Apr 2012
by Tom Igoe
http://arduino.cc/en/Tutorial/StringComparisonOperators
This example code is in the public domain.
*/
String stringOne, stringTwo;
void setup() {
// Open serial communications and wait for port to open:
Serial.begin(9600);
while (!Serial) {
; // wait for serial port to connect. Needed for Leonardo only
}](https://image.slidesharecdn.com/whatisarduino-140128055527-phpapp02/85/What-is-arduino-147-320.jpg)

![// if the first character of the string you're comparing to
// comes first in alphanumeric order, then compareTo() is greater than 0:
stringOne = "Cucumber";
stringTwo = "Cucuracha";
if (stringOne.compareTo(stringTwo) < 0 ) {
Serial.println(stringOne + " comes before " + stringTwo);
}
else {
Serial.println(stringOne + " comes after " + stringTwo);
}
delay(10000);
// because the next part is a loop:
// compareTo() is handy when you've got strings with numbers in them too:
while (true) {
stringOne = "Sensor: ";
stringTwo= "Sensor: ";
stringOne += analogRead(A0);
stringTwo += analogRead(A5);
if (stringOne.compareTo(stringTwo) < 0 ) {
Serial.println(stringOne + " comes before " + stringTwo);
}
else {
Serial.println(stringOne + " comes after " + stringTwo);
}
}
}
String Object Constructors
String Object Constructors
The String object allows you to manipulate strings of text in a variety of useful ways. You can append
characters to Strings, combine Strings through concatenation, get the length of a String, search and
replace substrings, and more. This tutorial shows you how to initialize String objects.
String stringOne
String stringOne
String
String stringTwo
String object
String stringOne
String stringOne
String stringOne
String stringOne
(hexadecimal)
String stringOne
String stringOne
= "Hello String";
= String('a');
// using a constant String
// converting a constant char into a
=
String("This is a string");
// converting a constant string into a
=
=
=
=
String(stringTwo + " with more");// concatenating two strings
String(13);
// using a constant integer
String(analogRead(0), DEC);
// using an int and a base
String(45, HEX);
// using an int and a base
=
=
String(255, BIN);
String(millis(), DEC);
// using an int and a base (binary)
// using a long and a base
[Get Code]
All of these methods are valid ways to declare a String object. They all result in an object containing a
string of characters that can be manipulated using any of the String methods. To see them in action,](https://image.slidesharecdn.com/whatisarduino-140128055527-phpapp02/85/What-is-arduino-149-320.jpg)

![// using an int and a base:
stringOne = String(analogRead(A0), DEC);
// prints "453" or whatever the value of analogRead(A0) is
Serial.println(stringOne);
// using an int and a base (hexadecimal):
stringOne = String(45, HEX);
// prints "2d", which is the hexadecimal version of decimal 45:
Serial.println(stringOne);
// using an int and a base (binary)
stringOne = String(255, BIN);
// prints "11111111" which is the binary value of 255
Serial.println(stringOne);
// using a long and a base:
stringOne = String(millis(), DEC);
// prints "123456" or whatever the value of millis() is:
Serial.println(stringOne);
// do nothing while true:
while(true);
}
String indexOf() and lastIndexOf()Method
String indexOf() and lastIndexOf()Method
The String object indexOf() method gives you the ability to search for the first instance of a particular
character value in a String. You can also look for the first instance of the character after a given offset.
The lastIndexOf() method lets you do the same things from the end of a String.
String stringOne = "<HTML><HEAD><BODY>";
int firstClosingBracket = stringOne.indexOf('>');
[Get Code]
In this case, firstClosingBracket equals 5, because the first > character is at position 5 in the String
(counting the first character as 0). If you want to get the second closing bracket, you can use the fact that
you know the position of the first one, and search from firstClosingBracket
+ 1
as the offset, like so:
stringOne = "<HTML><HEAD><BODY>";
int secondClosingBracket = stringOne.indexOf('>', firstClosingBracket + 1 );
[Get Code]
The result would be 11, the position of the closing bracket for the HEAD tag.
If you want to search from the end of the String, you can use the lastIndexOf() method instead. This
function returns the position of the last occurrence of a given character.
stringOne = "<HTML><HEAD><BODY>";
int lastOpeningBracket = stringOne.lastIndexOf('<');
[Get Code]
In this case, lastOpeningBracket equals 12, the position of the < for the BODY tag. If you want the opening
bracket for the HEAD tag, it would be at stringOne.lastIndexOf('<',
Hardware Required
Arduino Board
lastOpeningBracket -1),
or 6.](https://image.slidesharecdn.com/whatisarduino-140128055527-phpapp02/85/What-is-arduino-151-320.jpg)


![Open the Serial Monitor and start sending characters to see the results.
created 1 Aug 2010
by Tom Igoe
http://arduino.cc/en/Tutorial/StringLengthTrim
This example code is in the public domain.
*/
String txtMsg = "";
// a string for incoming text
int lastStringLength = txtMsg.length();
// previous length of the String
void setup() {
// Open serial communications and wait for port to open:
Serial.begin(9600);
while (!Serial) {
; // wait for serial port to connect. Needed for Leonardo only
}
// send an intro:
Serial.println("nnString
Serial.ptintln();
length():");
}
void loop() {
// add any incoming characters to the String:
while (Serial.available() > 0) {
char inChar = Serial.read();
txtMsg += inChar;
}
// print the message and a notice if it's changed:
if (txtMsg.length() != lastStringLength) {
Serial.println(txtMsg);
Serial.println(txtMsg.length());
// if the String's longer than 140 characters, complain:
if (txtMsg.length() < 140) {
Serial.println("That's a perfectly acceptable text message");
}
else {
Serial.println("That's too long for a text message.");
}
// note the length for next time through the loop:
lastStringLength = txtMsg.length();
}
}
[Get Code]
trim()
is useful for when you know there are extraneous whitespace characters on the beginning or the
end of a String and you want to get rid of them. Whitespace refers to characters that take space but aren't
seen. It includes the single space (ASCII 32), tab (ASCII 9), vertical tab (ASCII 11), form feed (ASCII 12),
carriage return (ASCII 13), or newline (ASCII 10). The example below shows a String with whitespace,
before and after trimming:
/*
String length() and trim()
Examples of how to use length() and trim() in a String
created 27 July 2010
modified 2 Apr 2012
by Tom Igoe
http://arduino.cc/en/Tutorial/StringLengthTrim
This example code is in the public domain.
*/
void setup() {
// Open serial communications and wait for port to open:
Serial.begin(9600);
while (!Serial) {
; // wait for serial port to connect. Needed for Leonardo only
}
// send an intro:
Serial.println("nnString
length() and trim():");](https://image.slidesharecdn.com/whatisarduino-140128055527-phpapp02/85/What-is-arduino-154-320.jpg)
![Serial.println();
}
void loop() {
// here's a String with empty spaces at the end (called white space):
String stringOne = "Hello!
";
Serial.print(stringOne);
Serial.print("<--- end of string. Length: ");
Serial.println(stringOne.length());
// trim the white space off the string:
stringOne.trim();
Serial.print(stringOne);
Serial.print("<--- end of trimmed string. Length: ");
Serial.println(stringOne.length());
// do nothing while true:
while(true);
}
String replace Function
String replace Function
The String replace() function allows you to replace all instances of a given character with another
character. You can also use replace to replace substrings of a string with a different substring.
Hardware Required
Arduino Board
Circuit
There is no circuit for this example, though your Arduino must be connected to your computer via USB.
image developed using Fritzing. For more circuit examples, see the Fritzing project page
Code
Caution: If you try to replace a substring that's more than the whole string itself, nothing will be
replaced. For example:
String stringOne = "<html><head><body>";
String
stringTwo = stringOne.replace("<html><head></head><body></body></html>", "Blah");
[Get Code]](https://image.slidesharecdn.com/whatisarduino-140128055527-phpapp02/85/What-is-arduino-155-320.jpg)

![The String functions startsWith() and endsWith() allow you to check what character or substring a given
String starts or ends with. They're basically special cases of substring.
Hardware Required
Arduino Board
Circuit
There is no circuit for this example, though your Arduino must be connected to your computer via USB.
image developed using Fritzing. For more circuit examples, see the Fritzing project page
Code
startsWith()
and endsWith() can be used to look for a particular message header, or for a single character
at the end of a String. They can also be used with an offset to look for a substring starting at a particular
position. For example:
stringOne = "HTTP/1.1 200 OK";
if (stringOne.startsWith("200 OK", 9)) {
Serial.println("Got an OK from the server");
}
[Get Code]
This is functionally the same as this:
stringOne = "HTTP/1.1 200 OK";
if (stringOne.substring(9) == "200 OK") {
Serial.println("Got an OK from the server");
}
[Get Code]
Caution: If you look for a position that's outside the range of the string,you'll get unpredictable results.
For example, in the example above stringOne.startsWith("200 OK", 16) wouldn't check against the
String itself, but whatever is in memory just beyond it. For best results, make sure the index values you
use for startsWith and endsWith are between 0 and the String's length().
/*
String startWith() and endsWith()
Examples of how to use startsWith() and endsWith() in a String
created 27 July 2010
modified 2 Apr 2012
by Tom Igoe
http://arduino.cc/en/Tutorial/StringStartsWithEndsWith
This example code is in the public domain.
*/
void setup() {
// Open serial communications and wait for port to open:
Serial.begin(9600);
while (!Serial) {
; // wait for serial port to connect. Needed for Leonardo only
}
// send an intro:
Serial.println("nnString startsWith() and endsWith():");
Serial.println();](https://image.slidesharecdn.com/whatisarduino-140128055527-phpapp02/85/What-is-arduino-157-320.jpg)

![image developed using Fritzing. For more circuit examples, see the Fritzing project page
Code
substring()
with only one parameter looks for a given substring from the position given to the end of the
string. It expects that the substring extends all the way to the end of the String. For example:
String stringOne = "Content-Type: text/html";
// substring(index) looks for the substring from the index position to the end:
if (stringOne.substring(19) == "html") {
}
[Get Code]
is true, while
String stringOne = "Content-Type: text/html";
// substring(index) looks for the substring from the index position to the end:
if (stringOne.substring(19) == "htm") {
}
[Get Code]
is not true, because there's an
substring()
l
after the
htm
in the String.
with two parameters looks for a given substring from the first parameter to the second. For
example:
String stringOne = "Content-Type: text/html";
// you can also look for a substring in the middle of a string:
if (stringOne.substring(14,18) == "text") {
}
[Get Code]
This looks for the word text from positions 14 through 18 of the String.
Caution: make sure your index values are within the String's length or you'll get unpredictable results.
This kind of error can be particularly hard to find with the second instance of substring() if the starting
position is less than the String's length, but the ending position isn't.
SORRY, There is an error at our code repository, please inform to web@arduino.cc](https://image.slidesharecdn.com/whatisarduino-140128055527-phpapp02/85/What-is-arduino-159-320.jpg)


More Related Content
What's hot (20)
Similar to What is arduino (20)


Recently uploaded (20)


What is arduino
- 1. What is Arduino? Arduino is a tool for making computers that can sense and control more of the physical world than your desktop computer. It's an open-source physical computing platform based on a simple microcontroller board, and a development environment for writing software for the board. Arduino can be used to develop interactive objects, taking inputs from a variety of switches or sensors, and controlling a variety of lights, motors, and other physical outputs. Arduino projects can be standalone, or they can be communicate with software running on your computer (e.g. Flash, Processing, MaxMSP.) The boards can be assembled by hand or purchased preassembled; the opensource IDE can be downloaded for free. The Arduino programming language is an implementation of Wiring, a similar physical computing platform, which is based on the Processing multimedia programming environment. Why Arduino? There are many other microcontrollers and microcontroller platforms available for physical computing. Parallax Basic Stamp, Netmedia's BX-24, Phidgets, MIT's Handyboard, and many others offer similar functionality. All of these tools take the messy details of microcontroller programming and wrap it up in an easy-to-use package. Arduino also simplifies the process of working with microcontrollers, but it offers some advantage for teachers, students, and interested amateurs over other systems: Inexpensive - Arduino boards are relatively inexpensive compared to other microcontroller platforms. The least expensive version of the Arduino module can be assembled by hand, and even the preassembled Arduino modules cost less than $50 Cross-platform - The Arduino software runs on Windows, Macintosh OSX, and Linux operating systems. Most microcontroller systems are limited to Windows. Simple, clear programming environment - The Arduino programming environment is easy-to-use for beginners, yet flexible enough for advanced users to take advantage of as well. For teachers, it's conveniently based on the Processing programming environment, so students learning to program in that environment will be familiar with the look and feel of Arduino Open source and extensible software- The Arduino software is published as open source tools, available for extension by experienced programmers. The language can be expanded through C++ libraries, and people wanting to understand the technical details can make the leap from Arduino to the AVR C programming language on which it's based. SImilarly, you can add AVR-C code directly into your Arduino programs if you want to. Open source and extensible hardware - The Arduino is based on Atmel's ATMEGA8 and ATMEGA168microcontrollers. The plans for the modules are published under a Creative Commons license, so experienced circuit designers can make their own version of the module, extending it and improving it. Even relatively inexperienced users can build the breadboard version of the module in order to understand how it works and save money.
- 2. Examples See the foundations page for in-depth description of core concepts of the Arduino hardware and software; thehacking page for information on extending and modifying the Arduino hardware and software; and the links pagefor other documentation. Note: these examples are written for Arduino 1.0 and later. Certain functions may not work in earlier versions. For best results, download the latest version. Here's a style guide that helps with writing examples for beginners. Core F unctions Libraries Simple programs that demonstrate basic Examples from the libraries that are included in Arduino commands. These are included with the the Arduino software. Arduino environment; to open them, click the EEPROM Library Open button on the toolbar and look in the examples folder. 1.Basics BareMinimum: The bare minimum of code EEPROM Clear: clear the bytes in the EEPROM. EEPROM Read: read the EEPROM and send its values to the computer. needed to start an Arduino sketch. input to the EEPROM. Blink: Turn an LED on and off. EEPROM Write: stores values from an analog DigitalReadSerial: Read a switch, print the state Ethernet Library out to the Arduino Serial Monitor. ChatServer: set up a simple chat server. AnalogReadSerial: Read a potentiometer, print WebClient: make a HTTP request. it's state out to the Arduino Serial Monitor. WebClientRepeating: Make repeated HTTP Fade: Demonstrates the use of analog output to fade an LED. requests. ReadAnalogVoltage : Reads an analog input and prints the voltage to the serial monitor displays analog sensor values. PachubeClientString: send strings to pachube.com. Blink Without Delay: blinking an LED without using the delay() function. PachubeClient: connect to pachube.com, a free datalogging site. 2.Digital WebServer: host a simple HTML page that BarometricPressureWebServer: outputs the Button: use a pushbutton to control an LED. values from a barometric pressure sensor as a Debounce: read a pushbutton, filtering noise. web page. Button State Change: counting the number of button pushes. Input Pullup Serial: Demonstrates the use of strings via UDP. INPUT_PULLUP with pinMode(). Tone: play a melody with a Piezo speaker. UDPSendReceiveString: Send and receive text UdpNtpClient: Query a Network Time Protocol (NTP) server using UDP. Pitch follower: play a pitch on a piezo speaker DnsWebClient: DNS and DHCP-based Web client. depending on an analog input. DhcpChatServer: A simple DHCP Chat Server Simple Keyboard: a three-key musical keyboard DhcpAddressPrinter: Get an IP address via using force sensors and a piezo speaker. DHCP and print it out Tone4: play tones on multiple speakers TwitterClient: A Twitter client with Strings sequentially using the tone() command. TelnetClient: A simple Telnet client 3.Analog Firmata Libraries
- 3. AnalogInOutSerial: read an analog input pin, map the result, and then use that data to dim or Liq uidCrystal Library brighten an LED. Analog Input: use a potentiometer to control the Guide to the Standard Firmata Library blinking of an LED. Hello World: displays "hello world!" and the seconds since reset. AnalogWriteMega: fade 12 LEDs on and off, one Blink: control of the block-style cursor. by one, using an Arduino Mega board. Cursor: control of the underscore-style cursor. Calibration: define a maximum and minimum Display: quickly blank the display without losing for expected analog sensor values. Fading: use an analog output (PWM pin) to fade what's on it. an LED. TextDirection: control which way text flows from the cursor. Smoothing: smooth multiple readings of an Scroll: scroll text left and right. analog input. Serial input: accepts serial input, displays it. SetCursor: set the cursor position. Autoscroll: shift text right and left. 4.Communication These examples include code that allows the Arduino to talk to Processing sketches running SPI Library on the computer. For more information or to download Processing, seeprocessing.org. There BarometricPressureSensor: read air pressure are also Max/MSP patches that can and temperature from a sensor using the SPI communicate with each Arduino sketch as well. protocol. For more on Max/MSP see Cycling 74. For Pd potentiometer using the SPI protocol. patches that can communicate with these sketches, see Scott Fitzgerald's examples. ReadASCIIString: parse a comma-separated string of ints to fade an LED ASCII Table: demonstrates Arduino's advanced serial output functions. Servo Library Software Serial Library Graph: send data to the computer and graph it one serial port just isn't enough! data to your Arduino from Processing or Software Serial Example: how to use theSoftwareSerial Library...Because sometimes Physical Pixel: turn a LED on and off by sending Max/MSP. Sweep: sweeps the shaft of a servo motor back and forth. Dimmer: move the mouse to change the in Processing. Knob: control the shaft of a servo motor by turning a potentiometer. brightness of an LED. SPIDigitalPot: control a AD5206 digital Two Port Receive: how to work with multiple software serial ports. Virtual Color Mixer: send multiple variables from Arduino to your computer and read them Stepper Library in Processing or Max/MSP. Serial Call Response: send multiple vairables motor using a potentiometer. using a call-and-response (handshaking) method. Wire Library Serial Call Response ASCII: send multiple variables using a call-and-response Motor Knob: control a highly accurate stepper SFRRanger_reader: read a (handshaking) method, and ASCII-encode the Devantech SRFxx ultra-sonic range finder values before sending. using I2C communication.
- 4. SerialEvent: Demonstrates the use of SerialEvent(). Serial input (Switch (case) Statement): how to digital_potentiometer: control a AD5171 digital pot using the Wire Library. master reader/slave sender: set up two (or take different actions based on characters more) arduino boards to share information via a received by the serial port. master reader/slave sender configuration. MIDI: send MIDI note messages serially. MultiSerialMega: use two of the serial ports arduino boards to share information using a available on the Arduino Mega. master writer/slave reader set up. 5.Control Structures WiFi Library The WiFi Library will be included in a future If Statement (Conditional): how to use an if release of the Arduino IDE. You can download statement to change output conditions based on the most recent version, and install it as you changing input conditions. Array: a variation on the For Loop example that demonstrates how to use an array. would any other library. For Loop: controlling multiple LEDs with a for loop and. ConnectNoEncryption : Demonstrates how to connect to an open network While Loop: how to use a while loop to calibrate a sensor while a button is being read. master writer/slave reader: allow two (or more) ConnectWithWEP : Demonstrates how to connect to a network that is encrypted with WEP ConnectWithWPA : Demonstrates how to Switch Case: how to choose between a discrete connect to a network that is encrypted number of values. Equivalent to multiple If with WPA2 Personal statements. This example shows how to divide a sensor's range into a set of four bands and to ScanNetworks : Displays all WiFi networks in range take four different actions depending on which WiFiChatServer : Set up a simple chat server band the result is in. WiFiPachubeClient : connect to pachube.com, a Switch Case 2: a second switch-case example, showing how to take different actions based in free datalogging site characters received in the serial port. 6.Sensors ADXL3xx: read an ADXL3xx accelerometer. Memsic2125 : two-axis acceleromoter. Ping: detecting objects with an ultrasonic range pachube.com WiFiTwitterClient : A Twitter client with Strings WiFiWebClient : Connect to a remote webserver WiFiWebClientRepeating: Repeatedly make Knock: detect knocks with a piezo element. finder. WiFiPachubeClientString: send strings to HTTP calls to a server WiFiWebServer : Serve a webpage from the WiFishield Arduino as ISP Programmer 7.Display ArduinoISP turns your Arduino into an in- Examples of basic display control circuit programmer to re-program Atmega LED Bar Graph: how to make an LED bar graph. Row Column Scanning: how to control an 8x8 matrix of LEDs. 8.Strings StringAdditionOperator: add strings together in a variety of ways. chips. Useful when you need to re-load the bootloader on an Arduino, if you're going from Arduino to an Atmega on a breadboard, or if you're making your own Arduino-compatible circuit on a breadboard. More For a huge list of examples from the Arduino
- 5. StringAppendOperator: append data to strings. community, see the interfacing with StringCaseChanges: change the case of a string. hardware page on the playground wiki. Also see StringCharacters: get/set the value of a specific the list of old examples. character in a string. StringComparisonOperators: compare strings alphabetically. StringConstructors: how to initialize string objects. StringIndexOf: look for the first/last instance of a character in a string. StringLength & StringLengthTrim: get and trim the length of a string. StringReplace: replace individual characters in a string. StringStartsWithEndsWith: check which characters/substrings a given string starts or ends with. StringSubstring: look for "phrases" within a given string. 9.USB (Leonardo, Micro, and D ue specific examples) The Keyboard and Mouse examples are unique to the Leonardo, Micro and Due. They demonstrate the use of libraries that are unique to the board. KeyboardAndMouseControl: Demonstrates the Mouse and Keyboard commands in one program. Keyboard KeyboardMessage: Sends a text string when a button is pressed. KeyboardLogout : Logs out the current user with key commands KeyboardSerial: Reads a byte from the serial port, and sends back a keystroke. KeyboardReprogram : opens a new window in the Arduino IDE and reprograms the Leonardo with a simple blink program Mouse ButtonMouseControl: Control cursor movement with 5 pushbuttons. JoystickMouseControl: Controls a computer's
- 6. cursor movement with a Joystick when a button is pressed. Core Functions 1-BASICS Bare minimum Bare Minimum code needed to get started This example contains the bare minimum of code you need for an Arduino sketch to compile: the setup() method and theloop() method. Hardware Required Arduino Board Circuit Only your Arduino Board is needed for this example. image developed using Fritzing. For more circuit examples, see the Fritzing project page Code The setup() function is called when a sketch starts. Use it to initialize variables, pin modes, start using libraries, etc. The setup function will only run once, after each powerup or reset of the Arduino board.
- 7. After creating a setup() function, the loop() function does precisely what its name suggests, and loops consecutively, allowing your program to change and respond as it runs. Code in the loop() section of your sketch is used to actively control the Arduino board. The code below won't actually do anything, but it's structure is useful for copying and pasting to get you started on any sketch of your own. It also shows you how to make comments in your code. Any line that starts with two slashes (//) will not be read by the compiler, so you can write anything you want after it. Commenting your code like this can be particularly helpful in explaining, both to yourself and others, how your program functions step by step. void setup() { // put your setup code here, to run once: } void loop() { // put your main code here, to run repeatedly: } Blink Blink This example shows the simplest thing you can do with an Arduino to see physical output: it blinks an LED. Hardware Required Arduino Board LED Circuit To build the circuit, attach a 220-ohm resistor to pin 13. Then attach the long leg of an LED (the positive leg, called the anode) to the resistor. Attach the short leg (the negative leg, called the cathode) to ground. Then plug your Arduino board into your computer, start the Arduino program, and enter the code below. Most Arduino boards already have an LED attached to pin 13 on the board itself. If you run this example with no hardware attached, you should see that LED blink. click the image to enlarge
- 8. image developed using Fritzing. For more circuit examples, see the Fritzing project page Schematic click the image to enlarge Code
- 9. In the program below, the first thing you do is to initialize pin 13 as an output pin with the line pinMode(13, OUTPUT); In the main loop, you turn the LED on with the line: digitalWrite(13, HIGH); This supplies 5 volts to pin 13. That creates a voltage difference across the pins of the LED, and lights it up. Then you turn it off with the line: digitalWrite(13, LOW); That takes pin 13 back to 0 volts, and turns the LED off. In between the on and the off, you want enough time for a person to see the change, so the delay() commands tell the Arduino to do nothing for 1000 milliseconds, or one second. When you use the delay() command, nothing else happens for that amount of time. Once you've understood the basic examples, check out the BlinkWithoutDelay example to learn how to create a delay while doing other things. Once you've understood this example, check out the DigitalReadSerial example to learn how read a switch connected to the Arduino. /* Blink Turns on an LED on for one second, then off for one second, repeatedly. This example code is in the public domain. */ // Pin 13 has an LED connected on most Arduino boards. // give it a name: int led = 13; // the setup routine runs once when you press reset: void setup() { // initialize the digital pin as an output. pinMode(led, OUTPUT); } // the loop routine runs over and over again forever: void loop() { digitalWrite(led, HIGH); // turn the LED on (HIGH is the voltage level) delay(1000); // wait for a second digitalWrite(led, LOW); // turn the LED off by making the voltage LOW delay(1000); // wait for a second } Digital Read Serial Digital Read Serial This example shows you how to monitor the state of a switch by establishing serial communication between your Arduino and your computer over USB. Hardware Required Arduino Board A momentary switch, button, or toggle switch 10k ohm resistor breadboard hook-up wire Circuit
- 10. image developed using Fritzing. For more circuit examples, see the Fritzing project page Connect three wires to the Arduino board. The first two, red and black, connect to the two long vertical rows on the side of the breadboard to provide access to the 5 volt supply and ground. The third wire goes from digital pin 2 to one leg of the pushbutton. That same leg of the button connects through a pulldown resistor (here 10 KOhms) to ground. The other leg of the button connects to the 5 volt supply. Pushbuttons or switches connect two points in a circuit when you press them. When the pushbutton is open (unpressed) there is no connection between the two legs of the pushbutton, so the pin is connected to ground (through the pull-down resistor) and reads as LOW, or 0. When the button is closed (pressed), it makes a connection between its two legs, connecting the pin to 5 volts, so that the pin reads as HIGH, or 1. If you disconnect the digital i/o pin from everything, the LED may blink erratically. This is because the input is "floating" - that is, it doesn't have a solid connection to voltage or ground, and it will randomly return either HIGH or LOW. That's why you need a pull-down resistor in the circuit. Schematic
- 11. Code In the program below, the very first thing that you do will in the setup function is to begin serial communications, at 9600 bits of data per second, between your Arduino and your computer with the line: Serial.begin(9600); Next, initialize digital pin 2, the pin that will read the output from your button, as an input: pinMode(2,INPUT); Now that your setup has been completed, move into the main loop of your code. When your button is pressed, 5 volts will freely flow through your circuit, and when it is not pressed, the input pin will be connected to ground through the 10-kilohm resistor. This is a digital input, meaning that the switch can only be in either an on state (seen by your Arduino as a "1", or HIGH) or an off state (seen by your Arduino as a "0", or LOW), with nothing in between. The first thing you need to do in the main loop of your program is to establish a variable to hold the information coming in from your switch. Since the information coming in from the switch will be either a "1" or a "0", you can use anint datatype. Call this variable sensorValue, and set it to equal whatever is being read on digital pin 2. You can accomplish all this with just one line of code: int sensorValue = digitalRead(2); Once the Arduino has read the input, make it print this information back to the computer as a decimal value. You can do this with the command Serial.println() in our last line of code: Serial.println(sensorValue); Now, when you open your Serial Monitor in the Arduino environment, you will see a stream of "0"s if your switch is open, or "1"s if your switch is closed. /* DigitalReadSerial Reads a digital input on pin 2, prints the result to the serial monitor This example code is in the public domain. */ // digital pin 2 has a pushbutton attached to it. Give it a name: int pushButton = 2; // the setup routine runs once when you press reset: void setup() { // initialize serial communication at 9600 bits per second: Serial.begin(9600); // make the pushbutton's pin an input: pinMode(pushButton, INPUT); } // the loop routine runs over and over again forever: void loop() { // read the input pin: int buttonState = digitalRead(pushButton); // print out the state of the button: Serial.println(buttonState); delay(1); // delay in between reads for stability } Analog Read Serial
- 12. Analog Read Serial This example shows you how to read analog input from the physical world using a potentiometer. A potentiometer is a simple mechanical device that provides a varying amount of resistance when its shaft is turned. By passing voltage through a potentiometer and into an analog input on your Arduino, it is possible to measure the amount of resistance produced by a potentiometer (or pot for short) as an analog value. In this example you will monitor the state of your potentiometer after establishing serial communication between your Arduino and your computer. Hardware Required Arduino Board 10-kilohm Potentiometer Circuit Connect the three wires from the potentiometer to your Arduino board. The first goes to ground from one of the outer pins of the potentiometer. The second goes from 5 volts to the other outer pin of the potentiometer. The third goes from analog input 2 to the middle pin of the potentiometer. click the image to enlarge image developed using Fritzing. For more circuit examples, see the Fritzing project page By turning the shaft of the potentiometer, you change the amount of resistance on either side of the wiper which is connected to the center pin of the potentiometer. This changes the voltage at the center pin. When the resistance between the center and the side connected to 5 volts is close to zero (and the resistance on the other side is close to 10 kilohms), the voltage at the center pin nears 5 volts. When the resistances are reversed, the voltage at the center pin nears 0 volts, or ground. This voltage is the analog voltage that you're reading as an input. The Arduino has a circuit inside called an analog-to-digital converter that reads this changing voltage and converts it to a number between 0 and 1023. When the shaft is turned all the way in one direction, there are 0 volts going to the pin, and the input value is 0. When the shaft is turned all the way in the opposite direction, there are 5 volts going to the pin and the input value is 1023. In between, analogRead() returns a number between 0 and 1023 that is proportional to the amount of voltage being applied to the pin. Schematic click the image to enlarge
- 13. Code In the program below, the only thing that you do will in the setup function is to begin serial communications, at 9600 bits of data per second, between your Arduino and your computer with the command: Serial.begin(9600); Next, in the main loop of your code, you need to establish a variable to store the resistance value (which will be between 0 and 1023, perfect for an int datatype) coming in from your potentiometer: int sensorValue = analogRead(A0); Finally, you need to print this information to your serial window as a decimal (DEC) value. You can do this with the command Serial.println() in your last line of code: Serial.println(sensorValue, DEC) Now, when you open your Serial Monitor in the Arduino development environment (by clicking the button directly to the right of the "Upload" button in the header of the program), you should see a steady stream of numbers ranging from 0-1023, correlating to the position of the pot. As you turn your potentiometer, these numbers will respond almost instantly. /* AnalogReadSerial Reads an analog input on pin 0, prints the result to the serial monitor. Attach the center pin of a potentiometer to pin A0, and the outside pins to +5V and ground. This example code is in the public domain. */ // the setup routine runs once when you press reset: void setup() { // initialize serial communication at 9600 bits per second: Serial.begin(9600); } // the loop routine runs over and over again forever: void loop() { // read the input on analog pin 0: int sensorValue = analogRead(A0);
- 14. // print out the value you read: Serial.println(sensorValue); delay(1); // delay in between reads for stability } Fading Fading Demonstrates the use of the analogWrite() function in fading an LED off and on. AnalogWrite uses pulse width modulation (PWM), turning a digital pin on and off very quickly, to create a fading effect. Hardware Required Arduino board Breadboard a LED a 220 ohm resistor Circuit Connect the anode (the longer, positive leg) of your LED to digital output pin 9 on your Arduino through a 220-ohm resistor. Connect the cathode (the shorter, negative leg) directly to ground. click the image to enlarge Schematic click the image to enlarge
- 15. image developed using Fritzing. For more circuit examples, see the Fritzing project page Code After declaring pin 9 to be your ledPin, there is nothing to do in the setup() function of your code. The analogWrite() function that you will be using in the main loop of your code requires two arguments: One telling the function which pin to write to, and one indicating what PWM value to write. In order to fade your LED off and on, gradually increase your PWM value from 0 (all the way off) to 255 (all the way on), and then back to 0 once again to complete the cycle. In the sketch below, the PWM value is set using a variable calledbrightness. Each time through the loop, it increases by the value of the variable fadeAmount. If brightness is at either extreme of its value (either 0 or 255), then fadeAmount is changed to its negative. In other words, if fadeAmount is 5, then it is set to -5. If it's 55, then it's set to 5. The next time through the loop, this change causesbrightness to change direction as well. analogWrite() can change the PWM value very fast, so the delay at the end of the sketch controls the speed of the fade. Try changing the value of the delay and see how it changes the program. /* Fade This example shows how to fade an LED on pin 9 using the analogWrite() function. This example code is in the public domain. */ int led = 9; int brightness = 0; int fadeAmount = 5; // the pin that the LED is attached to // how bright the LED is // how many points to fade the LED by // the setup routine runs once when you press reset: void setup() { // declare pin 9 to be an output: pinMode(led, OUTPUT); } // the loop routine runs over and over again forever: void loop() { // set the brightness of pin 9: analogWrite(led, brightness); // change the brightness for next time through the loop:
- 16. brightness = brightness + fadeAmount; // reverse the if (brightness fadeAmount = } // wait for 30 delay(30); direction of the fading at the ends of the fade: == 0 || brightness == 255) { -fadeAmount ; milliseconds to see the dimming effect } Analog Read Voltage Analog Read Voltage This example shows you how to read an analog input on Pin 0, convert the values from analogRead() into voltage, and print it out to the serial monitor. Hardware Required Arduino Board a variable resistor, like a potentiometer Circuit image developed using Fritzing. For more circuit examples, see the Fritzing project page Connect the three wires from the potentiometer to your Arduino board. The first goes to ground from one of the outer pins of the potentiometer. The second goes from 5 volts to the other outer pin of the potentiometer. The third goes from analog input 2 to the middle pin of the potentiometer. By turning the shaft of the potentiometer, you change the amount of resistance on either side of the wiper which is connected to the center pin of the potentiometer. This changes the voltage at the center pin. When the resistance between the center and the side connected to 5 volts is close to zero (and the resistance on the other side is close to 10 kilohms), the voltage at the center pin nears 5 volts. When the
- 17. resistances are reversed, the voltage at the center pin nears 0 volts, or ground. This voltage is the analog voltage that you're reading as an input. The Arduino has a circuit inside called an analog-to-digital converter that reads this changing voltage and converts it to a number between 0 and 1023. When the shaft is turned all the way in one direction, there are 0 volts going to the pin, and the input value is 0. When the shaft is turned all the way in the opposite direction, there are 5 volts going to the pin and the input value is 1023. In between, analogRead() returns a number between 0 and 1023 that is proportional to the amount of voltage being applied to the pin. Schematic Code In the program below, the very first thing that you do will in the setup function is to begin serial communications, at 9600 bits of data per second, between your Arduino and your computer with the line: Serial.begin(9600); Next, in the main loop of your code, you need to establish a variable to store the resistance value (which will be between 0 and 1023, perfect for an int datatype) coming in from your potentiometer: int sensorValue = analogRead(A0); To change the values from 0-1023 to a range that corresponds to the voltage the pin is reading, you'll need to create another variable, a float, and do a little math. To scale the numbers between 0.0 and 5.0, divide 5.0 by 1023.0 and multiply that by sensorValue : float voltage= sensorValue * (5.0 / 1023.0); Finally, you need to print this information to your serial window as. You can do this with the command Serial.println() in your last line of code: Serial.println(voltage)
- 18. Now, when you open your Serial Monitor in the Arduino development environment (by clicking the button directly to the right of the "Upload" button in the header of the program), you should see a steady stream of numbers ranging from 0.0 - 5.0. As you turn the pot, the values will change, corresponding to the voltage coming into pin A0. /* ReadAnalogVoltage Reads an analog input on pin 0, converts it to voltage, and prints the result to the serial monitor. Attach the center pin of a potentiometer to pin A0, and the outside pins to +5V and ground. This example code is in the public domain. */ // the setup routine runs once when you press reset: void setup() { // initialize serial communication at 9600 bits per second: Serial.begin(9600); } // the loop routine runs over and over again forever: void loop() { // read the input on analog pin 0: int sensorValue = analogRead(A0); // Convert the analog reading (which goes from 0 - 1023) to a voltage (0 - 5V): float voltage = sensorValue * (5.0 / 1023.0); // print out the value you read: Serial.println(voltage); } 2.Digital Blink Without Delay Blink Without Delay Sometimes you need to do two things at once. For example you might want to blink an LED (or some other time-sensitive function) while reading a button press or other input. In this case, you can't use delay(), or you'd stop everything else the program while the LED blinked. The program might miss the button press if it happens during the delay(). This sketch demonstrates how to blink the LED without using delay(). It keeps track of the last time the Arduino turned the LED on or off. Then, each time through loop(), it checks if a long enough interval has passed. If it has, it toggles the LED on or off. Hardware Required Arduino Board LED Circuit
- 19. To build the circuit, grab an LED and attach its long, positive leg (called the anode) to pin 13. Attach the short, negative leg (called the anode) to ground. Then plug your Arduino board into your computer, start the Arduino program, and enter the code below. Schematic: click the image to enlarge image developed using Fritzing. For more circuit examples, see the Fritzing project page
- 20. Code The code below uses the millis() function, a command that returns the number of milliseconds since the Arduino board started running its current program, to blink an LED. /* Blink without Delay Turns on and off a light emitting diode(LED) connected to a digital pin, without using the delay() function. This means that other code can run at the same time without being interrupted by the LED code. The circuit: * LED attached from pin 13 to ground. * Note: on most Arduinos, there is already an LED on the board that's attached to pin 13, so no hardware is needed for this example. created 2005 by David A. Mellis modified 8 Feb 2010 by Paul Stoffregen This example code is in the public domain. http://www.arduino.cc/en/Tutorial/BlinkWithoutDelay */ // constants won't change. Used here to // set pin numbers: const int ledPin = 13; // the number of the LED pin // Variables will change: int ledState = LOW; long previousMillis = 0; // ledState used to set the LED // will store last time LED was updated // the follow variables is a long because the time, measured in miliseconds, // will quickly become a bigger number than can be stored in an int. long interval = 1000; // interval at which to blink (milliseconds) void setup() { // set the digital pin as output: pinMode(ledPin, OUTPUT); } void loop() { // here is where you'd put code that needs to be running all the time. // check to see if it's time to blink the LED; that is, if the // difference between the current time and last time you blinked // the LED is bigger than the interval at which you want to // blink the LED. unsigned long currentMillis = millis(); if(currentMillis - previousMillis > interval) { // save the last time you blinked the LED previousMillis = currentMillis; // if the LED is off turn it on and vice-versa: if (ledState == LOW) ledState = HIGH; else ledState = LOW; // set the LED with the ledState of the variable: digitalWrite(ledPin, ledState); } }
- 21. Button Button Pushbuttons or switches connect two points in a circuit when you press them. This example turns on the built-in LED on pin 13 when you press the button. Hardware Arduino Board momentary button or switch 10K ohm resistor breadboard hook-up wire Circuit image developed using Fritzing. For more circuit examples, see the Fritzing project page Connect three wires to the Arduino board. The first two, red and black, connect to the two long vertical rows on the side of the breadboard to provide access to the 5 volt supply and ground. The third wire goes from digital pin 2 to one leg of the pushbutton. That same leg of the button connects through a pulldown resistor (here 10 KOhms) to ground. The other leg of the button connects to the 5 volt supply. When the pushbutton is open (unpressed) there is no connection between the two legs of the pushbutton, so the pin is connected to ground (through the pull-down resistor) and we read a LOW. When the button is closed (pressed), it makes a connection between its two legs, connecting the pin to 5 volts, so that we read a HIGH. You can also wire this circuit the opposite way, with a pullup resistor keeping the input HIGH, and going LOW when the button is pressed. If so, the behavior of the sketch will be reversed, with the LED normally on and turning off when you press the button. If you disconnect the digital i/o pin from everything, the LED may blink erratically. This is because the input is "floating" - that is, it will randomly return either HIGH or LOW. That's why you need a pull-up or pull-down resistor in the circuit. Schematic: click the image to enlarge
- 22. Code /* Button Turns on and off a light emitting diode(LED) connected to digital pin 13, when pressing a pushbutton attached to pin 2. The circuit: * LED attached from pin 13 to ground * pushbutton attached to pin 2 from +5V * 10K resistor attached to pin 2 from ground * Note: on most Arduinos there is already an LED on the board attached to pin 13. created 2005 by DojoDave <http://www.0j0.org> modified 30 Aug 2011 by Tom Igoe This example code is in the public domain. http://www.arduino.cc/en/Tutorial/Button */ // constants won't change. They're used here to // set pin numbers: const int buttonPin = 2; // the number of the pushbutton pin const int ledPin = 13; // the number of the LED pin // variables will change: int buttonState = 0; // variable for reading the pushbutton status void setup() { // initialize the LED pin as an output: pinMode(ledPin, OUTPUT); // initialize the pushbutton pin as an input: pinMode(buttonPin, INPUT); } void loop(){ // read the state of the pushbutton value: buttonState = digitalRead(buttonPin); // check if the pushbutton is pressed. // if it is, the buttonState is HIGH: if (buttonState == HIGH) { // turn LED on: digitalWrite(ledPin, HIGH); }
- 23. else { // turn LED off: digitalWrite(ledPin, LOW); } } Debounce Debounce This example demonstrates the use of a pushbutton as a switch: each time you press the button, the LED (or whatever) is turned on (if it's off) or off (if on). It also debounces the input, which means checking twice in a short period of time to make sure it's definitely pressed. Without debouncing, pressing the button once can appear to the code as multiple presses. Makes use of the millis() function to keep track of the time when the button is pressed. Hardware Required Arduino Board momentary button or switch 10K ohm resistor breadboard hook-up wire Circuit image developed using Fritzing. For more circuit examples, see the Fritzing project page Schematic click the image to enlarge
- 24. Code The code below is based on Limor Fried's version of debounce, but the logic is inverted from her example. In her example, the switch returns LOW when closed, and HIGH when open. Here, the switch returns HIGH when pressed and LOW when not pressed. /* Debounce Each time the input pin goes from LOW to HIGH (e.g. because of a push-button press), the output pin is toggled from LOW to HIGH or HIGH to LOW. There's a minimum delay between toggles to debounce the circuit (i.e. to ignore noise). The circuit: * LED attached from pin 13 to ground * pushbutton attached from pin 2 to +5V * 10K resistor attached from pin 2 to ground * Note: On most Arduino boards, there is already an LED on the board connected to pin 13, so you don't need any extra components for this example. created 21 November 2006 by David A. Mellis modified 30 Aug 2011 by Limor Fried This example code is in the public domain. http://www.arduino.cc/en/Tutorial/Debounce */ // constants won't change. They're used here to // set pin numbers: const int buttonPin = 2; // the number of the pushbutton pin const int ledPin = 13; // the number of the LED pin // Variables will change: int ledState = HIGH; // the current state of the output pin
- 25. int buttonState; int lastButtonState = LOW; // the current reading from the input pin // the previous reading from the input pin // the following variables are long's because the time, measured in miliseconds, // will quickly become a bigger number than can be stored in an int. long lastDebounceTime = 0; // the last time the output pin was toggled long debounceDelay = 50; // the debounce time; increase if the output flickers void setup() { pinMode(buttonPin, INPUT); pinMode(ledPin, OUTPUT); } void loop() { // read the state of the switch into a local variable: int reading = digitalRead(buttonPin); // check to see if you just pressed the button // (i.e. the input went from LOW to HIGH), and you've waited // long enough since the last press to ignore any noise: // If the switch changed, due to noise or pressing: if (reading != lastButtonState) { // reset the debouncing timer lastDebounceTime = millis(); } if ((millis() // whatever // than the buttonState } - lastDebounceTime) > debounceDelay) { the reading is at, it's been there for longer debounce delay, so take it as the actual current state: = reading; // set the LED using the state of the button: digitalWrite(ledPin, buttonState); // save the reading. Next time through the loop, // it'll be the lastButtonState: lastButtonState = reading; } Button State Change Detection (Edge Detection) Button State Change Detection (Edge Detection) Once you've got a pushbutton working, you often want to do some action based on how many times the button is pushed. To do this, you need to know when the button changes state from off to on, and count how many times this change of state happens. This is called state change detection or edge detection. Hardware Required Arduino Board momentary button or switch 10K ohm resistor breadboard hook-up wire Circuit
- 26. image developed using Fritzing. For more circuit examples, see the Fritzing project page Connect three wires to the Arduino board. The first goes from one leg of the pushbutton through a pulldown resistor (here 10 KOhms) to ground. The second goes from the corresponding leg of the pushbutton to the 5 volt supply. The third connects to a digital i/o pin (here pin 2) which reads the button's state. When the pushbutton is open (unpressed) there is no connection between the two legs of the pushbutton, so the pin is connected to ground (through the pull-down resistor) and we read a LOW. When the button is closed (pressed), it makes a connection between its two legs, connecting the pin to voltage, so that we read a HIGH. (The pin is still connected to ground, but the resistor resists the flow of current, so the path of least resistance is to +5V.) If you disconnect the digital i/o pin from everything, the LED may blink erratically. This is because the input is "floating" - that is, not connected to either voltage or ground. It will more or less randomly return either HIGH or LOW. That's why you need a pull-down resistor in the circuit. Schematic click the image to enlarge
- 27. The sketch below continually reads the button's state. It then compares the button's state to its state the last time through the main loop. If the current button state is different from the last button state and the current button state is high, then the button changed from off to on. The sketch then increments a button push counter. The sketch also checks the button push counter's value, and if it's an even multiple of four, it turns the LED on pin 13 ON. Otherwise, it turns it off. Code /* State change detection (edge detection) Often, you don't need to know the state of a digital input all the time, but you just need to know when the input changes from one state to another. For example, you want to know when a button goes from OFF to ON. This is called state change detection, or edge detection. This example shows how to detect when a button or button changes from off to on and on to off. The circuit: * pushbutton attached to pin 2 from +5V * 10K resistor attached to pin 2 from ground * LED attached from pin 13 to ground (or use the built-in LED on most Arduino boards) created 27 Sep 2005 modified 30 Aug 2011 by Tom Igoe This example code is in the public domain. http://arduino.cc/en/Tutorial/ButtonStateChange */ // this constant won't change: const int buttonPin = 2; // the pin that the pushbutton is attached to
- 28. const int ledPin = 13; // the pin that the LED is attached to // Variables will change: int buttonPushCounter = 0; int buttonState = 0; int lastButtonState = 0; // counter for the number of button presses // current state of the button // previous state of the button void setup() { // initialize the button pin as a input: pinMode(buttonPin, INPUT); // initialize the LED as an output: pinMode(ledPin, OUTPUT); // initialize serial communication: Serial.begin(9600); } void loop() { // read the pushbutton input pin: buttonState = digitalRead(buttonPin); // compare the buttonState to its previous state if (buttonState != lastButtonState) { // if the state has changed, increment the counter if (buttonState == HIGH) { // if the current state is HIGH then the button // wend from off to on: buttonPushCounter++; Serial.println("on"); Serial.print("number of button pushes: "); Serial.println(buttonPushCounter); } else { // if the current state is LOW then the button // wend from on to off: Serial.println("off"); } } // save the current state as the last state, //for next time through the loop lastButtonState = buttonState; // turns on the LED every four button pushes by // checking the modulo of the button push counter. // the modulo function gives you the remainder of // the division of two numbers: if (buttonPushCounter % 4 == 0) { digitalWrite(ledPin, HIGH); } else { digitalWrite(ledPin, LOW); } } Input Pullup Serial Input Pullup Serial This example demonstrates the use of INPUT_PULLUP with pinMode(). It monitors the state of a switch by establishingserial communication between your Arduino and your computer over USB. Additionally, when the input is HIGH, the onboard LED attached to pin 13 will turn on; when LOW, the LED will turn off.
- 29. Hardware Required Arduino Board A momentary switch, button, or toggle switch breadboard hook-up wire Circuit image developed using Fritzing. For more circuit examples, see the Fritzing project page Connect two wires to the Arduino board. The black wire connects ground to one leg of the pushbutton. The second wire goes from digital pin 2 to the other leg of the pushbutton. Pushbuttons or switches connect two points in a circuit when you press them. When the pushbutton is open (unpressed) there is no connection between the two legs of the pushbutton. Because the internal pull-up on pin 2 is active and connected to 5V, we read HIGH when the button is open. When the button is closed, the Arduino reads LOW because a connection to ground is completed. Schematic
- 30. Code In the program below, the very first thing that you do will in the setup function is to begin serial communications, at 9600 bits of data per second, between your Arduino and your computer with the line: Serial.begin(9600); Next, initialize digital pin 2 as an input with the internal pull-up resistor enabled: pinMode(2,INPUT_PULLUP); The following line make pin 13, with the onboard LED, an output : pinMode(13, OUTPUT); Now that your setup has been completed, move into the main loop of your code. When your button not is pressed, the internal pull-up resistor connects to 5 volts. This causes the Arduino to report "1" or HIGH. When the button is pressed, the Arduino pin is pulled to ground, causing the Arduino report a "0", or LOW. The first thing you need to do in the main loop of your program is to establish a variable to hold the information coming in from your switch. Since the information coming in from the switch will be either a "1" or a "0", you can use anint datatype. Call this variable sensorValue, and set it to equal whatever is being read on digital pin 2. You can accomplish all this with just one line of code:
- 31. int sensorValue = digitalRead(2); Once the Arduino has read the input, make it print this information back to the computer as a decimal (DEC) value. You can do this with the command Serial.println() in our last line of code: Serial.println(sensorValue, DEC); Now, when you open your Serial Monitor in the Arduino environment, you will see a stream of "0"s if your switch is closed, or "1"s if your switch is open. The LED on pin 13 will illuminate when the switch is HIGH, and turn off when LOW. /* Input Pullup Serial This example demonstrates the use of pinMode(INPUT_PULLUP). It reads a digital input on pin 2 and prints the results to the serial monitor. The circuit: * Momentary switch attached from pin 2 to ground * Built-in LED on pin 13 Unlike pinMode(INPUT), there is no pull-down resistor necessary. An internal 20K-ohm resistor is pulled to 5V. This configuration causes the input to read HIGH when the switch is open, and LOW when it is closed. created 14 March 2012 by Scott Fitzgerald http://www.arduino.cc/en/Tutorial/InputPullupSerial This example code is in the public domain */ void setup(){ //start serial connection Serial.begin(9600); //configure pin2 as an input and enable the internal pull-up resistor pinMode(2, INPUT_PULLUP); pinMode(13, OUTPUT); } void loop(){ //read the pushbutton value into a variable int sensorVal = digitalRead(2); //print out the value of the pushbutton Serial.println(sensorVal); // Keep in mind the pullup means the pushbutton's // logic is inverted. It goes HIGH when it's open, // and LOW when it's pressed. Turn on pin 13 when the // button's pressed, and off when it's not: if (sensorVal == HIGH) { digitalWrite(13, LOW); } else { digitalWrite(13, HIGH); } } Play a Melody using the tone() function
- 32. Play a Melody using the tone() function This example shows how to use the tone() command to generate notes. It plays a little melody you may have heard before. Hardware Required Arduino board 8 ohm small speaker 100 ohm resistor hook-up wire Circuit image developed using Fritzing. For more circuit examples, see the Fritzing project page Connect one terminal of your speaker to digital pin 8 through a 100 ohm resistor. Connect the other terminal to ground. Schematic click the image to enlarge
- 33. Code The code below uses an extra file, pitches.h. This file contains all the pitch values for typical notes. For example, NOTE_C4 is middle C. NOTE_FS4 is F sharp, and so forth. This note table was originally written by Brett Hagman, on whose work the tone() command was based. You may find it useful for whenever you want to make musical notes. The main sketch is as follows: /* Melody Plays a melody circuit: * 8-ohm speaker on digital pin 8 created 21 Jan 2010 modified 30 Aug 2011 by Tom Igoe This example code is in the public domain. http://arduino.cc/en/Tutorial/Tone */ #include "pitches.h" // notes in the melody: int melody[] = { NOTE_C4, NOTE_G3,NOTE_G3, NOTE_A3, NOTE_G3,0, NOTE_B3, NOTE_C4}; // note durations: 4 = quarter note, 8 = eighth note, etc.: int noteDurations[] = { 4, 8, 8, 4,4,4,4,4 }; void setup() { // iterate over the notes of the melody: for (int thisNote = 0; thisNote < 8; thisNote++) { // to calculate the note duration, take one second // divided by the note type. //e.g. quarter note = 1000 / 4, eighth note = 1000/8, etc. int noteDuration = 1000/noteDurations[thisNote]; tone(8, melody[thisNote],noteDuration);
- 34. // to distinguish the notes, set a minimum time between them. // the note's duration + 30% seems to work well: int pauseBetweenNotes = noteDuration * 1.30; delay(pauseBetweenNotes); // stop the tone playing: noTone(8); } } void loop() { // no need to repeat the melody. } [Get Code] To make the pitches.h file, click on the "new Tab" button in the upper right hand corner of the window. It looks like this: The paste in the following code: /************************************************* * Public Constants *************************************************/ #define #define #define #define #define #define #define #define #define #define #define #define #define #define #define #define #define #define #define #define #define #define #define #define #define #define #define #define #define #define #define #define #define #define #define #define #define #define #define #define #define #define #define #define #define #define #define #define #define #define #define #define #define #define NOTE_B0 NOTE_C1 NOTE_CS1 NOTE_D1 NOTE_DS1 NOTE_E1 NOTE_F1 NOTE_FS1 NOTE_G1 NOTE_GS1 NOTE_A1 NOTE_AS1 NOTE_B1 NOTE_C2 NOTE_CS2 NOTE_D2 NOTE_DS2 NOTE_E2 NOTE_F2 NOTE_FS2 NOTE_G2 NOTE_GS2 NOTE_A2 NOTE_AS2 NOTE_B2 NOTE_C3 NOTE_CS3 NOTE_D3 NOTE_DS3 NOTE_E3 NOTE_F3 NOTE_FS3 NOTE_G3 NOTE_GS3 NOTE_A3 NOTE_AS3 NOTE_B3 NOTE_C4 NOTE_CS4 NOTE_D4 NOTE_DS4 NOTE_E4 NOTE_F4 NOTE_FS4 NOTE_G4 NOTE_GS4 NOTE_A4 NOTE_AS4 NOTE_B4 NOTE_C5 NOTE_CS5 NOTE_D5 NOTE_DS5 NOTE_E5 31 33 35 37 39 41 44 46 49 52 55 58 62 65 69 73 78 82 87 93 98 104 110 117 123 131 139 147 156 165 175 185 196 208 220 233 247 262 277 294 311 330 349 370 392 415 440 466 494 523 554 587 622 659
- 35. #define #define #define #define #define #define #define #define #define #define #define #define #define #define #define #define #define #define #define #define #define #define #define #define #define #define #define #define #define #define #define #define #define #define #define NOTE_F5 NOTE_FS5 NOTE_G5 NOTE_GS5 NOTE_A5 NOTE_AS5 NOTE_B5 NOTE_C6 NOTE_CS6 NOTE_D6 NOTE_DS6 NOTE_E6 NOTE_F6 NOTE_FS6 NOTE_G6 NOTE_GS6 NOTE_A6 NOTE_AS6 NOTE_B6 NOTE_C7 NOTE_CS7 NOTE_D7 NOTE_DS7 NOTE_E7 NOTE_F7 NOTE_FS7 NOTE_G7 NOTE_GS7 NOTE_A7 NOTE_AS7 NOTE_B7 NOTE_C8 NOTE_CS8 NOTE_D8 NOTE_DS8 698 740 784 831 880 932 988 1047 1109 1175 1245 1319 1397 1480 1568 1661 1760 1865 1976 2093 2217 2349 2489 2637 2794 2960 3136 3322 3520 3729 3951 4186 4435 4699 4978 Pitch follower using the tone() function Pitch follower using the tone() function This example shows how to use the tone() command to generate a pitch that follows the values of an analog input Hardware Required 8-ohm speaker 1 photocell 4.7K ohm resistor 100 ohm resistor breadboard hook up wire Circuit
- 36. image developed using Fritzing. For more circuit examples, see the Fritzing project page Connect one terminal of your speaker to digital pin 9 through a 100 ohm resistor, and its other terminal to ground. Power your photoresistor with 5V, and connect it to analog 0 with the addition of a 4.7K resistor to ground. Schematic click the image to enlarge Code The code for this example is very simple. Just take an analog input and map its values to a range of audible pitches. Humans can hear from 20 - 20,000Hz, but 120 - 1500 usually works pretty well for this sketch. You'll need to get the actual range of your analog input for the mapping. In the circuit shown, the analog input value ranged from about 400 to about 1000. Change the values in the map() command to match the range for your sensor. The sketch is as follows:
- 37. /* Pitch follower Plays a pitch that changes based on a changing analog input circuit: * 8-ohm speaker on digital pin 8 * photoresistor on analog 0 to 5V * 4.7K resistor on analog 0 to ground created 21 Jan 2010 modified 31 May 2012 by Tom Igoe, with suggestion from Michael Flynn This example code is in the public domain. http://arduino.cc/en/Tutorial/Tone2 */ void setup() { // initialize serial communications (for debugging only): Serial.begin(9600); } void loop() { // read the sensor: int sensorReading = analogRead(A0); // print the sensor reading so you know its range Serial.println(sensorReading); // map the analog input range (in this case, 400 - 1000 from the photoresistor) // to the output pitch range (120 - 1500Hz) // change the minimum and maximum input numbers below // depending on the range your sensor's giving: int thisPitch = map(sensorReading, 400, 1000, 120, 1500); // play the pitch: tone(9, thisPitch, 10); delay(1); // delay in between reads for stability } Simple keyboard using the tone() function Simple keyboard using the tone() function This example shows how to use the tone() command to generate different pitches depending on which sensor is pressed. Hardware Required 8-ohm speaker (3) force sensing resistors (3) 10k ohm resistors (1) 100 ohm resistor breadboard hook up wire Circuit
- 38. Connect one terminal of your speaker to digital pin 8 through a 100 ohm resistor, and its other terminal to ground. Power your three FSRs (or any other analog sensor) with 5V in parallel. Connect each sensor to analog pins 0-2, using a 10K resistor as a reference to groud on each input line. click the image to enlarge image developed using Fritzing. For more circuit examples, see the Fritzing project page Schematic click the image to enlarge
- 39. Code The sketch below reads three analog sensors. Each corresponds to a note value in an array of notes. IF any of the sensors is above a given threshold, the corresponding note is played. Here's the main sketch: /* keyboard Plays a pitch that changes based on a changing analog input circuit: * 3 force-sensing resistors from +5V to analog in 0 through 5 * 3 10K resistors from analog in 0 through 5 to ground * 8-ohm speaker on digital pin 8 created 21 Jan 2010 modified 9 Apr 2012 by Tom Igoe This example code is in the public domain. http://arduino.cc/en/Tutorial/Tone3 */ #include "pitches.h" const int threshold = 10; // minimum reading of the sensors that generates a note // notes to play, corresponding to the 3 sensors: int notes[] = { NOTE_A4, NOTE_B4,NOTE_C3 }; void setup() { } void loop() { for (int thisSensor = 0; thisSensor < 3; thisSensor++) { // get a sensor reading:
- 40. int sensorReading = analogRead(thisSensor); // if the sensor is pressed hard enough: if (sensorReading > threshold) { // play the note corresponding to this sensor: tone(8, notes[thisSensor], 20); } } } [Get Code] The sketch uses an extra file, pitches.h. This file contains all the pitch values for typical notes. For example, NOTE_C4 is middle C. NOTE_FS4 is F sharp, and so forth. This note table was originally written by Brett Hagman, on whose work the tone() command was based. You may find it useful for whenever you want to make musical notes. To make this file, click on the "new Tab" button in the upper right hand corner of the window. It looks like this: The paste in the following code: /************************************************* * Public Constants *************************************************/ #define #define #define #define #define #define #define #define #define #define #define #define #define #define #define #define #define #define #define #define #define #define #define #define #define #define #define #define #define #define #define #define #define #define #define #define #define #define #define #define #define #define #define #define #define #define #define #define #define #define #define NOTE_B0 NOTE_C1 NOTE_CS1 NOTE_D1 NOTE_DS1 NOTE_E1 NOTE_F1 NOTE_FS1 NOTE_G1 NOTE_GS1 NOTE_A1 NOTE_AS1 NOTE_B1 NOTE_C2 NOTE_CS2 NOTE_D2 NOTE_DS2 NOTE_E2 NOTE_F2 NOTE_FS2 NOTE_G2 NOTE_GS2 NOTE_A2 NOTE_AS2 NOTE_B2 NOTE_C3 NOTE_CS3 NOTE_D3 NOTE_DS3 NOTE_E3 NOTE_F3 NOTE_FS3 NOTE_G3 NOTE_GS3 NOTE_A3 NOTE_AS3 NOTE_B3 NOTE_C4 NOTE_CS4 NOTE_D4 NOTE_DS4 NOTE_E4 NOTE_F4 NOTE_FS4 NOTE_G4 NOTE_GS4 NOTE_A4 NOTE_AS4 NOTE_B4 NOTE_C5 NOTE_CS5 31 33 35 37 39 41 44 46 49 52 55 58 62 65 69 73 78 82 87 93 98 104 110 117 123 131 139 147 156 165 175 185 196 208 220 233 247 262 277 294 311 330 349 370 392 415 440 466 494 523 554
- 41. #define #define #define #define #define #define #define #define #define #define #define #define #define #define #define #define #define #define #define #define #define #define #define #define #define #define #define #define #define #define #define #define #define #define #define #define #define #define NOTE_D5 NOTE_DS5 NOTE_E5 NOTE_F5 NOTE_FS5 NOTE_G5 NOTE_GS5 NOTE_A5 NOTE_AS5 NOTE_B5 NOTE_C6 NOTE_CS6 NOTE_D6 NOTE_DS6 NOTE_E6 NOTE_F6 NOTE_FS6 NOTE_G6 NOTE_GS6 NOTE_A6 NOTE_AS6 NOTE_B6 NOTE_C7 NOTE_CS7 NOTE_D7 NOTE_DS7 NOTE_E7 NOTE_F7 NOTE_FS7 NOTE_G7 NOTE_GS7 NOTE_A7 NOTE_AS7 NOTE_B7 NOTE_C8 NOTE_CS8 NOTE_D8 NOTE_DS8 587 622 659 698 740 784 831 880 932 988 1047 1109 1175 1245 1319 1397 1480 1568 1661 1760 1865 1976 2093 2217 2349 2489 2637 2794 2960 3136 3322 3520 3729 3951 4186 4435 4699 4978 SPlaying tones on Multiple outputs using the tone() function SPlay ing tones on Multiple outputs using the tone() function This example shows how to use the tone() command to play different notes on multiple outputs. The tone() command works by taking over one of the Atmega's internal timers, setting it to the frequency you want, and using the timer to pulse an output pin. Since it's only using one timer, you can only play one note at a time. You can, however, play notes on multiple pins sequentially. To do this, you need to turn the timer off for one pin before moving on to the next. Thanks to Greg Borenstein for clarifying this. Hardware Required (3) 8-ohm speakers (3) 100 ohm resistor breadboard hook up wire
- 42. Circuit image developed using Fritzing. For more circuit examples, see the Fritzing project page Schematic click the image to enlarge Code The sketch below plays a tone on each of the speakers in sequence, turning off the previous speaker first. Note that the duration of each tone is the same as the delay that follows it. Here's the main sketch: /* Multiple tone player Plays multiple tones on multiple pins in sequence circuit: * 3 8-ohm speaker on digital pins 6, 7, and 11 created 8 March 2010 by Tom Igoe
- 43. based on a snippet from Greg Borenstein This example code is in the public domain. http://arduino.cc/en/Tutorial/Tone4 */ void setup() { } void loop() { // turn off tone function for pin 11: noTone(11); // play a note on pin 6 for 200 ms: tone(6, 440, 200); delay(200); // turn off tone function for pin 6: noTone(6); // play a note on pin 7 for 500 ms: tone(7, 494, 500); delay(500); // turn off tone function for pin 7: noTone(7); // play a note on pin 11 for 500 ms: tone(11, 523, 300); delay(300); } 3.Analog Analog In, Out Serial Analog In, Out Serial This example shows how to read an analog input pin, map the result to a range from 0 to 255, and then use that result to set the pulsewidth modulation (PWM) of an output pin to dim or brighten an LED. Hardware Required Arduino Board Potentiometer LED 220 ohm resistor Circuit
- 44. image developed using Fritzing. For more circuit examples, see the Fritzing project page Connect one pin from your pot to 5V, the center pin to analog pin 0, and the remaining pin to ground. Next, connect a 220 ohm current limiting resistor to digital pin 9, with an LED in series. The long, positive leg (the anode) of the LED should be connected to the output from the resistor, with the shorter, negative leg (the cathode) connected to ground. Schematic Code In the program below, after declaring two pin assignments (analog 0 for your potentiometer and digital 9 for your LED) and two variables, sensorValue and outputValue, the only thing that you do will in the setup function is to begin serial communication.
- 45. Next, in the main loop of the code, sensorValue is assigned to store the raw analog value coming in from the potentiometer. Because the Arduino has an analogRead resolution of 0-1023, and an analogWrite resolution of only 0-255, this raw data from the potentiometer needs to be scaled before using it to dim the LED. In order to scale this value, use a function called map() outputValue = map(sensorValue, 0, 1023, 0, 255); [Get Code] outputValue is assigned to equal the scaled value from the potentiometer. map() accepts five arguments: The value to be mapped, the low range and high range of the raw data, and the low and high values for that data to be scaled too. In this case, the sensor data is mapped down from its original range of 0 to 1023 to 0 to 255. The newly mapped sensor data is then output to the analogOutPin dimming or brightening the LED as the potentiometer is turned. Finally, both the raw and scaled sensor values are sent to the Arduino serial window in a steady stream of data. /* Analog input, analog output, serial output Reads an analog input pin, maps the result to a range from 0 to 255 and uses the result to set the pulsewidth modulation (PWM) of an output pin. Also prints the results to the serial monitor. The circuit: * potentiometer connected to analog pin 0. Center pin of the potentiometer goes to the analog pin. side pins of the potentiometer go to +5V and ground * LED connected from digital pin 9 to ground created 29 Dec. 2008 modified 9 Apr 2012 by Tom Igoe This example code is in the public domain. */ // These constants won't change. They're used to give names // to the pins used: const int analogInPin = A0; // Analog input pin that the potentiometer is attached to const int analogOutPin = 9; // Analog output pin that the LED is attached to int sensorValue = 0; int outputValue = 0; // value read from the pot // value output to the PWM (analog out) void setup() { // initialize serial communications at 9600 bps: Serial.begin(9600); } void loop() { // read the analog in value: sensorValue = analogRead(analogInPin); // map it to the range of the analog out: outputValue = map(sensorValue, 0, 1023, 0, 255); // change the analog out value: analogWrite(analogOutPin, outputValue); // print the results to the serial monitor: Serial.print("sensor = " ); Serial.print(sensorValue); Serial.print("t output = "); Serial.println(outputValue); // wait 2 milliseconds before the next loop // for the analog-to-digital converter to settle // after the last reading: delay(2); }
- 46. Analog Input Analog Input A potentiometer is a simple knob that provides a variable resistance, which you can read into the Arduino board as an analog value. In this example, you'll connect a poterntiometer to one of the Arduino's analog inputs to control the rate at which the built-in LED on pin 13 blinks. Hardware Required Arduino Board Potentiometer built-in LED on pin 13 Circuit click the image to enlarge image developed using Fritzing. For more circuit examples, see the Fritzing project page Connect three wires to the Arduino board. The first goes to ground from one of the outer pins of the potentiometer. The second goes from 5 volts to the other outer pin of the potentiometer. The third goes from analog input 0 to the middle pin of the potentiometer. For this example, it is possible to use the Arduino board's built in LED attached to pin 13. To use an additional LED, attach its longer leg (the positive leg, or anode), to digital pin 13, and it's shorter leg (the
- 47. negative leg, or cathode) to the ground (gnd) pin next to pin 13. Because of the low amount of current coming from digital pin 13, it is not necessary to use a current limiting resistor in this particular case. Schematic click the image to enlarge Code In the beginning of this program, the variable sensorPin is set to to analog pin 0, where your potentiometer is attached, and ledPin is set to digital pin 13. You'll also create another variable, sensorValue i to store the values read from your sensor. The analogRead() command converts the input voltage range, 0 to 5 volts, to a digital value between 0 and 1023. This is done by a circuit inside the Arduino called an analog-to-digital converter or ADC. By turning the shaft of the potentiometer, you change the amount of resistance on either side of the center pin (or wiper) of the potentiometer. This changes the relative resistances between the center pin and the two outside pins, giving you a different voltage at the analog input. When the shaft is turned all the way in one direction, there is no resistance between the center pin and the pin connected to ground. The voltage at the center pin then is 0 volts, and analogRead() returns 0. When the shaft is turned all the way in the other direction, there is no resistance between the center pin and the pin connected to +5 volts. The voltage at the center pin then is 5 volts, and analogRead() returns 1023. In between,analogRead() returns a number between 0 and 1023 that is proportional to the amount of voltage being applied to the pin. That value, stored in sensorValue, is used to set a delay() for your blink cycle. The higher the value, the longer the cycle, the smaller the value, the shorter the cycle. /* Analog Input Demonstrates analog input by reading an analog sensor on analog pin 0 and turning on and off a light emitting diode(LED) connected to digital pin 13. The amount of time the LED will be on and off depends on the value obtained by analogRead().
- 48. The circuit: * Potentiometer attached to analog input 0 * center pin of the potentiometer to the analog pin * one side pin (either one) to ground * the other side pin to +5V * LED anode (long leg) attached to digital output 13 * LED cathode (short leg) attached to ground * Note: because most Arduinos have a built-in LED attached to pin 13 on the board, the LED is optional. Created by David Cuartielles modified 30 Aug 2011 By Tom Igoe This example code is in the public domain. http://arduino.cc/en/Tutorial/AnalogInput */ int sensorPin = A0; int ledPin = 13; int sensorValue = 0; // select the input pin for the potentiometer // select the pin for the LED // variable to store the value coming from the sensor void setup() { // declare the ledPin as an OUTPUT: pinMode(ledPin, OUTPUT); } void loop() { // read the value from the sensor: sensorValue = analogRead(sensorPin); // turn the ledPin on digitalWrite(ledPin, HIGH); // stop the program for <sensorValue> milliseconds: delay(sensorValue); // turn the ledPin off: digitalWrite(ledPin, LOW); // stop the program for for <sensorValue> milliseconds: delay(sensorValue); } Analog Write with 12 LEDs on an Arduino Mega Analog Write with 12 LEDs on an Arduino Mega This example fades 12 LEDs up and the down, one by one, on an Arduino Mega board. Hardware Required Arduino Mega Board (12) LEDs (12) 220 ohm resistors hook up wire breadboard Circuit
- 49. image developed using Fritzing. For more circuit examples, see the Fritzing project page Connect the longer, positive legs of (anodes) 12 LEDs to digital pins 2-13 through 220 ohm current limiting resistors. Connect the shorter, negative legs (cathodes) to ground. Schematic
- 50. Code In the setup() function of the code below, a for() loop is used to assign digital pins 2-13 of the Mega as outputs. Next, in the loop() function of the program below, a trio of nested for() loops are used. The first of these loops, for (int thisPin =lowestPin; thisPin <= highestPin; thisPin++) [Get Code] moves through each of the LEDS one by one, from the lowest pin to the highest. Before this loop is allowed to move from one pin to the next, two things must be accomplished. First, you brighten the individual LED through these lines of code: for (int brightness = 0; brightness < 255; brightness++) { analogWrite(thisPin, brightness); delay(2); } [Get Code] With each pass through the loop above, the variable brightness increases by one point, and that value is written to the pin currently selected to the main loop. One that pin reaches the maximum PWM value (255), the following loop kicks in: for (int brightness = 255; brightness >= 0; brightness--) { analogWrite(thisPin, brightness); delay(2); } [Get Code] This loop subtracts a point from the brightness variable, dimming the LED back down to 0. Once zero is reached, the mainfor() loop kicks in, and the program moves on to the next LED pin, repeating all the steps mentioned above. /* Mega analogWrite() test This sketch fades LEDs up and down one at a time on digital pins 2 through 13. This sketch was written for the Arduino Mega, and will not work on previous boards. The circuit: * LEDs attached from pins 2 through 13 to ground. created 8 Feb 2009 by Tom Igoe This example code is in the public domain. */ // These constants won't change. // to the pins used: const int lowestPin = 2; const int highestPin = 13; They're used to give names void setup() { // set pins 2 through 13 as outputs: for (int thisPin =lowestPin; thisPin <= highestPin; thisPin++) { pinMode(thisPin, OUTPUT); } } void loop() { // iterate over the pins: for (int thisPin =lowestPin; thisPin <= highestPin; thisPin++) { // fade the LED on thisPin from off to brightest: for (int brightness = 0; brightness < 255; brightness++) { analogWrite(thisPin, brightness); delay(2); } // fade the LED on thisPin from brithstest to off: for (int brightness = 255; brightness >= 0; brightness--) { analogWrite(thisPin, brightness); delay(2); }
- 51. // pause between LEDs: delay(100); } } Calibration Calibration This example demonstrates one techinque for calibrating sensor input. The Arduino takes sensor readings for five seconds during the startup, and tracks the highest and lowest values it gets. These sensor readings during the first five seconds of the sketch execution define the minimum and maximum of expected values for the readings taken during the loop. Hardware Required Arduino board (1) LED (1) analog sensor (a photocell will do) (1) 10K ohm resistor (1) 220 ohm resistor breadboard hook-up wire Circuit Analog sensor (e.g. potentiometer, light sensor) on analog input 2. LED on digital pin 9. click the image to enlarge image developed using Fritzing. For more circuit examples, see the Fritzing project page Connect an LED to digital pin 9 with a 220 ohm current limiting resistor. Connect a photocell to 5V and then to analog pin 0 with a 10K ohm resistor as a reference to ground. Schematic click the image to enlarge
- 52. Code Before the setup, you set initial values for the minimum and maximum like so: int sensorMin = 1023; int sensorMax = 0; // minimum sensor value // maximum sensor value [Get Code] These may seem backwards. Initially, you set the minimum high and read for anything lower than that, saving it as the new minimum. Likewise, you set the maximum low and read for anything higher as the new maximum, like so: // calibrate during the first five seconds while (millis() < 5000) { sensorValue = analogRead(sensorPin); // record the maximum sensor value if (sensorValue > sensorMax) { sensorMax = sensorValue; } // record the minimum sensor value if (sensorValue < sensorMin) { sensorMin = sensorValue; } } [Get Code] This way, any further readings you take can be mapped to the range between this minimum and maximum like so: // apply the calibration to the sensor reading sensorValue = map(sensorValue, sensorMin, sensorMax, 0, 255); [Get Code] Here's the whole program: /* Calibration Demonstrates one technique for calibrating sensor input. The sensor readings during the first five seconds of the sketch execution define the minimum and maximum of expected values
- 53. attached to the sensor pin. The sensor minimum and maximum initial values may seem backwards. Initially, you set the minimum high and listen for anything lower, saving it as the new minimum. Likewise, you set the maximum low and listen for anything higher as the new maximum. The circuit: * Analog sensor (potentiometer will do) attached to analog input 0 * LED attached from digital pin 9 to ground created 29 Oct 2008 By David A Mellis modified 30 Aug 2011 By Tom Igoe http://arduino.cc/en/Tutorial/Calibration This example code is in the public domain. */ // These constants won't change: const int sensorPin = A0; // pin that the sensor is attached to const int ledPin = 9; // pin that the LED is attached to // variables: int sensorValue = 0; int sensorMin = 1023; int sensorMax = 0; // the sensor value // minimum sensor value // maximum sensor value void setup() { // turn on LED to signal the start of the calibration period: pinMode(13, OUTPUT); digitalWrite(13, HIGH); // calibrate during the first five seconds while (millis() < 5000) { sensorValue = analogRead(sensorPin); // record the maximum sensor value if (sensorValue > sensorMax) { sensorMax = sensorValue; } // record the minimum sensor value if (sensorValue < sensorMin) { sensorMin = sensorValue; } } // signal the end of the calibration period digitalWrite(13, LOW); } void loop() { // read the sensor: sensorValue = analogRead(sensorPin); // apply the calibration to the sensor reading sensorValue = map(sensorValue, sensorMin, sensorMax, 0, 255); // in case the sensor value is outside the range seen during calibration sensorValue = constrain(sensorValue, 0, 255); // fade the LED using the calibrated value: analogWrite(ledPin, sensorValue); }
- 54. Fading Fading Demonstrates the use of analog output (Pulse Width Modulation (PWM)) to fade an LED. PWM is a technique for getting an analog-like behavior from a digital output by switching it off and on very fast. Circuit An LED connected to digital output pin 9 through a 220-ohm resistor. click the image to enlarge Schematic click the image to enlarge
- 55. image developed using Fritzing. For more circuit examples, see the Fritzing project page Code /* Fading This example shows how to fade an LED using the analogWrite() function. The circuit: * LED attached from digital pin 9 to ground. Created 1 Nov 2008 By David A. Mellis modified 30 Aug 2011 By Tom Igoe http://arduino.cc/en/Tutorial/Fading This example code is in the public domain. */ int ledPin = 9; // LED connected to digital pin 9 void setup() { // nothing happens in setup } void loop() { // fade in from min to max in increments of 5 points: for(int fadeValue = 0 ; fadeValue <= 255; fadeValue +=5) { // sets the value (range from 0 to 255): analogWrite(ledPin, fadeValue); // wait for 30 milliseconds to see the dimming effect delay(30); } // fade out from max to min in increments of 5 points: for(int fadeValue = 255 ; fadeValue >= 0; fadeValue -=5) { // sets the value (range from 0 to 255): analogWrite(ledPin, fadeValue); // wait for 30 milliseconds to see the dimming effect delay(30);
- 56. } } Smoothing Smoothing This sketch reads repeatedly from an analog input, calculating a running average and printing it to the computer. This example is useful for smoothing out the values from jumpy or erratic sensors, and also demonstrates the use of arrays to store data. Hardware Arduino Board Potentiometer Circuit click the image to enlarge image developed using Fritzing. For more circuit examples, see the Fritzing project page Connect one pin of a potentiometer to 5V, the center pin to analog pin 0, and the the last pin to ground. Schematic click the image to enlarge
- 57. Code The code below sequentially stores 10 readings from your analog sensor into an arrays, one by one. With each new value, the sum of all the numbers is generated and divided, producing an average value which then be used to smooth outlying data. Because this averaging takes place each time a new value is added to the array (rather then waiting for 10 new values, for instance) there is no lag time in calculating this running average. Altering the size of the array used, by changing numReadings to a larger value will smooth the data collected even further. /* Smoothing Reads repeatedly from an analog input, calculating a running average and printing it to the computer. Keeps ten readings in an array and continually averages them. The circuit: * Analog sensor (potentiometer will do) attached to analog input 0 Created 22 April 2007 By David A. Mellis <[email protected]> modified 9 Apr 2012 by Tom Igoe http://www.arduino.cc/en/Tutorial/Smoothing This example code is in the public domain. */ // Define the number of samples to keep track of. The higher the number, // the more the readings will be smoothed, but the slower the output will // respond to the input. Using a constant rather than a normal variable lets // use this value to determine the size of the readings array. const int numReadings = 10; int readings[numReadings]; // the readings from the analog input
- 58. int index = 0; int total = 0; int average = 0; // the index of the current reading // the running total // the average int inputPin = A0; void setup() { // initialize serial communication with computer: Serial.begin(9600); // initialize all the readings to 0: for (int thisReading = 0; thisReading < numReadings; thisReading++) readings[thisReading] = 0; } void loop() { // subtract the last reading: total= total - readings[index]; // read from the sensor: readings[index] = analogRead(inputPin); // add the reading to the total: total= total + readings[index]; // advance to the next position in the array: index = index + 1; // if we're at the end of the array... if (index >= numReadings) // ...wrap around to the beginning: index = 0; // calculate the average: average = total / numReadings; // send it to the computer as ASCII digits Serial.println(average); delay(1); // delay in between reads for stability } 4.Communication Read ASCII String Read ASCII String This sketch uses the Serial.parseInt() function to locate values separated by a non-alphanumeric character. Often people use a comma to indicate different pieces of information (this format is commonly referred to as comma-separated-values), but other characters like a space or a period will work too.
- 59. The values are parsed into ints and used to determine the color of a RGB LED. You'll use the serial monitor to send strings like "5,220,70" to the Arduino to change the lights. Hardware Required Arduino Board Breadboard Hookup wire Common anode RGB LED Three 220-ohm resistors Circuit image developed using Fritzing. For more circuit examples, see the Fritzing project page You'll need five wires to make the circuit above. Connect a red wire to one of the long vertical rows on your breadboard. Connect the other end to the 5V pin on your Arduino. Place an RGB LED on your breadboard. Check the datasheet for your specific LED to verify the pins. Connect the power rail you just created to the common anode on the LED. With your remaining wires, connect your red cathode to pin 3, green cathode to pin 5, and blue cathode to pin 6 in series with the resistors. RGB LEDs with a common anode share a common power pin. Instead of turning a pin HIGH to illuminate the LED, you need to turn the pin LOW, to create a voltage difference across the diode. So sending 255 via analogWrite() turns the LED off, while a value of 0 turns it on at full brightness. In the code below, you'll use a little bit of math on the Arduino side, so you can send values which correspond to the expected brightness. Essentially, instead of using analogWrite(pin, brightness), you'll be calling analogWrite(pin, 255-brightness). Code You'll first set up some global variables for the pins your LED will connect to. This will make it easier to differentiate which one is red, green, and blue in the main part of your program:
- 60. const int redPin = 3; const int greenPin = 5; const int bluePin = 6; In your setup(), begin serial communication at 9600 bits of data per second between Arduino and your computer with the line: Serial.begin(9600); Also in the setup, you'll want to configure the pins as outputs: pinMode(redPin, OUTPUT); pinMode(greenPin, OUTPUT); pinMode(bluePin, OUTPUT); In the loop(), check to see if there is any data in the serial buffer. By making this a while() statement, it will run as long as there is information waiting to be read : while (Serial.available() > 0) { Next, declare some local variables for storing the serial information. This will be the brightness of the LEDs. UsingSerial.parseInt() to separate the data by commas, read the information into your variables: int red = Serial.parseInt(); int green = Serial.parseInt(); int blue = Serial.parseInt(); Once you've read the data into your variables, check for the newline character to proceed: if (Serial.read() == 'n') { Using constrain(), you can keep the values in an acceptable range for PWM control. This way, if the value was outside the range of what PWM can send, it will be limited to a valid number. By subtracting this value from 255 you will be formatting the value to use with a common anode LED. As explained above, these LEDs will illuminate when there is a voltage difference between the anode and the pin connected to the Arduino: red = 255 - constrain(red, 0, 255); green = 255 - constrain(green, 0, 255); blue = 255 - constrain(blue, 0, 255); Now that you have formatted the values for PWM, use analogWrite() to change the color of the LED. Because you subtracted your value from 255 in the step above: analogWrite(redPin, red); analogWrite(greenPin, green); analogWrite(bluePin, blue); Send the value of each LED back to the serial monitor in one string as HEX values : Serial.print(red, HEX); Serial.print(green, HEX); Serial.println(blue, HEX); Finally, close up your brackets from the if statement, while statement, and main loop : } } } Once you have programmed the Arduino, open your Serial minitor. Make sure you have chosen to send a newline character when sending a message. Enter values between 0-255 for the lights in the following format : Red,Green,Blue. Once you have sent the values to the Arduino, the attached LED will turn the color you specified, and you will receive the HEX values in the serial monitor. /* Reading a serial ASCII-encoded string. This sketch demonstrates the Serial parseInt() function. It looks for an ASCII string of comma-separated values.
- 61. It parses them into ints, and uses those to fade an RGB LED. Circuit: Common-anode RGB LED wired like so: * Red cathode: digital pin 3 * Green cathode: digital pin 5 * blue cathode: digital pin 6 * anode: +5V created 13 Apr 2012 by Tom Igoe This example code is in the public domain. */ // pins for the LEDs: const int redPin = 3; const int greenPin = 5; const int bluePin = 6; void setup() { // initialize serial: Serial.begin(9600); // make the pins outputs: pinMode(redPin, OUTPUT); pinMode(greenPin, OUTPUT); pinMode(bluePin, OUTPUT); } void loop() { // if there's any serial available, read it: while (Serial.available() > 0) { // look for the next valid integer in the incoming serial stream: int red = Serial.parseInt(); // do it again: int green = Serial.parseInt(); // do it again: int blue = Serial.parseInt(); // look for the newline. That's the end of your // sentence: if (Serial.read() == 'n') { // constrain the values to 0 - 255 and invert // if you're using a common-cathode LED, just use "constrain(color, 0, 255);" red = 255 - constrain(red, 0, 255); green = 255 - constrain(green, 0, 255); blue = 255 - constrain(blue, 0, 255); // fade the red, green, and blue legs of the LED: analogWrite(redPin, red); analogWrite(greenPin, green); analogWrite(bluePin, blue); // print the three numbers in one string as hexadecimal: Serial.print(red, HEX); Serial.print(green, HEX); Serial.println(blue, HEX); } } } ASCII Table ASCII Table
- 62. Demonstrates the advanced serial printing functions by generating a table of characters and their ASCII values in decimal, hexadecimal, octal, and binary. For more on ASCII, see asciitable.com Hardware Required Arduino Board Circuit image developed using Fritzing. For more circuit examples, see the Fritzing project page None, but the Arduino has to be connected to the computer. Code /* ASCII table Prints out byte values in all possible formats: * as raw binary values * as ASCII-encoded decimal, hex, octal, and binary values For more on ASCII, see http://www.asciitable.com and http://en.wikipedia.org/wiki/ASCII The circuit: No external hardware needed. created 2006 by Nicholas Zambetti modified 9 Apr 2012 by Tom Igoe This example code is in the public domain. <http://www.zambetti.com> */ void setup() { //Initialize serial and wait for port to open: Serial.begin(9600); while (!Serial) { ; // wait for serial port to connect. Needed for Leonardo only } // prints title with ending line break Serial.println("ASCII Table ~ Character Map"); } // first visible ASCIIcharacter '!' is number 33: int thisByte = 33; // you can also write ASCII characters in single quotes. // for example. '!' is the same as 33, so you could also use this: //int thisByte = '!'; void loop() { // prints value unaltered, i.e. the raw binary version of the // byte. The serial monitor interprets all bytes as // ASCII, so 33, the first number, will show up as '!' Serial.write(thisByte); Serial.print(", dec: "); // prints value as string as an ASCII-encoded decimal (base 10). // Decimal is the default format for Serial.print() and Serial.println(),
- 63. // so no modifier is needed: Serial.print(thisByte); // But you can declare the modifier for decimal if you want to. //this also works if you uncomment it: // Serial.print(thisByte, DEC); Serial.print(", hex: "); // prints value as string in hexadecimal (base 16): Serial.print(thisByte, HEX); Serial.print(", oct: "); // prints value as string in octal (base 8); Serial.print(thisByte, OCT); Serial.print(", bin: "); // prints value as string in binary (base 2) // also prints ending line break: Serial.println(thisByte, BIN); // if printed last visible character '~' or 126, stop: if(thisByte == 126) { // you could also use if (thisByte == '~') { // This loop loops forever and does nothing while(true) { continue; } } // go on to the next character thisByte++; } [Get Code] Output ASCII Table ~ Character Map !, dec: 33, hex: 21, oct: 41, bin 4, decúASCII Table ~ Character Map !, dec: 33, hex: 21, oct: 41, bin: 100001 ", dec: 34, hex: 22, oct: 42, bin: 100010 #, dec: 35, hex: 23, oct: 43, bin: 100011 $, dec: 36, hex: 24, oct: 44, bin: 100100 %, dec: 37, hex: 25, oct: 45, bin: 100101 &, dec: 38, hex: 26, oct: 46, bin: 100110 ', dec: 39, hex: 27, oct: 47, bin: 100111 (, dec: 40, hex: 28, oct: 50, bin: 101000 ), dec: 41, hex: 29, oct: 51, bin: 101001 *, dec: 42, hex: 2A, oct: 52, bin: 101010 +, dec: 43, hex: 2B, oct: 53, bin: 101011 ,, dec: 44, hex: 2C, oct: 54, bin: 101100 -, dec: 45, hex: 2D, oct: 55, bin: 101101 ., dec: 46, hex: 2E, oct: 56, bin: 101110 /, dec: 47, hex: 2F, oct: 57, bin: 101111 0, dec: 48, hex: 30, oct: 60, bin: 110000 1, dec: 49, hex: 31, oct: 61, bin: 110001 2, dec: 50, hex: 32, oct: 62, bin: 110010 3, dec: 51, hex: 33, oct: 63, bin: 110011 4, dec: 52, hex: 34, oct: 64, bin: 110100 5, dec: 53, hex: 35, oct: 65, bin: 110101 6, dec: 54, hex: 36, oct: 66, bin: 110110 7, dec: 55, hex: 37, oct: 67, bin: 110111 8, dec: 56, hex: 38, oct: 70, bin: 111000 9, dec: 57, hex: 39, oct: 71, bin: 111001 :, dec: 58, hex: 3A, oct: 72, bin: 111010 ;, dec: 59, hex: 3B, oct: 73, bin: 111011 <, dec: 60, hex: 3C, oct: 74, bin: 111100 =, dec: 61, hex: 3D, oct: 75, bin: 111101 >, dec: 62, hex: 3E, oct: 76, bin: 111110 ?, dec: 63, hex: 3F, oct: 77, bin: 111111 @, dec: 64, hex: 40, oct: 100, bin: 1000000 A, dec: 65, hex: 41, oct: 101, bin: 1000001 B, dec: 66, hex: 42, oct: 102, bin: 1000010 C, dec: 67, hex: 43, oct: 103, bin: 1000011 D, dec: 68, hex: 44, oct: 104, bin: 1000100 E, dec: 69, hex: 45, oct: 105, bin: 1000101 ...
- 64. Dimmer Dimmer This example shows how to send data from a personal computer to an Arduino board to control the brightness of an LED. The data is sent in individual bytes, each of which ranges in value from 0 to 255. Arduino reads these bytes and uses them to set the brightness of the LED. You can send bytes to the Arduino from any software that can access the computer serial port. Examples for Processingand Max/MSP version 5 are shown below. Hardware Required Arduino Board LED 220 ohm resistor Software Required Processing or Max/MSP version 5 Circuit An LED connected to pin 9. Use an appropriate resistor as needed. For most common LEDs, you can usually do without the resistor, as the current output of the digital I/O pins is limited. click the image to enlarge image developed using Fritzing. For more circuit examples, see the Fritzing project page Schematic click the image to enlarge
- 65. % Code /* Dimmer Demonstrates the sending data from the computer to the Arduino board, in this case to control the brightness of an LED. The data is sent in individual bytes, each of which ranges from 0 to 255. Arduino reads these bytes and uses them to set the brightness of the LED. The circuit: LED attached from digital pin 9 to ground. Serial connection to Processing, Max/MSP, or another serial application created 2006 by David A. Mellis modified 30 Aug 2011 by Tom Igoe and Scott Fitzgerald This example code is in the public domain. http://www.arduino.cc/en/Tutorial/Dimmer */ const int ledPin = 9; // the pin that the LED is attached to void setup() { // initialize the serial communication: Serial.begin(9600); // initialize the ledPin as an output: pinMode(ledPin, OUTPUT); } void loop() { byte brightness; // check if data has been sent from the computer: if (Serial.available()) { // read the most recent byte (which will be from 0 to 255): brightness = Serial.read(); // set the brightness of the LED: analogWrite(ledPin, brightness); } } /* Processing code for this example // Dimmer - sends bytes over a serial port
- 66. // by David A. Mellis //This example code is in the public domain. import processing.serial.*; Serial port; void setup() { size(256, 150); println("Available serial ports:"); println(Serial.list()); // Uses the first port in this list (number 0). Change this to // select the port corresponding to your Arduino board. The last // parameter (e.g. 9600) is the speed of the communication. It // has to correspond to the value passed to Serial.begin() in your // Arduino sketch. port = new Serial(this, Serial.list()[0], 9600); // If you know the name of the port used by the Arduino board, you // can specify it directly like this. //port = new Serial(this, "COM1", 9600); } void draw() { // draw a gradient from black to white for (int i = 0; i < 256; i++) { stroke(i); line(i, 0, i, 150); } // write the current X-position of the mouse to the serial port as // a single byte port.write(mouseX); } */ /* Max/MSP v5 patch for this example ----------begin_max5_patcher---------1008.3ocuXszaiaCD9r8uhA5rqAeHIa0aAMaAVf1S6hdoYQAsDiL6JQZHQ2M YWr+2KeX4vjnjXKKkKhhiGQ9MeyCNz+X9rnMp63sQvuB+MLa1OlOalSjUvrC ymEUytKuh05TKJWUWyk5nE9eSyuS6jesvHu4F4MxOuUzB6X57sPKWVzBLXiP xZtGj6q2vafaaT0.BzJfjj.p8ZPukazsQvpfcpFs8mXR3plh8BoBxURIOWyK rxspZ0YI.eTCEh5Vqp+wGtFXZMKe6CZc3yWZwTdCmYW.BBkdiby8v0r+ST.W sD9SdUkn8FYspPbqvnBNFtZWiUyLmleJWo0vuKzeuj2vpJLaWA7YiE7wREui FpDFDp1KcbAFcP5sJoVxp4NB5Jq40ougIDxJt1wo3GDZHiNocKhiIExx+owv AdOEAksDs.RRrOoww1Arc.9RvN2J9tamwjkcqknvAE0l+8WnjHqreNet8whK z6mukIK4d+Xknv3jstvJs8EirMMhxsZIusET25jXbX8xczIl5xPVxhPcTGFu xNDu9rXtUCg37g9Q8Yc+EuofIYmg8QdkPCrOnXsaHwYs3rWx9PGsO+pqueG2 uNQBqWFh1X7qQG+3.VHcHrfO1nyR2TlqpTM9MDsLKNCQVz6KO.+Sfc5j1Ykj jzkn2jwNDRP7LVb3d9LtoWBAOnvB92Le6yRmZ4UF7YpQhiFi7A5Ka8zXhKdA 4r9TRGG7V4COiSbAJKdXrWNhhF0hNUh7uBa4Mba0l7JUK+omjDMwkSn95Izr TOwkdp7W.oPRmNRQsiKeu4j3CkfVgt.NYPEYqMGvvJ48vIlPiyzrIuZskWIS xGJPcmPiWOfLodybH3wjPbMYwlbFIMNHPHFOtLBNaLSa9sGk1TxMzCX5KTa6 WIH2ocxSdngM0QPqFRxyPHFsprrhGc9Gy9xoBjz0NWdR2yW9DUa2F85jG2v9 FgTO4Q8qiC7fzzQNpmNpsY3BrYPVJBMJQ1uVmoItRhw9NrVGO3NMNzYZ+zS7 3WTvTOnUydG5kHMKLqAOjTe7fN2bGSxOZDkMrBrGQ9J1gONBEy0k4gVo8qHc cxmfxVihWz6a3yqY9NazzUYkua9UnynadOtogW.JfsVGRVNEbWF8I+eHtcwJ +wLXqZeSdWLo+FQF6731Tva0BISKTx.cLwmgJsUTTvkg1YsnXmxDge.CDR7x D6YmX6fMznaF7kdczmJXwm.XSOOrdoHhNA7GMiZYLZZR.+4lconMaJP6JOZ8 ftCs1YWHZI3o.sIXezX5ihMSuXzZtk3ai1mXRSczoCS32hAydeyXNEu5SHyS xqZqbd3ZLdera1iPqYxOm++v7SUSz -----------end_max5_patcher----------*/ [Get Code] Processing Code The Processing sketch in the code sample above will send bytes out the serial port to the Arduino to dim the LED. Max code The Max/MSP patch in the code sample above looks like the image below. Copy it and paste it into a new patch window.
- 67. Graph Graph This example shows you how to send a byte of data from the Arduino to a personal computer and graph the result. This is called serial communication because the connection appears to both the Arduino and the computer as a serial port, even though it may actually use a USB cable. You can use the Arduino serial monitor to view the sent data, or it can be read by Processing (see code below), Flash, PD, Max/MSP, etc. Hardware Required Arduino Board Analog Sensor (potentiometer, photocell, FSR, etc.) Software Required
- 68. Processing or Max/MSP version 5 Circuit Connect a potentiometer or other analog sensor to analog input 0. click the image to enlarge image developed using Fritzing. For more circuit examples, see the Fritzing project page Schematic click the image to enlarge
- 69. Code /* Graph A simple example of communication from the Arduino board to the computer: the value of analog input 0 is sent out the serial port. We call this "serial" communication because the connection appears to both the Arduino and the computer as a serial port, even though it may actually use a USB cable. Bytes are sent one after another (serially) from the Arduino to the computer. You can use the Arduino serial monitor to view the sent data, or it can be read by Processing, PD, Max/MSP, or any other program capable of reading data from a serial port. The Processing code below graphs the data received so you can see the value of the analog input changing over time. The circuit: Any analog input sensor is attached to analog in pin 0. created 2006 by David A. Mellis modified 9 Apr 2012 by Tom Igoe and Scott Fitzgerald This example code is in the public domain. http://www.arduino.cc/en/Tutorial/Graph */ void setup() { // initialize the serial communication: Serial.begin(9600); } void loop() { // send the value of analog input 0: Serial.println(analogRead(A0)); // wait a bit for the analog-to-digital converter // to stabilize after the last reading: delay(2); } /* Processing code for this example
- 70. // Graphing sketch // This program takes ASCII-encoded strings // from the serial port at 9600 baud and graphs them. It expects values in the // range 0 to 1023, followed by a newline, or newline and carriage return // // // // Created 20 Apr 2005 Updated 18 Jan 2008 by Tom Igoe This example code is in the public domain. import processing.serial.*; Serial myPort; int xPos = 1; // The serial port // horizontal position of the graph void setup () { // set the window size: size(400, 300); // List all the available serial ports println(Serial.list()); // I know that the first port in the serial list on my mac // is always my Arduino, so I open Serial.list()[0]. // Open whatever port is the one you're using. myPort = new Serial(this, Serial.list()[0], 9600); // don't generate a serialEvent() unless you get a newline character: myPort.bufferUntil('n'); // set inital background: background(0); } void draw () { // everything happens in the serialEvent() } void serialEvent (Serial myPort) { // get the ASCII string: String inString = myPort.readStringUntil('n'); if (inString != null) { // trim off any whitespace: inString = trim(inString); // convert to an int and map to the screen height: float inByte = float(inString); inByte = map(inByte, 0, 1023, 0, height); // draw the line: stroke(127,34,255); line(xPos, height, xPos, height - inByte); // at the edge of the screen, go back to the beginning: if (xPos >= width) { xPos = 0; background(0); } else { // increment the horizontal position: xPos++; } } } */ /* Max/MSP v5 patch for this example ----------begin_max5_patcher---------1591.3oc0YszbaaCD9r7uBL5RalQUAO3CvdyS5zVenWZxs5NcfHgjPCIfJIT RTxj+6AOHkoTDooroUs0AQPR73a+1cwtK3WtZxzEpOwqlB9YveAlL4KWMYh6 Q1GLo99ISKXeJMmU451zTUQAWpmNy+NM+SZ2y+sR1l02JuU9t0hJvFlNcMPy dOuBv.U5Rgb0LPpRpYBooM3529latArTUVvzZdFPtsXAuDrrTU.f.sBffXxL vGE50lIHkUVJXq3fRtdaoDvjYfbgjujaFJSCzq4.tLaN.bi1tJefWpqbO0uz 1IjIABoluxrJ1guxh2JfPO2B5zRNyBCLDFcqbwNvuv9fHCb8bvevyyEU2JKT YhkBSWPAfq2TZ6YhqmuMUo0feUn+rYpY4YtY+cFw3lUJdCMYAapZqzwUHX8S crjAd+SIOU6UBAwIygy.Q1+HAA1KH6EveWOFQlitUK92ehfal9kFhUxJ3tWc sgpxadigWExbt1o7Ps5dk3yttivyg20W0VcSmg1G90qtx92rAZbH4ez.ruy1 nhmaDPidE07J+5n2sg6E6oKXxUSmc20o6E3SPRDbrkXnPGUYE.i5nCNB9TxQ jG.G0kCTZtH88f07Rt0ZMMWUw8VvbKVAaTk6GyoraPdZff7rQTejBN54lgyv
- 71. HE0Ft7AvIvvgvIwO23jBdUkYOuSvIFSiNcjFhiSsUBwsUCh1AgfNSBAeNDBZ DIDqY.f8.YjfjV1HAn9XDTxyNFYatVTkKx3kcK9GraZpI5jv7GOx+Z37Xh82 LSKHIDmDXaESoXRngIZQDKVkpxUkMCyXCQhcCK1z.G457gi3TzMz4RFD515F G3bIQQwcP3SOF0zlkGhiCBQ1kOHHFFlXaEBQIQnCwv9QF1LxPZ.A4jR5cyQs vbvHMJsLll01We+rE2LazX6zYmCraRrsPFwKg1ANBZFY.IAihr8Ox.aH0oAL hB8nQVw0FSJiZeunOykbT6t3r.NP8.iL+bnwNiXuVMNJH9H9YCm89CFXPBER bz422p8.O4dg6kRxdyjDqRwMIHTbT3QFLskxJ8tbmQK4tm0XGeZWF7wKKtYY aTAF.XPNFaaQBinQMJ4QLF0aNHF0JtYuHSxoUZfZY6.UU2ejJTb8lQw8Fo5k Rv6e2PI+fOM71o2ecY1VgTYdCSxxUqLokuYq9jYJi6lxPgD2NIPePLB0mwbG YA9Rgxdiu1k5xiLlSU6JVnx6wzg3sYHwTesB8Z5D7RiGZpXyvDNJY.DQX3.H hvmcUN4bP1yCkhpTle2P37jtBsKrLWcMScEmltOPv22ZfAqQAdKr9HzATQwZ q18PrUGt6Tst2XMCRUfGuhXs6ccn23YloomMqcTiC5iMGPsHsHRWhWFlaenV XcqwgCQiGGJzptyS2ZMODBz6fGza0bzmXBj7+DA94bvpR01MffAlueO7HwcI pWCwmzJdvi9ILgflLAFmyXB6O7ML0YbD26lenmcGxjVsZUN+A6pUK7AtTrPg M+eRYG0qD9j4I7eEbco8Xh6WcO.or9XDC6UCiewbXHkh6xm5LiPEkzpJDRTu mEB44Fgz4NCtJvX.SM1vo2SlTCZGAe7GZu6ahdRyzFOhYZ+mbVVSYptBw.K1 tboIkatIA7c1cTKD1u.honLYV04VkluHsXe0szv9pQCE9Ro3jaVB1o15pz2X zYoBvO5KXCAe0LCYJybE8ZODf4fV8t9qW0zYxq.YJfTosj1bv0xc.SaC0+AV 9V9L.KKyV3SyTcRtmzi6rO.O16USvts4B5xe9EymDvebK0eMfW6+NIsNlE2m eqRyJ0utRq13+RjmqYKN1e.4d61jjdsauXe3.2p6jgi9hsNIv97CoyJ01xzl c3ZhUCtSHx3UZgjoEJYqNY+hYs5zZQVFW19L3JDYaTlMLqAAt1G2yXlnFg9a 53L1FJVcv.cOX0dh7mCVGCLce7GFcQwDdH5Ta3nyAS0pQbHxegr+tGIZORgM RnMj5vGl1Fs16drnk7Tf1XOLgv1n0d2iEsCxR.eQsNOZ4FGF7whofgfI3kES 1kCeOX5L2rifbdu0A9ae2X.V33B1Z+.Bj1FrP5iFrCYCG5EUWSG.hhunHJd. HJ5hhnng3h9HPj4lud02.1bxGw. -----------end_max5_patcher----------*/ [Get Code] Processing Sketch Using the Processing sketch in the code sample above, you'll get a graph of the sensor's value. As you change the value of the analog sensor, you'll get a graph something like this: Max Code The max patch looks like this. The text of the patch is in the code sample above. Copy the text and paste it into a new Max window to see the sketch.
- 72. Physical Pixel Phy sical Pixel This example example uses the Arduino board to receive data from the computer. The Arduino boards turns on an LED when it receives the character 'H', and turns off the LED when it receives the character 'L'. The data can be sent from the Arduino serial monitor, or another program like Processing (see code below), Flash (via a serial-net proxy), PD, or Max/MSP. Hardware Required Arduino Board Analog Sensor (potentiometer, photocell, FSR, etc.) Software Required Processing or Max/MSP version 5
- 73. Circuit Attach an LED to pin 13. The long leg, or anode, goes to pin 13. The short leg, or cathode, goes to ground. You can also use the built-in LED on most Arduino boards. click the image to enlarge image developed using Fritzing. For more circuit examples, see the Fritzing project page Schematic click the image to enlarge
- 74. Code /* Physical Pixel An example of using the Arduino board to receive data from the computer. In this case, the Arduino boards turns on an LED when it receives the character 'H', and turns off the LED when it receives the character 'L'. The data can be sent from the Arduino serial monitor, or another program like Processing (see code below), Flash (via a serial-net proxy), PD, or Max/MSP. The circuit: * LED connected from digital pin 13 to ground created 2006 by David A. Mellis modified 30 Aug 2011 by Tom Igoe and Scott Fitzgerald This example code is in the public domain. http://www.arduino.cc/en/Tutorial/PhysicalPixel */ const int ledPin = 13; // the pin that the LED is attached to int incomingByte; // a variable to read incoming serial data into void setup() { // initialize serial communication: Serial.begin(9600); // initialize the LED pin as an output: pinMode(ledPin, OUTPUT); } void loop() { // see if there's incoming serial data: if (Serial.available() > 0) { // read the oldest byte in the serial buffer: incomingByte = Serial.read(); // if it's a capital H (ASCII 72), turn on the LED: if (incomingByte == 'H') { digitalWrite(ledPin, HIGH); } // if it's an L (ASCII 76) turn off the LED: if (incomingByte == 'L') { digitalWrite(ledPin, LOW);
- 75. } } } /* Processing code for this example // mouseover serial // Demonstrates how to send data to the Arduino I/O board, in order to // turn ON a light if the mouse is over a square and turn it off // if the mouse is not. // // // // // created 2003-4 based on examples by Casey Reas and Hernando Barragan modified 30 Aug 2011 by Tom Igoe This example code is in the public domain. import processing.serial.*; float boxX; float boxY; int boxSize = 20; boolean mouseOverBox = false; Serial port; void setup() { size(200, 200); boxX = width/2.0; boxY = height/2.0; rectMode(RADIUS); // List all the available serial ports in the output pane. // You will need to choose the port that the Arduino board is // connected to from this list. The first port in the list is // port #0 and the third port in the list is port #2. println(Serial.list()); // Open the port that the Arduino board is connected to (in this case #0) // Make sure to open the port at the same speed Arduino is using (9600bps) port = new Serial(this, Serial.list()[0], 9600); } void draw() { background(0); // Test if the cursor is over the box if (mouseX > boxX-boxSize && mouseX < boxX+boxSize && mouseY > boxY-boxSize && mouseY < boxY+boxSize) { mouseOverBox = true; // draw a line around the box and change its color: stroke(255); fill(153); // send an 'H' to indicate mouse is over square: port.write('H'); } else { // return the box to it's inactive state: stroke(153); fill(153); // send an 'L' to turn the LED off: port.write('L'); mouseOverBox = false; } // Draw the box rect(boxX, boxY, boxSize, boxSize); } */ /* Max/MSP version 5 patch to run with this example:
- 76. ----------begin_max5_patcher---------1672.3oc2ZszaaiCD9ryuBBebQVCQRYao8xhf1cQCPVfBzh8RRQ.sDsM2HSZ HQmlzh9eu7gjsjsEk7y0oWjiHoHm4aluYHGlueUmtiDuPy5B9Cv8fNc99Uc5 XZR2Pm726zcF4knDRlYXciDylQ4xtWa6SReQZZ+iSeMiEQR.ej8BM4A9C7OO kkAlSjQSAYTdbFfvA27o2c6sfO.Doqd6NfXgDHmRUCKkolg4hT06BfbQJGH3 5Qd2e8d.QJIQSow5tzebZ7BFW.FIHow8.2JAQpVIIYByxo9KIMkSjL9D0BRT sbGHZJIkDoZOSMuQT.8YZ5qpgGI3locF4IpQRzq2nDF+odZMIJkRjpEF44M3 A9nWAum7LKFbSOv+PSRXYOvmIhYiYpg.8A2LOUOxPyH+TjPJA+MS9sIzTRRr QP9rXF31IBZAHpVHkHrfaPRHLuUCzoj9GSoQRqIB52y6Z.tu8o4EX+fddfuj +MrXiwPL5+9cXwrOVvkbxLpomazHbQO7EyX7DpzXYgkFdF6algCQpkX4XUlo hA6oa7GWck9w0Gnmy6RXQOoQeCfWwlzsdnHLTq8n9PCHLv7Cxa6PAN3RCKjh ISRVZ+sSl704Tqt0kocE9R8J+P+RJOZ4ysp6gN0vppBbOTEN8qp0YCq5bq47 PUwfA5e766z7NbGMuncw7VgNRSyQhbnPMGrDsGaFSvKM5NcWoIVdZn44.eOi 9DTRUT.7jDQzSTiF4UzXLc7tLGh4T9pwaFQkGUGIiOOkpBSJUwGsBd40krHQ 9XEvwq2V6eLIhV6GuzP7uzzXBmzsXPSRYwBtVLp7s5lKVv6UN2VW7xRtYDbx 7s7wRgHYDI8YVFaTBshkP49R3rYpH3RlUhTQmK5jMadJyF3cYaTNQMGSyhRE IIUlJaOOukdhoOyhnekEKmZlqU3UkLrk7bpPrpztKBVUR1uorLddk6xIOqNt lBOroRrNVFJGLrDxudpET4kzkstNp2lzuUHVMgk5TDZx9GWumnoQTbhXsEtF tzCcM+z0QKXsngCUtTOEIN0SX2iHTTIIz968.Kf.uhfzUCUuAd3UKd.OKt.N HTynxTQyjpQD9jlwEXeKQxfHCBahUge6RprSa2V4m3aYOMyaP6gah2Yf1zbD jVwZVGFZHHxINFxpjr5CiTS9JiZn6e6nTlXQZTAFj6QCppQwzL0AxVtoi6WE QXsANkEGWMEuwNvhmKTnat7A9RqLq6pXuEwY6xM5xRraoTiurj51J1vKLzFs CvM7HI14Mpje6YRxHOSieTsJpvJORjxT1nERK6s7YTN7sr6rylNwf5zMiHI4 meZ4rTYt2PpVettZERbjJ6PjfqN2loPSrUcusH01CegsGEE5467rnCdqT1ES QxtCvFq.cvGz+BaAHXKzRSfP+2Jf.KCvj5ZLJRAhwi+SWHvPyN3vXiaPn6JR 3eoA.0TkFhTvpsDMIrL20nAkCI4EoYfSHAuiPBdmJRyd.IynYYjIzMvjOTKf 3DLvnvRLDLpWeEOYXMfAZqfQ0.qsnlUdmA33t8CNJ7MZEb.u7fiZHLYzDkJp R7CqEVLGN75U+1JXxFUY.xEEBcRCqhOEkz2bENEWnh4pbh0wY25EefbD6EmW UA6Ip8wFLyuFXx+Wrp8m6iff1B86W7bqJO9+mx8er4E3.abCLrYdA16sBuHx vKT6BlpIGQIhL55W7oicf3ayv3ixQCm4aQuY1HZUPQWY+cASx2WZ3f1fICuz vj5R5ZbM1y8gXYN4dIXaYGq4NhQvS5MmcDADy+S.j8CQ78vk7Q7gtPDX3kFh 3NGaAsYBUAO.8N1U4WKycxbQdrWxJdXd10gNIO+hkUMmm.CZwknu7JbNUYUq 0sOsTsI1QudDtjw0t+xZ85wWZd80tMCiiMADNX4UzrcSeK23su87IANqmA7j tiRzoXi2YRh67ldAk79gPmTe3YKuoY0qdEDV3X8xylCJMTN45JIakB7uY8XW uVr3PO8wWwEoTW8lsfraX7ZqzZDDXCRqNkztHsGCYpIDDAOqxDpMVUMKcOrp 942acPvx2NPocMC1wQZ8glRn3myTykVaEUNLoEeJjVaAevA4EAZnsNgkeyO+ 3rEZB7f0DTazDcQTNmdt8aACGi1QOWnMmd+.6YjMHH19OB5gKsMF877x8wsJ hN97JSnSfLUXGUoj6ujWXd6Pk1SAC+Pkogm.tZ.1lX1qL.pe6PE11DPeMMZ2 .P0K+3peBt3NskC -----------end_max5_patcher----------*/ [Get Code] Processing Code Copy the Processing code from the code sample above. As you mouse over the center square, the LED on pin 13 should turn on and off. The Processing applet looks like this: Mouse over the square to turn the LED on and off. Max patch The Max/MSP patch looks like the image below. Copy it from the code sample above and paste it into a new patch window.
- 77. Virtual Color Mixer Virtual Color Mixer This example demonstrates how to send multiple values from the Arduino board to the computer. The readings from three potentiometers are used to set the red, green, and blue components of the background color of a Processing sketch or Max/MSP patch. Hardware Required Arduino Board (3) Analog Sensors (potentiometer, photocell, FSR, etc.) (3) 10K ohm resistors breadboard hook-up wire Software Required Processing or Max/MSP version 5 Circuit
- 78. Connect analog sensors to analog input pins 0, 1, and 2. This circuit uses three voltage divider sub-circuits to generate analog voltages from the force-sensing resistors. a voltage divider has two resistors in series, dividing the voltage proportionally to their values. Click on the image to enlarge image developed using Fritzing. For more circuit examples, see the Fritzing project page Schematic Click on the image to enlarge
- 79. Code The sensor values are sent from the Arduino to the computer as ASCII-encoded decimal numbers. This means that each number is sent using the ASCII characters "0" through "9". For the value "234" for example, three bytes are sent: ASCII "2" (binary value 50), ASCII "3" (binary value 51), and ASCII "4" (binary value 52). /* This example reads three analog sensors (potentiometers are easiest) and sends their values serially. The Processing and Max/MSP programs at the bottom take those three values and use them to change the background color of the screen. The circuit: * potentiometers attached to analog inputs 0, 1, and 2 http://www.arduino.cc/en/Tutorial/VirtualColorMixer created 2 Dec 2006 by David A. Mellis modified 30 Aug 2011 by Tom Igoe and Scott Fitzgerald This example code is in the public domain. */ const int redPin = A0; const int greenPin = A1; const int bluePin = A2; // sensor to control red color // sensor to control green color // sensor to control blue color void setup() { Serial.begin(9600); } void loop() { Serial.print(analogRead(redPin)); Serial.print(","); Serial.print(analogRead(greenPin));
- 80. Serial.print(","); Serial.println(analogRead(bluePin)); } /* Processing code for this example // This example code is in the public domain. import processing.serial.*; float redValue = 0; float greenValue = 0; float blueValue = 0; // red value // green value // blue value Serial myPort; void setup() { size(200, 200); // List all the available serial ports println(Serial.list()); // I know that the first port in the serial list on my mac // is always my Arduino, so I open Serial.list()[0]. // Open whatever port is the one you're using. myPort = new Serial(this, Serial.list()[0], 9600); // don't generate a serialEvent() unless you get a newline character: myPort.bufferUntil('n'); } void draw() { // set the background color with the color values: background(redValue, greenValue, blueValue); } void serialEvent(Serial myPort) { // get the ASCII string: String inString = myPort.readStringUntil('n'); if (inString != null) { // trim off any whitespace: inString = trim(inString); // split the string on the commas and convert the // resulting substrings into an integer array: float[] colors = float(split(inString, ",")); // if the array has at least three elements, you know // you got the whole thing. Put the numbers in the // color variables: if (colors.length >=3) { // map them to the range 0-255: redValue = map(colors[0], 0, 1023, 0, 255); greenValue = map(colors[1], 0, 1023, 0, 255); blueValue = map(colors[2], 0, 1023, 0, 255); } } } */ /* Max/MSP patch for this example ----------begin_max5_patcher---------1512.3oc4Z00aaaCE8YmeED9ktB35xOjrj1aAsXX4g8xZQeYoXfVh1gqRjdT TsIsn+2K+PJUovVVJ1VMdCAvxThV7bO7b48dIyWtXxzkxaYkSA+J3u.Sl7kK lLwcK6MlT2dxzB5so4zRW2lJXeRt7elNy+HM6Vs61uDDzbOYkNmo02sg4euS 4BSede8S2P0o2vEq+aEKU66PPP7b3LPHDauPvyCmAvv4v6+M7L2XXF2WfCaF lURgVPKbCxzKUbZdySDUEbgABN.ia08R9mccGYGn66qGutNir27qWbg8iY+7 HDRx.Hjf+OPHCQgPdpQHoxhBlwB+QF4cbkthlCRk4REnfeKScs3ZwaugWBbj .PS+.qDPAkZkgPlY5oPS4By2A5aTLFv9pounjsgpnZVF3x27pqtBrRpJnZaa C3WxTkfUJYA.BzR.BhIy.ehquw7dSoJCsrlATLckR.nhLPNWvVwL+Vp1LHL. SjMG.tRaG7OxT5R2c8Hx9B8.wLCxVaGI6qnpj45Ug84kL+6YIM8CqUxJyycF 7bqsBRULGvwfWyRMyovElat7NvqoejaLm4f+fkmyKuVTHy3q3ldhB.WtQY6Z x0BSOeSpTqA+FW+Yy3SyybH3sFy8p0RVCmaMpTyX6HdDZ2JsPbfSogbBMueH JLd6RMBdfRMzPjZvimuWIK2XgFA.ZmtfKoh0Sm88qc6OF4bDQ3P6kEtF6xej .OkjD4H5OllyS+.3FlhY0so4xRlWqyrXErQpt+2rsnXgQNZHZgmMVzEofW7T S4zORQtgIdDbRHrObRzSMNofUVZVcbKbhQZrSOo934TqRHIN2ncr7BF8TKR1 tHDqL.PejLRRPKMR.pKFAkbtDa+UOvsYsIFH0DYsTCjqZ66T1CmGeDILLpSm myk0SdkOKh5LUr4GbWwRYdW7fm.BvDmzHnSdH3biGpSbxxDNJoGDAD1ChH7L I0DaloOTBLvkO7zPs5HJnKNoGAXbol5eytUhfyiSfnjE1uAq+Fp0a+wygGwR q3ZI8.psJpkpJnyPzwmXBj7Sh.+bNvVZxlcKAm0OYHIxcIjzEKdRChgO5UMf LkMPNN0MfiS7Ev6TYQct.F5IWcCZ4504rGsiVswGWWSYyma01QcZgmL+f+sf
- 81. oU18Hn6o6dXkMkFF14TL9rIAWE+6wvGV.p.TPqz3HK5L+VxYxl4UmBKEjr.B 6zinuKI3C+D2Y7azIM6N7QL6t+jQyZxymK1ToAKqVsxjlGyjz2c1kTK3180h kJEYkacWpv6lyp2VJTjWK47wHA6fyBOWxH9pUf6jUtZkLpNKW.9EeUBH3ymY XSQlaqGrkQMGzp20adYSmIOGjIABo1xZyAWJtCX9tg6+HMuhMCPyx76ao+Us UxmzUE79H8d2ZB1m1ztbnOa1mGeAq0awyK8a9UqBUc6pZolpzurTK232e5gp aInVw8QIIcpaiNSJfY4Z+92Cs+Mc+mgg2cEsvGlLY6V+1kMuioxnB5VM+fsY 9vSu4WI1PMBGXye6KXvNuzmZTh7U9h5j6vvASdngPdgOFxycNL6ia1axUMmT JIzebXcQCn3SKMf+4QCMmOZung+6xBCPLfwO8ngcEI52YJ1y7mx3CN9xKUYU bg7Y1yXjlKW6SrZnguQdsSfOSSDItqv2jwJFjavc1vO7OigyBr2+gDYorRk1 HXZpVFfu2FxXkZtfp4RQqNkX5y2sya3YYL2iavWAOaizH+pw.Ibg8f1I9h3Z 2B79sNeOHvBOtfEalWsvyu0KMf015.AaROvZ7vv5AhnndfHLbTgjcCK1KlHv gOk5B26OqrXjcJ005.QqCHn8fVTxnxfj93SfQiJlv8YV0VT9fVUwOOhSV3uD eeqCUClbBPa.j3vWDoMZssNTzRNEnE6gYPXazZaMF921syaLWyAeBXvCESA8 ASi6Zyw8.RQi65J8ZsNx3ho93OhGWENtWpowepae4YhCFeLErOLENtXJrOSc iadi39rf4hwc8xdhHz3gn3dBI7iDRlFe8huAfIZhq -----------end_max5_patcher----------*/ [Get Code] Processing Code Copy the Processing sketch from the code sample above. As you change the value of the analog sensors, the background color will change: Max Code The max patch looks like this. Copy the text of it from the code sample above and paste into a new Max window.
- 82. Serial Call and Response (handshaking) Serial Call and Response (handshaking) This example demonstrates multi-byte communication from the Arduino board to the computer using a call-and-response (handshaking) method. This sketch sends an ASCII A (byte of value 65) on startup and repeats that until it gets a serial response from the computer. Then it sends three sensor values as single bytes, and waits for another response from the computer. You can use the Arduino serial monitor to view the sent data, or it can be read by Processing (see code below), Flash, PD, Max/MSP (see example below), etc. Hardware Required Arduino Board (2) analog sensors (potentiometer, photocell, FSR, etc.) (1) momentary switch/button
- 83. (3) 10K ohm resistors breadboard hook-up wire Software Required Processing or Max/MSP version 5 Circuit Connect analog sensors to analog input pin 0 and 1 with 10K ohm resistors used as voltage dividers. Connect a pushbutton or switch to digital I/O pin 2 with a 10Kohm resistor as a reference to ground. click on the image to enlarge image developed using Fritzing. For more circuit examples, see the Fritzing project page Schematic click the image to enlarge
- 84. Code /* Serial Call and Response Language: Wiring/Arduino This program sends an ASCII A (byte of value 65) on startup and repeats that until it gets some data in. Then it waits for a byte in the serial port, and sends three sensor values whenever it gets a byte in. Thanks to Greg Shakar and Scott Fitzgerald for the improvements The circuit: * potentiometers attached to analog inputs 0 and 1 * pushbutton attached to digital I/O 2 Created 26 Sept. 2005 by Tom Igoe modified 24 April 2012 by Tom Igoe and Scott Fitzgerald This example code is in the public domain. http://www.arduino.cc/en/Tutorial/SerialCallResponse */ int int int int firstSensor = 0; secondSensor = 0; thirdSensor = 0; inByte = 0; // // // // first analog sensor second analog sensor digital sensor incoming serial byte void setup() { // start serial port at 9600 bps: Serial.begin(9600); while (!Serial) { ; // wait for serial port to connect. Needed for Leonardo only } pinMode(2, INPUT); establishContact(); // digital sensor is on digital pin 2 // send a byte to establish contact until receiver responds
- 85. } void loop() { // if we get a valid byte, read analog ins: if (Serial.available() > 0) { // get incoming byte: inByte = Serial.read(); // read first analog input, divide by 4 to make the range 0-255: firstSensor = analogRead(A0)/4; // delay 10ms to let the ADC recover: delay(10); // read second analog input, divide by 4 to make the range 0-255: secondSensor = analogRead(1)/4; // read switch, map it to 0 or 255L thirdSensor = map(digitalRead(2), 0, 1, 0, 255); // send sensor values: Serial.write(firstSensor); Serial.write(secondSensor); Serial.write(thirdSensor); } } void establishContact() { while (Serial.available() <= 0) { Serial.print('A'); // send a capital A delay(300); } } /* Processing sketch to run with this example: // This example code is in the public domain. import processing.serial.*; int bgcolor; // Background color int fgcolor; // Fill color Serial myPort; // The serial port int[] serialInArray = new int[3]; // Where we'll put what we receive int serialCount = 0; // A count of how many bytes we receive int xpos, ypos; // Starting position of the ball boolean firstContact = false; // Whether we've heard from the microcontroller void setup() { size(256, 256); noStroke(); // Stage size // No border on the next thing drawn // Set the starting position of the ball (middle of the stage) xpos = width/2; ypos = height/2; // Print a list of the serial ports, for debugging purposes: println(Serial.list()); // I know that the first port in the serial list on my mac // is always my FTDI adaptor, so I open Serial.list()[0]. // On Windows machines, this generally opens COM1. // Open whatever port is the one you're using. String portName = Serial.list()[0]; myPort = new Serial(this, portName, 9600); } void draw() { background(bgcolor); fill(fgcolor); // Draw the shape ellipse(xpos, ypos, 20, 20); } void serialEvent(Serial myPort) { // read a byte from the serial port: int inByte = myPort.read(); // if this is the first byte received, and it's an A, // clear the serial buffer and note that you've // had first contact from the microcontroller. // Otherwise, add the incoming byte to the array: if (firstContact == false) {
- 86. if (inByte == 'A') { myPort.clear(); firstContact = true; myPort.write('A'); } // clear the serial port buffer // you've had first contact from the microcontroller // ask for more } else { // Add the latest byte from the serial port to array: serialInArray[serialCount] = inByte; serialCount++; // If we have 3 bytes: if (serialCount > 2 ) { xpos = serialInArray[0]; ypos = serialInArray[1]; fgcolor = serialInArray[2]; // print the values (for debugging purposes only): println(xpos + "t" + ypos + "t" + fgcolor); // Send a capital A to request new sensor readings: myPort.write('A'); // Reset serialCount: serialCount = 0; } } } */ /* Max/MSP version 5 patch to run with this example: ----------begin_max5_patcher---------3908.3oc6ckziiaiE9b0+J3XjCIXpp.WzZNMURv.jCInQ5fYNjNngrDssRKK 4nkp6JA4+973hrkrsjncKu0SRiXasQ83G+dKj7QV+4qtaxzrOxKlf9Zzuft6 t+7U2cm7ThSbm936lrL3igIAExaaRJ+CYS+sI2qtTI+ikxSuBMKNojm+N3D4 Aua5KkPwpuoUAkgKhSm+tbdXo5cQXVOhuGwrohuHD4WT7iXzupen3HY4BuqG rH0kzrrzxzfkb4kdJONHo9JoUKiSS3kRgjt4jYUk0mkznPJh+CYgHewpSqty xWVwUh3jIqkEYEfmqQEMr.ETbB+YddQbVZix+tIAqV03z203QDX4ukIKHm6W ep3T0ovqOUN+435m2Rcx+5U0E+FTzVBh9xOsHXIh5YuADg1x4IYgumG0r3mj shmFmtJmWvSKCJ0um0WNhOKnJo7c6GmZe8YAg7Ne381Rc2j44wQYoBgn0SJN c8qCHH1RhQqJi7NRCVsmGt.pGUESCxE31zDdCV.PRyxRZeo0MU.WOHMdYPIu LVIrT75BMd4p73zxVuHdZ.TFKJByyRRZUTpq77dtRDzZFx+PbT4BYY0DJgaO dUcSvj0XTT7bdQY6yUFLun8YZo71jl0TIt042RYNLa4RfCTWfsznKWDWfJpl tJHrbgV6t.AZInfzWP.4INpJHA8za91u+6QN1nk7hh.PpQwonxEbTAWzpilV MimilkmsDtPbo3TPiUdY0pGa9ZShS4gYUJz1pwE1iwCpxbAgJI9DGGwWNzFT ksLf3z7M0MybG6Hj1WngsD7VEXS8j5q7Wu5U0+39ir8QJJS5GMHdtRimL4m1 0e1EVX0YsE2YssINriYRoFRyWVMoRRUGQvnkmms3pnXDYHbBKMPpIOL5i1s8 3rMPwFcRCsGRyPH780.8HBnpWz.vlEQBWJ+0CSunehJSmJxiIZRtNGhhDYrU jt3ZQyA2fHJhZDifXIQHUHH8oGYgOREI5nqHIzhFWUndPyBdB3VzHJGwUhkV rgvRl2UCVNMHcd234lf1DN16HFEIdHt99A5hrp7v5WWMSBQZgMP.Tkwoqig8 W1.Sn1f3h3nn1wLpBypPDzlJ7XinEGkLiMPloWOhrgR7dpZWJQV1faDy35Qj MThMFkWFGsJChQPqrQp8iorV6Q28HBVF4nMVDJj7f1xyYACFScisg.ruLHOW uMUS4Am4pI4PTnHi.6bi02HNzSYnDBe4cgAgKzRk1jc8PJLoH3Ydz6.Q.7K8 tfxx73oUkJq1MGuCy5TpAi.POWZ3AenidLOOIaZPhdjZVW3sdk6LXEGzHb7p Mfr7SEy3SXHyBSxJ3J2ncNNYVJsXG6Me10nj4cfCRFdTFjLo7q3SiCpjjEDM .nvra.GN39.E2CDTHWXPo8.xzfqrHCHKnf5QUYUVdoZPUjCSC7LU8.XtTUXl X8vr51GjwFGLC2AlMdLkU4RiaRrnmJuiudnDk0ZW+9p6TuKBe433JUCzp6fU iOF0SUk2UQYUPNTEkiZubvKa1tsmgL5SCTXGHnnG0CceLpkpR9Rs28IUESWl EwWNKfHlg.zj6Ee7S+nE8A+m9F7Cu40u9gMm+aRp3kYYkKd3GDOz5y+c7b96 K9gfvuIK68uNO6g2vUUL80WxihCVFD9vlB30e2SOrmxUb527RZ3nZNrljGrR 70vs1J9suWuZ3zaHVdG3RIJLgGj2Gfn6TcGcstEfvtH.hpFLlnBndjOLGQAI z98BXc6yQxghmOn6gZqj0ShPOXhynLOjzCESt+XwE8TxrCvrdXo16rqnLgvb HaFmbh29QD+K0DyNdjDwvzQL.NXpoMvoOBxkger0HwMRQbpbCh91fjjG9Idw prTH9SzaSea5a.GQEPnnh43WNefMlsOgx18n.vgUNO.tKl7tDyI3iHzafJHZ VVNedVEbGgYIY42i93prB0i7B7KT1LnnCiyAiinpBnsPV7OG.tYKfBsrJOkG UG5aq26iJw6GyJ4eM5mEgEKaNQPMEBUp.t8.krplOVTlZdJAW27bjvGK7p2p HQPgLOSJDYv4E9gQBYBjMUselRxDy+4WplIzm9JQAWOEmfb.E364B43CAwp5 uRRDEv8hWXprjADMUOYpOg9.bVQpEfhKgGCnAnk.rghBJCdTVICA3sDvAhE5 oU4hf67ea5zWPuILqrD8uiK+i477fjHIt9y.V88yy3uMsZUj7wnxGKNAdPx5 fAZMErDZOcJU4M01WFQokix.pKa+JE1WacmnKFeYd7b.0PeIzB8Kk+5WIZpB Ejt34KJeHgOCh4HK8Y3QiAkAfs8TRhhOkG7AAGQf0qxyfmQxa+PLb8Ex.2PS 4BdO5GB9Hvg+cfJCMofAIMu9Qz+UPCjckqVJlEmyA8Bf.rC6.3hAEuG8TdTU bZljQ0nr1ayIqmTwQYfyRGafZhur5vfuyMSqYNWmtAPwWHalDSuUgT0Bosh. JpAR89Y6Ez5QEfPTQO4J0DHLInIliz8BZV2JfV3Bd36qsQwAVVXbr1BGXp6s Sd5sSDruo74wofx.HxUgxQwTnMLqTXvRmiGh2PUZr5pBynKChjl6feNUjSRn hEUfRPT1GfG9Ik4TQBm.hEZZ.bc38HjAMKGzDRijEm1ifx1dbgzQyKh6FZc3 wOCkRJH+KUh0daWs6wzltWx1puXxlWW6NZWY2JiTBzzILRIANku02NourySM VI1VJTvQZff32AJr+dS9e34QAoA6EGXlGFH9yk7yyQAlVd3SR94g+TxOu1sU
- 88. The max patch looks like this. Copy the text from the code sample above. Serial Call and Response (handshaking) with ASCII-encoded output Serial Call and Response (handshaking) with ASCII -encoded output This example demonstrates string-based communication from the Arduino board to the computer using a call-and-response (handshaking) method. The sketch sends an ASCII string on startup and repeats that until it gets a serial response from the computer. Then it sends three sensor values as ASCII-encoded numbers, separated by commas and terminated by a linefeed and carriage return, and waits for another response from the computer.
- 89. You can use the Arduino serial monitor to view the sent data, or it can be read by Processing (see code below), Flash, PD, Max/MSP (see example below), etc. The examples below split the incoming string on the commas and convert the string into numbers again. Compare this to the Serial call and response example. They are similar, in that both use a handshaking method, but this one encodes the sensor readings as strings, while the other sends them as binary values. While sending as ASCII-encoded strings takes more bytes, it means you can easily send values larger than 255 for each sensor reading. It's also easier to read in a serial terminal program. Hardware Required Arduino Board (2) analog sensors (potentiometer, photocell, FSR, etc.) (1) momentary switch/button (3) 10K ohm resistors breadboard hook-up wire Software Required Processing or Max/MSP version 5 Circuit Connect analog sensors to analog input pin 0 and 1 with 10Kohm resistors used as voltage dividers. Connect a pushbutton or switch connected to digital I/O pin 2 with a 10Kohm resistor as a reference to ground. click the image to enlarge image developed using Fritzing. For more circuit examples, see the Fritzing project page Schematic click the image to enlarge
- 90. Code /* Serial Call and Response in ASCII Language: Wiring/Arduino This program sends an ASCII A (byte of value 65) on startup and repeats that until it gets some data in. Then it waits for a byte in the serial port, and sends three ASCII-encoded, comma-separated sensor values, truncated by a linefeed and carriage return, whenever it gets a byte in. Thanks to Greg Shakar and Scott Fitzgerald for the improvements The circuit: * potentiometers attached to analog inputs 0 and 1 * pushbutton attached to digital I/O 2 Created 26 Sept. 2005 by Tom Igoe modified 24 Apr 2012 by Tom Igoe and Scott Fitzgerald This example code is in the public domain. http://www.arduino.cc/en/Tutorial/SerialCallResponseASCII */ int int int int firstSensor = 0; secondSensor = 0; thirdSensor = 0; inByte = 0; // // // // first analog sensor second analog sensor digital sensor incoming serial byte void setup() { // start serial port at 9600 bps and wait for port to open: Serial.begin(9600); while (!Serial) { ; // wait for serial port to connect. Needed for Leonardo only
- 91. } pinMode(2, INPUT); establishContact(); // digital sensor is on digital pin 2 // send a byte to establish contact until receiver responds } void loop() { // if we get a valid byte, read analog ins: if (Serial.available() > 0) { // get incoming byte: inByte = Serial.read(); // read first analog input: firstSensor = analogRead(A0); // read second analog input: secondSensor = analogRead(A1); // read switch, map it to 0 or 255L thirdSensor = map(digitalRead(2), 0, 1, 0, 255); // send sensor values: Serial.print(firstSensor); Serial.print(","); Serial.print(secondSensor); Serial.print(","); Serial.println(thirdSensor); } } void establishContact() { while (Serial.available() <= 0) { Serial.println("0,0,0"); // send an initial string delay(300); } } /* Processing code to run with this example: // This example code is in the public domain. import processing.serial.*; Serial myPort; float bgcolor; float fgcolor; float xpos, ypos; // import the Processing serial library // The serial port // Background color // Fill color // Starting position of the ball void setup() { size(640,480); // List all the available serial ports println(Serial.list()); // I know that the first port in the serial list on my mac // is always my Arduino module, so I open Serial.list()[0]. // Change the 0 to the appropriate number of the serial port // that your microcontroller is attached to. myPort = new Serial(this, Serial.list()[0], 9600); // read bytes into a buffer until you get a linefeed (ASCII 10): myPort.bufferUntil('n'); // draw with smooth edges: smooth(); } void draw() { background(bgcolor); fill(fgcolor); // Draw the shape ellipse(xpos, ypos, 20, 20); } // serialEvent method is run automatically by the Processing applet // whenever the buffer reaches the byte value set in the bufferUntil() // method in the setup(): void serialEvent(Serial myPort) {
- 92. // read the serial buffer: String myString = myPort.readStringUntil('n'); // if you got any bytes other than the linefeed: myString = trim(myString); // split the string at the commas // and convert the sections into integers: int sensors[] = int(split(myString, ',')); // print out the values you got: for (int sensorNum = 0; sensorNum < sensors.length; sensorNum++) { print("Sensor " + sensorNum + ": " + sensors[sensorNum] + "t"); } // add a linefeed after all the sensor values are printed: println(); if (sensors.length > 1) { xpos = map(sensors[0], 0,1023,0,width); ypos = map(sensors[1], 0,1023,0,height); fgcolor = sensors[2]; } // send a byte to ask for more data: myPort.write("A"); } */ /* Max/MSP version 5 patch to run with this example: ----------begin_max5_patcher---------3640.3oc6cs0jZajE94Y9UzKkeHoVloTeSHkm1II0VkeHIthSs6C1obIjZ.E KjHRhY7jT4+9d5KBj.jTCAXfoV6x.sj5VmyWet127ed6MCFm8EQw.z2f9.5l a9yau4F0kjW3FS4aFLO3KgIAEpGaPX174hzxAC02qT7kR80mkkUHPAnBQdbP BZQVdIZRd1bT4r3BDTmkU0YQPY3r3zoeJWDVpe2ttr6cFhvXt7KhyH8W26f9 USkhiTulrw+1czQUszjrzxzf4B0sdP9dqtS5x4woIhREQiWewrkkUW0oViTD +GpFASt2Qd0+51akeLzRPIU7DPXagIFnH.4653f9WAKKyxVHRQNcfDXlih2w puvbdWHAlcTPBRKHg4x5mr74EBMINHV1+iFL.8qG.VMWTTDLUrs.TBH+zAvP nTEhvvxun9pBd6FWH38DWH6DWv6ItbX.RKBOJ7XbP5ztvDesvhBLb6VTwcOg DmiBjnXfiIrjjED0CpP490PEmtPExwQA5EGUVjK.CKQJqtcYl0nCMRAJi76D Z7dQflCCVV1i+ENiTy3AwYaghEA4.KVJx+jHMXbhntJPceO3iBpPOPKtZqtU jUoXtw28fkEimmEIlOI.3Q4iMT9wO+iLxc9O7sN28928t6Ve8uMYo.7EUN6t ePVoUW+6E4hOW7CAgeaV1meWd1cuWnYLy8mKhhClGDd25F3ce+C2si1Ud42+ bZ3IQJOXg7q96t80e50YvDjqHw7VvkRTXhHHuKEerRwmqfBFsS.g9h.HZN3X hJf5Qd+xHZHgzc.mrqeYjbn4E84evfIDUjDtjNwD2iRHV6anmGdbmsfKxTTJ dd93rjtBJ2U42foCwZDqKfYzKkrh4VgYIY4FxVRmN2646f8ck+xw7KrjzOlZ ZYAVfdZgKlaWn29FzA8nfdR2quj.3ejflBJnKr.Dwpf13cZBm85P0rPj.rOB 6fvztPFGkVI0SAPi5NKHmih7E8Ph2e35uOtYN6x6JEQtJVWpV7gRtm2dZy9W +YMCxLHrEvAknQktDVdY7v82SFosgmSGHO56BRRt6mEEKxRKDnGd+2812h9X 5GSeODOcAJ.M9YHHAfjPkyD0GIugn.Ht6bQ.7TTS8DoPtCQCQxWobX+jYPUJ hPn3zgnx7kogphieFZ2j3TwDgH5dzaUscJ77kEnIY4hoYKglVYzcH5KKxJzu qmgegxl.0MLNGBNDsr.5IUz0iAPZFE.0TtLOEdClQYrAAeORwW+XVo3aP+hb DHUBCH.mfbEKfGOPyjQhGiCAdNUUBRcQjij4X.u5MZRDzHSyTDQFbcYdHHIM AzlF1lnoLjKG8UZH5guV1vEkA4kKWbOPGPC9YgjNdJHVy+ZJQ1.Cq.FUWQpA ke.8DbUwi.YEWBUCDhPyAXCEETFbuhICg9EIRiYnGVjKyt0+io.r+9vrxRz+ Nt7OlJxCRhT35u.X0amlI9X5xEQppQwneJrLarPVU7JkGYWVHz2njevz1UoX XkoEWOkxDWO9kXYocoTwuzF611zXJyimB3F5qf9nOT9qesryJTJ1EOcV4cIh IPVWYoOBUMFTl.4sGRRzRT4AOIkRjn8h7LnNJI2mhg6OSk5JZrPJ4i9gfu.R w+NHLCcpfAMij88n+qTPPMt4UTwj3bAnY.h.aIe.RiAEeF8Pdzx3zLkLUs1Z mcmczah0FH4ZmpLcp.rVbX3d0zalKhSiKAxBZ9BU2zTP3uPobgL1Q.U0.kl+ jcBZj1AMOpzsJYjdz0n53QXsfYrqELKblH7yUFoDfPVXbrwDGXqCjwjviT7a rXZbpxOvxzXvpOnPH0GlTJMZog8l2UZJcdPjxjG7ywIYgeFULaInFDk8jpxZ apvMA4cv9X.7.vaRRGFAcPYHMR0dF2BZC7wEJ2TOKeZnCRD+HzJo.OLWSW6r qk2wfI6pGf.pdjC4rpfL2YeK8JYloVf93.ocJEvocv9wAcEiMQgBtl.lb0y9 heKnvtGRs+iHOJHM3uaZbN1jDrhED4FfwfLPCEmH8jV.BB0Z+aF.Vkqc4apU EIb9a5zAcGt5Rf3WdsNJ3R4PXDU0mouHzIca0MWO.KpQjT8oq1SIyqV3mP24 ToxfHpdyOPNqgwoK.W.fxfRNtwsiDSBVlT9ociSMu+jfPQqUtk9paFLMONJK URFMpq7xUuvOXF1HBuN6ndhzfE6nxPXQkKKFGjKQNyHtSptYYVVRyaspyBD3 CRiA0YQYrlbgHdptY77E4wZk5UWSOf9yJByyRRZzT5673NtiNrvmhiJmoZq5 fI73wKp5DFrBihhmBNxadsxfoEMuRiIbutfVcM4FWuyr.2bvrlNF5.3U+q9C sKaa5jkMt70iSd8bC2ZbEFUuAa0DWqYF0tJ91p43649br2nZ2usLGuoxrnQq 6TArNx+1CjRLPpVWf62Kj59ZFRa38Y6D0kRo8AnT8b0g0e4p8+f6.P4sBnaX TqMmPsOdOcjG+dMtOmdzcgLdIGqjX0J+FAVrmSu.L8fAX19Ky1C.e1.z+IB2 qpeCIUV+.I4fARxQGH0i.9ECVZrhZMTheMCkc4XRMsoCgbef2ZFjaF5MXzaH n2PQugYmhe0WjdcU47Z1Ukhb6CwFISy2HNtcvtaNRWdshHNVgHcNMUlopRm4 tJByyLXfI0UN6GM7eUiFTm8BMbctZQC8atOegDu6oveXrgpeaGnfaETvsBJN 6AKuNsT4n+zRVXJtQd+ciEEYKyCq.8ptRTSdBRQrLNcUd5eXcjoa7fyhihZl UrNQxBYZo5g.vpdt8klkJi1QyPvdH7UFMStbvYu8Amu1nY7ECMKGXBqnY2KH Z18Jjl4aYNnEYiQWVzrUxytWNzL0VZ14xglI6isN5kAMi2GZlbYPyNma6FqC aJRs9qEogO+ovfvYFxxjGV07cLnH3QQzm.R.BG7SAkk4wiWVpC2p9jwX23ka
- 93. 0zSz4M6e1QZY.8mljMNHwLURqZ9FuzslMk8ZJXtcMPeblVut1XYDhdMCpmjZ 8BAqsU9DezKxJAa8Hmbbfi+wccuVv7c0qELrEHB+UAhHWzCfCbKPEyBki24Z clythVwfkYSmlHrPdX8tC5v1iPb5ArPuOWc8NVrRZspq24UxhE0wBcAsMyt2 2LLuqvkKZRXjEq5CM6S3tq9Zm6HD+8Prm0F+jDWn1paUe+2ZuF259kxkiR5W Qf6vzKBtMm+gFrMeuWsKW.6B61VyWOFjz0Zsmwza+.ikxQcAL3iDtbLWMTKm OtyMEFcjWM9iu0rMa81D8kUl3v2ewcHWP5B2HX6kK7t7DL5fs6JVIrO0Z1l3 bEpOP3zih9.gbspPzKDYbRVAQ7CFhtZsYzhW1ko0WEJcG3oAC0aRIyxKsUEI +iDPwOLfp0uNA68MmtSUSmRuNb8d1ttWya7sVWf5Iwf.1LQtZUnqNvT1bS6z E5o2vfqNSH5bufQbuZV09M.E04Mj8XBUiBqNGl5FSt3NGlZaGRpV6wc4kiWi q0twaaORhul1jjsIi7cMjQlJJUaQuhR495nlfRQWRJXkrgmMGXWjKM4jdGJH yovkl4HUetutzWuY5tjFHneGn77rtG3iJ92whCVJxKhBwgGtRaFIzabfNrRn WThd9q24vsZjf9JvHwOKBhprFDmtXYIZ7xISjaO1GE4OK2V9yiS.qFhvrznh 8cKyMZs7EVepT01FlCe0rIC0lUk6NX4N9syCyAE660+ovE9hyGqjaGurrLak G0YwoMlFO4YMSZjd9DcWucsjUr1Yqgy8TluCY3N9Q8.+k0JCD3ZTS0CW8Qyb s19nOxrgjw7VFU+3ooYviK66pCfimt8AAxHOOBkK+EajC2yayWtciMzgdvpM NKORj29YyGcS4wFVlql0wcZTg1yw5wvMNiTpuUzpu.Y0miRlgO0w7wpZI2Em SUBGayVM5eqU4C+rV4ZSPkvXqLJbAHlR3mKwT5ISL8+Kv0k.GWEKwpP3ewk3 7omKIN7EtDmp4ZtHk0BfatXgLhgasHgZrVYaY8AIO7fq8Pas1fFzjd4ibwpd XO4GXOeOG+lcyasNh1R+wVx2yBxeTOT+wiZFYA0P48PNyiiVjAhJlNT4Qvpb uj3aN2qYqJcBfSWhMbf+YCPcsfbNeTC2l9WNc+5eIlkST0RJgupzIn+kysgC X6GGXnYpdYfP0GP6MKQXM3N1Ih6XVvcLuym7B0B5w8v.ahqBI49qJcJ.TaX. N+xBP4NGHhhqYfkRNM9q1f3ZweqyYCQYdGCSZGQ5wBx47o.Ssw+CkcgQOmud KZic4QKzCw+7ROm8nY2LfMsEDtdfeMKSn5Ev95IQhorcqJcBrzPsQUhRNe8M 1X6lhOezC4Bidv1nKcFs8YimJ9n8RWZXiO7aSCxDRLdjd91qU5TnmXCeRvmR 9jnm7b15RmJ9rO4Kr+IgO04BfczyOpqx9npzofOsIlaR8Mo0IUMR48i0mYly lVMwlw6gbloGRezy4yKEw6BHBBWik.eRi3DNM5KDahS.SOE1EjmXl7Uyqo9T AtQAO8fG3oLX3cZFxKh0FLNSRfDaoG74gdvW.ZDU9FMGSdFMBt+IQh.6eIvw FujTkJREGKKcJ3X2WtXf7Ub1HywEqxh2tJnE.FcZhMByrcXQw1x+bOWJYjpy lv8oq55aEHLcwD8hJjxbVU5EigcNtL7Ql76KVVp69Huhcb87vpoCkRYT+96v Hd5Ay1rofMqm+FkLYvv0+GL3FkL6bLp21kL6QFNV8BNM48foWBV4zt1wXm5V 4jkNEbL45dtNw13Iltmi9sAyY0S0l8BR+3yWjVXax7eOmKrp4m0QKIal6VYo SAf5XQxSrCa5l0qk45k5kAzqEgMNgzkz9FmL5abpnu4IhNzZ+0s+OKCSg0. -----------end_max5_patcher----------*/ [Get Code] Processing Code Copy the Processing sketch from the code sample above. As you change the value of the analog sensor, you'll get a ball moving onscreen something like this. When you turn the switch off, the ball will disappear: Max Code The max patch looks like this. Copy the text from the code sample above and paste it into a new Max window
- 94. SerialEvent SerialEvent Demonstrates use of the SerialEvent() function. SerialEvent() is called after a loop(), if there is serial data in the buffer. Hardware Required
- 95. Arduino Board Circuit image developed using Fritzing. For more circuit examples, see the Fritzing project page None, but the Arduino has to be connected to the computer. Code /* Serial Event example When new serial data arrives, this sketch adds it to a String. When a newline is received, the loop prints the string and clears it. A good test for this is to try it with a GPS receiver that sends out NMEA 0183 sentences. Created 9 May 2011 by Tom Igoe This example code is in the public domain. http://www.arduino.cc/en/Tutorial/SerialEvent */ String inputString = ""; boolean stringComplete = false; // a string to hold incoming data // whether the string is complete void setup() { // initialize serial: Serial.begin(9600); // reserve 200 bytes for the inputString: inputString.reserve(200); } void loop() { // print the string when a newline arrives: if (stringComplete) { Serial.println(inputString); // clear the string: inputString = ""; stringComplete = false; } } /* SerialEvent occurs whenever a new data comes in the hardware serial RX. This routine is run between each time loop() runs, so using delay inside loop can delay response. Multiple bytes of data may be available. */ void serialEvent() { while (Serial.available()) { // get the new byte: char inChar = (char)Serial.read(); // add it to the inputString: inputString += inChar; // if the incoming character is a newline, set a flag // so the main loop can do something about it: if (inChar == 'n') {
- 96. stringComplete = true; } } } Switch (case) Statement, used with serial input Switch (case ) Statement, used with serial input An if statement allows you to choose between two discrete options, TRUE or FALSE. When there are more than two options, you can use multiple if statements, or you can use the switch statement. Switch allows you to choose between several discrete options. This tutorial shows you how to use switch to turn on one of several different LEDs based on a byte of data received serially. The sketch listens for serial input, and turns on a different LED for the characters a, b, c, d, or e. Hardware Required Arduino Board (5) LEDs (5) 220 ohm resistors breadboard hook-up wire Circuit Five LEDs are attached to digital pins 2, 3, 4, 5, and 6 in series through 220 ohm resistors. To make this sketch work, your Arduino must be connected to your computer. Open the Serial Monitor, and send the characters a, b, c, d, or e, or anything else. click the image to enlarge image developed using Fritzing. For more circuit examples, see the Fritzing project page Schematic: click the image to enlarge
- 97. Code /* Switch statement with serial input Demonstrates the use of a switch statement. The switch statement allows you to choose from among a set of discrete values of a variable. It's like a series of if statements. To see this sketch in action, open the Serial monitor and send any character. The characters a, b, c, d, and e, will turn on LEDs. Any other character will turn the LEDs off. The circuit: * 5 LEDs attached to digital pins 2 through 6 through 220-ohm resistors created 1 Jul 2009 by Tom Igoe This example code is in the public domain. http://www.arduino.cc/en/Tutorial/SwitchCase2 */ void setup() { // initialize serial communication: Serial.begin(9600); // initialize the LED pins: for (int thisPin = 2; thisPin < 7; thisPin++) { pinMode(thisPin, OUTPUT); } } void loop() { // read the sensor: if (Serial.available() > 0) { int inByte = Serial.read(); // do something different depending on the character received. // The switch statement expects single number values for each case; // in this exmaple, though, you're using single quotes to tell // the controller to get the ASCII value for the character. For // example 'a' = 97, 'b' = 98, and so forth: switch (inByte) { case 'a': digitalWrite(2, HIGH); break; case 'b':
- 98. digitalWrite(3, HIGH); break; case 'c': digitalWrite(4, HIGH); break; case 'd': digitalWrite(5, HIGH); break; case 'e': digitalWrite(6, HIGH); break; default: // turn all the LEDs off: for (int thisPin = 2; thisPin < 7; thisPin++) { digitalWrite(thisPin, LOW); } } } } MIDI Note Player MIDI Note Player This tutorial shows how to play MIDI notes from an Arduino. MIDI, the Musical Instrument Digital Interface, is a useful protocol for controlling synthesizers, sequencers, and other musical devices. MIDI devices are generally grouped in to two broad classes: controllers (i.e. devices that generate MIDI signals based on human actions) and synthesizers (including samplers, sequencers, and so forth). The latter take MIDI data in and make sound, light, or some other effect. MIDI is a serial protocol that operates at 31,250 bits per second. The Arduino's built-in serial port (all of them on the Mega as well) can send data at that rate. MIDI bytes are divided into two types: command bytes and data bytes. Command bytes are always 128 or greater, or 0x80 to 0xFF in hexadecimal. Data bytes are always less than 127, or 0x00 to 0x7F in hex. Commands include things such as note on, note off, pitch bend, and so forth. Data bytes include things like the pitch of the note to play, the velocity, or loudness of the note, and amount of pitch bend, and so forth. For more details, see the MIDI specification, or one of the many MIDI Protocol Guides on the Web. MIDI data is usually notated in hexadecimal because MIDI banks and instruments are grouped in groups of 16. For more see this introduction to MIDI or this example. Hardware Required Arduino Board (1) MIDI jack (1) 220 ohm resistor hook-up wire MIDI enabled device (optional, for testing)
- 99. Circuit All MIDI connectors are female, by definition of the MIDI spec. Here's how to wire the connector to the Arduino: Arduino digital pin 1 connected to MIDI jack pin 5 MIDI jack pin 2 connected to ground MIDI jack pin 4 connected to +5V through 220-ohm resistor click the image to enlarge image developed using Fritzing. For more circuit examples, see the Fritzing project page Schematic click the image to enlarge Code /* MIDI note player This sketch shows how to use the serial transmit pin (pin 1) to send MIDI note data. If this circuit is connected to a MIDI synth, it will play the notes F#-0 (0x1E) to F#-5 (0x5A) in sequence.
- 100. The circuit: * digital in 1 connected to MIDI jack pin 5 * MIDI jack pin 2 connected to ground * MIDI jack pin 4 connected to +5V through 220-ohm resistor Attach a MIDI cable to the jack, then to a MIDI synth, and play music. created 13 Jun 2006 modified 13 Aug 2012 by Tom Igoe This example code is in the public domain. http://www.arduino.cc/en/Tutorial/Midi */ void setup() { // Set MIDI baud rate: Serial.begin(31250); } void loop() { // play notes from F#-0 (0x1E) to F#-5 (0x5A): for (int note = 0x1E; note < 0x5A; note ++) { //Note on channel 1 (0x90), some note value (note), middle velocity (0x45): noteOn(0x90, note, 0x45); delay(100); //Note on channel 1 (0x90), some note value (note), silent velocity (0x00): noteOn(0x90, note, 0x00); delay(100); } } // plays a MIDI note. Doesn't check to see that // cmd is greater than 127, or that data values are void noteOn(int cmd, int pitch, int velocity) { Serial.write(cmd); Serial.write(pitch); Serial.write(velocity); } less than 127: MultiSerialMega MultiSerialMega Sometimes, one serial port just isn't enough! When trying to communicate with multiple serial enabled devices, while also sending info back to the main serial window, a few extra RX/TX ports can be a welcomed thing. This example makes use of one of Arduino Mega's 3 auxiliary serial ports, routing any incoming data read on that connection straight to the main TX line, and, in turn, to the main serial window for you to view. Hardware Required (1) Arduino Mega Board (1) serial enabled device (a Xbee Radio, Bluetooth module, or RFID reader, or another Arduino, for instance).
- 101. Circuit After checking the data sheet of whatever serial enabled device you choose to use for this example, make sure that it is both properly wired and powered. Connect the RX pin and TX pins of your device to the TX and RX pins of your Mega, as shown in the schematic below. Make sure that your Mega is connected to your computer, via USB, to enable serial communication. image developed using Fritzing. For more circuit examples, see the Fritzing project page Schematic Code /* Mega multple serial test Receives from the main serial port, sends to the others.
- 102. Receives from serial port 1, sends to the main serial (Serial 0). This example works only on the Arduino Mega The circuit: * Any serial device attached to Serial port 1 * Serial monitor open on Serial port 0: created 30 Dec. 2008 modified 20 May 2012 by Tom Igoe & Jed Roach This example code is in the public domain. */ void setup() { // initialize both serial ports: Serial.begin(9600); Serial1.begin(9600); } void loop() { // read from port 1, send to port 0: if (Serial1.available()) { int inByte = Serial1.read(); Serial.write(inByte); } // read from port 0, send to port 1: if (Serial.available()) { int inByte = Serial.read(); Serial1.write(inByte); } } 5.Control Structures If Statement (Conditional Statement) If Statement (Conditional Statement) The if() statement is the most basic of all programming control structures. It allows you to make something happen or not depending on whether a given condition is true or not. It looks like this: if (someCondition) { // do stuff if the condition is true } [Get Code] There is a common variation called if-else that looks like this:
- 103. if (someCondition) { // do stuff if the condition is true } else { // do stuff if the condition is false } [Get Code] There's also the else-if, where you can check a second condition if the first is false: if (someCondition) { // do stuff if the condition is true } else if (anotherCondition) { // do stuff only if the first condition is false // and the second condition is true } [Get Code] You'll use if statements all the time. The example below turns on an LED on pin 13 (the built-in LED on many Arduino boards) if the value read on an analog input goes above a certain threshold. Hardware Required Arduino Board (1) Potentiometer or variable resistor (1) 220 ohm resistor (1) LED hook-up wire Circuit click the image to enlarge image developed using Fritzing. For more circuit examples, see the Fritzing project page Schematic: click the image to enlarge
- 104. Code In the code below, a variable called analogValue is used to store the data collected from a potentiometer connected to the Arduino on analogPin 0. This data is then compared to a threshold value. If the analog value is found to be above the set threshold the LED connected to digital pin 13 is turned on. If analogValue is found to be < threshold, the LED remains off. /* Conditionals - If statement This example demonstrates the use of if() statements. It reads the state of a potentiometer (an analog input) and turns on an LED only if the LED goes above a certain threshold level. It prints the analog value regardless of the level. The circuit: * potentiometer connected to analog pin 0. Center pin of the potentiometer goes to the analog pin. side pins of the potentiometer go to +5V and ground * LED connected from digital pin 13 to ground * Note: On most Arduino boards, there is already an LED on the board connected to pin 13, so you don't need any extra components for this example. created 17 Jan 2009 modified 9 Apr 2012 by Tom Igoe This example code is in the public domain. http://arduino.cc/en/Tutorial/IfStatement */ // These constants won't change: const int analogPin = A0; // pin that the sensor is attached to const int ledPin = 13; // pin that the LED is attached to const int threshold = 400; // an arbitrary threshold level that's in the range of the analog input void setup() { // initialize the LED pin as an output: pinMode(ledPin, OUTPUT);
- 105. // initialize serial communications: Serial.begin(9600); } void loop() { // read the value of the potentiometer: int analogValue = analogRead(analogPin); // if the analog value is high enough, turn on the LED: if (analogValue > threshold) { digitalWrite(ledPin, HIGH); } else { digitalWrite(ledPin,LOW); } // print the analog value: Serial.println(analogValue); delay(1); // delay in between reads for stability } Arrays Array s This variation on the For Loop example shows how to use an array. An array is a variable with multiple parts. If you think of a variable as a cup that holds values, you might think of an array as an ice cube tray. It's like a series of linked cups, all of which can hold the same maximum value. The For Loop example shows you how to light up a series of LEDs attached to pins 2 through 7 of the Arduino, with certain limitations (the pins have to be numbered contiguously, and the LEDs have to be turned on in sequence). This example shows you how you can turn on a sequence of pins whose numbers are neither contiguous nor necessarily sequential. To do this is, you can put the pin numbers in an array and then use for loops to iterate over the array. This example makes use of 6 LEDs connected to the pins 2 - 7 on the board using 220 Ohm resistors, just like in the For Loop. However, here the order of the LEDs is determined by their order in the array, not by their physical order. This technique of putting the pins in an array is very handy. You don't have to have the pins sequential to one another, or even in the same order. You can rearrange them however you want. Hardware Required Arduino Board (6) 220 ohm resistors (6) LEDs hook-up wire
- 106. breadboard Circuit Connect six LEDS, with 220 ohm resistors in series, to digital pins 2-7 on your Arduino. click the image to enlarge image developed using Fritzing. For more circuit examples, see the Fritzing project page Schematic: click the image to enlarge Code /* Arrays
- 107. Demonstrates the use of an array to hold pin numbers in order to iterate over the pins in a sequence. Lights multiple LEDs in sequence, then in reverse. Unlike the For Loop tutorial, where the pins have to be contiguous, here the pins can be in any random order. The circuit: * LEDs from pins 2 through 7 to ground created 2006 by David A. Mellis modified 30 Aug 2011 by Tom Igoe This example code is in the public domain. http://www.arduino.cc/en/Tutorial/Array */ int timer = 100; int ledPins[] = { 2, 7, 4, 6, 5, 3 }; int pinCount = 6; // The higher the number, the slower the timing. // an array of pin numbers to which LEDs are attached // the number of pins (i.e. the length of the array) void setup() { int thisPin; // the array elements are numbered from 0 to (pinCount - 1). // use a for loop to initialize each pin as an output: for (int thisPin = 0; thisPin < pinCount; thisPin++) { pinMode(ledPins[thisPin], OUTPUT); } } void loop() { // loop from the lowest pin to the highest: for (int thisPin = 0; thisPin < pinCount; thisPin++) { // turn the pin on: digitalWrite(ledPins[thisPin], HIGH); delay(timer); // turn the pin off: digitalWrite(ledPins[thisPin], LOW); } // loop from the highest pin to the lowest: for (int thisPin = pinCount - 1; thisPin >= 0; thisPin--) { // turn the pin on: digitalWrite(ledPins[thisPin], HIGH); delay(timer); // turn the pin off: digitalWrite(ledPins[thisPin], LOW); } } While Loop While Loop
- 108. Sometimes you want everything in the program to stop while a given condition is true. You can do this using a while loop. This example shows how to use a while loop to calibrate the value of an analog sensor. In the main loop, the sketch below reads the value of a photoresistor on analog pin 0 and uses it to fade an LED on pin 9. But while a button attached to digital pin 2 is pressed, the program runs a method called calibrate() that looks for the highest and lowest values of the analog sensor. When you release the button, the sketch continues with the main loop. This technique lets you update the maximum and minimum values for the photoresistor when the lighting conditions change. Hardware Required Arduino Board (1) digital pushbutton or switch (1) photocell, or analog sensor (2) 10k ohm resistors breadboard Circuit Connect your analog sensor (e.g. potentiometer, light sensor) on analog input 2 with a 10K ohm resistor to ground. Connect your button to digital pin, again with a 10K ohm resistor to ground. Connect your LED to digital pin 9, with a 220 ohm resistor in series. click the image to enlarge image developed using Fritzing. For more circuit examples, see the Fritzing project page Schematic: click the image to enlarge
- 109. Code /* Conditionals - while statement This example demonstrates the use of while() statements. While the pushbutton is pressed, the sketch runs the calibration routine. The sensor readings during the while loop define the minimum and maximum of expected values from the photo resistor. This is a variation on the calibrate example. The circuit: * photo resistor connected from +5V to analog in pin 0 * 10K resistor connected from ground to analog in pin 0 * LED connected from digital pin 9 to ground through 220 ohm resistor * pushbutton attached from pin 2 to +5V * 10K resistor attached from pin 2 to ground created 17 Jan 2009 modified 30 Aug 2011 by Tom Igoe This example code is in the public domain. http://arduino.cc/en/Tutorial/WhileLoop */ // These constants won't change: const int sensorPin = A2; // const int ledPin = 9; // const int indicatorLedPin = 13; // const int buttonPin = 2; // pin pin pin pin that that that that the the the the // These variables will change: int sensorMin = 1023; // minimum sensor value int sensorMax = 0; // maximum sensor value int sensorValue = 0; // the sensor value sensor is attached to LED is attached to built-in LED is attached to button is attached to void setup() {
- 110. // set the LED pins as outputs and the switch pin as input: pinMode(indicatorLedPin, OUTPUT); pinMode (ledPin, OUTPUT); pinMode (buttonPin, INPUT); } void loop() { // while the button is pressed, take calibration readings: while (digitalRead(buttonPin) == HIGH) { calibrate(); } // signal the end of the calibration period digitalWrite(indicatorLedPin, LOW); // read the sensor: sensorValue = analogRead(sensorPin); // apply the calibration to the sensor reading sensorValue = map(sensorValue, sensorMin, sensorMax, 0, 255); // in case the sensor value is outside the range seen during calibration sensorValue = constrain(sensorValue, 0, 255); // fade the LED using the calibrated value: analogWrite(ledPin, sensorValue); } void calibrate() { // turn on the indicator LED to indicate that calibration is happening: digitalWrite(indicatorLedPin, HIGH); // read the sensor: sensorValue = analogRead(sensorPin); // record the maximum sensor value if (sensorValue > sensorMax) { sensorMax = sensorValue; } // record the minimum sensor value if (sensorValue < sensorMin) { sensorMin = sensorValue; } } Switch (case) Statement, used with sensor input Switch (case ) Statement, used with sensor input An if statement allows you to choose between two discrete options, TRUE or FALSE. When there are more than two options, you can use multiple if statements, or you can use the switch statement. Switch allows you to choose between several discrete options. This tutorial shows you how to use it to switch between four desired states of a photo resistor: really dark, dim, medium, and bright. This program first reads the photoresistor. Then it uses the map() function to map its output to one of four values: 0, 1, 2, or 3. Finally, it uses the switch() statement to print one of four messages back to the computer depending on which of the four values is returned.
- 111. Hardware Required Arduino Board (1) photocell, or analog sensor (1) 10k ohm resistors breadboard hook-up wire Circuit The photoresistor is connected to analog in pin 0 using a voltage divider circuit. A 10Kilohm resistor makes up the other side of the voltage divider, running from analog in 0 to ground. The analogRead() function returns a range of about 0 to 600 from this circuit in a reasonably lit indoor space. click the image to enlarge image developed using Fritzing. For more circuit examples, see the Fritzing project page Schematic: click the image to enlarge
- 112. Code /* Switch statement Demonstrates the use of a switch statement. The switch statement allows you to choose from among a set of discrete values of a variable. It's like a series of if statements. To see this sketch in action, but the board and sensor in a well-lit room, open the serial monitor, and and move your hand gradually down over the sensor. The circuit: * photoresistor from analog in 0 to +5V * 10K resistor from analog in 0 to ground created 1 Jul 2009 modified 9 Apr 2012 by Tom Igoe This example code is in the public domain. http://www.arduino.cc/en/Tutorial/SwitchCase */ // these constants won't change. They are the // lowest and highest readings you get from your sensor: const int sensorMin = 0; // sensor minimum, discovered through experiment const int sensorMax = 600; // sensor maximum, discovered through experiment void setup() { // initialize serial communication: Serial.begin(9600); } void loop() { // read the sensor: int sensorReading = analogRead(A0); // map the sensor range to a range of four options: int range = map(sensorReading, sensorMin, sensorMax, 0, 3); // do something different depending on the // range value:
- 113. switch (range) { case 0: // your hand is on the sensor Serial.println("dark"); break; case 1: // your hand is close to the sensor Serial.println("dim"); break; case 2: // your hand is a few inches from the sensor Serial.println("medium"); break; case 3: // your hand is nowhere near the sensor Serial.println("bright"); break; } delay(1); // delay in between reads for stability } Switch (case) Statement, used with serial input Switch (case ) Statement, used with serial input An if statement allows you to choose between two discrete options, TRUE or FALSE. When there are more than two options, you can use multiple if statements, or you can use the switch statement. Switch allows you to choose between several discrete options. This tutorial shows you how to use switch to turn on one of several different LEDs based on a byte of data received serially. The sketch listens for serial input, and turns on a different LED for the characters a, b, c, d, or e. Hardware Required Arduino Board (5) LEDs (5) 220 ohm resistors breadboard hook-up wire Circuit Five LEDs are attached to digital pins 2, 3, 4, 5, and 6 in series through 220 ohm resistors. To make this sketch work, your Arduino must be connected to your computer. Open the Serial Monitor, and send the characters a, b, c, d, or e, or anything else. click the image to enlarge
- 114. image developed using Fritzing. For more circuit examples, see the Fritzing project page Schematic: click the image to enlarge Code /* Switch statement with serial input Demonstrates the use of a switch statement. The switch statement allows you to choose from among a set of discrete values of a variable. It's like a series of if statements.
- 115. To see this sketch in action, open the Serial monitor and send any character. The characters a, b, c, d, and e, will turn on LEDs. Any other character will turn the LEDs off. The circuit: * 5 LEDs attached to digital pins 2 through 6 through 220-ohm resistors created 1 Jul 2009 by Tom Igoe This example code is in the public domain. http://www.arduino.cc/en/Tutorial/SwitchCase2 */ void setup() { // initialize serial communication: Serial.begin(9600); // initialize the LED pins: for (int thisPin = 2; thisPin < 7; thisPin++) { pinMode(thisPin, OUTPUT); } } void loop() { // read the sensor: if (Serial.available() > 0) { int inByte = Serial.read(); // do something different depending on the character received. // The switch statement expects single number values for each case; // in this exmaple, though, you're using single quotes to tell // the controller to get the ASCII value for the character. For // example 'a' = 97, 'b' = 98, and so forth: switch (inByte) { case 'a': digitalWrite(2, HIGH); break; case 'b': digitalWrite(3, HIGH); break; case 'c': digitalWrite(4, HIGH); break; case 'd': digitalWrite(5, HIGH); break; case 'e': digitalWrite(6, HIGH); break; default: // turn all the LEDs off: for (int thisPin = 2; thisPin < 7; thisPin++) { digitalWrite(thisPin, LOW); } } } }
- 116. For Loop (aka The Knight Rider) For Loop (aka The Knight Rider) Often you want to iterate over a series of pins and do something to each one. For instance, this example blinks 6 LEDsattached the Arduino by using a for() loop to cycle back and forth through digital pins 2-7. The LEDS are turned on and off, in sequence, by using both the digitalWrite() and delay() functions . We also call this example "Knight Rider" in memory of a TV-series from the 80's where David Hasselhoff had an AI machine named KITT driving his Pontiac. The car had been augmented with plenty of LEDs in all possible sizes performing flashy effects. In particular, it had a display that scanned back and forth across a line, as shown in this excitingfight between KITT and KARR. This example duplicates the KITT display. Hardware Required Arduino Board (6) 220 ohm resistors (6) LEDs hook-up wire breadboard Circuit Connect six LEDS, with 220 ohm resistors in series, to digital pins 2-7 on your Arduino. click the image to enlarge image developed using Fritzing. For more circuit examples, see the Fritzing project page Schematic: click the image to enlarge
- 117. Code The code below begins by utilizing a for() loop to assign digital pins 2-7 as outputs for the 6 LEDs used. In the main loop of the code, two for() loops are used to loop incrementally, stepping through the LEDs, one by one, from pin 2 to pin seven. Once pin 7 is lit, the process reverses, stepping back down through each LED. /* For Loop Iteration Demonstrates the use of a for() loop. Lights multiple LEDs in sequence, then in reverse. The circuit: * LEDs from pins 2 through 7 to ground created 2006 by David A. Mellis modified 30 Aug 2011 by Tom Igoe This example code is in the public domain. http://www.arduino.cc/en/Tutorial/ForLoop */ int timer = 100; // The higher the number, the slower the timing. void setup() { // use a for loop to initialize each pin as an output: for (int thisPin = 2; thisPin < 8; thisPin++) { pinMode(thisPin, OUTPUT); } } void loop() { // loop from the lowest pin to the highest: for (int thisPin = 2; thisPin < 8; thisPin++) { // turn the pin on: digitalWrite(thisPin, HIGH); delay(timer); // turn the pin off: digitalWrite(thisPin, LOW); }
- 118. // loop from the highest pin to the lowest: for (int thisPin = 7; thisPin >= 2; thisPin--) { // turn the pin on: digitalWrite(thisPin, HIGH); delay(timer); // turn the pin off: digitalWrite(thisPin, LOW); } } 6.Sensors ADXL3xx Accelerometer ADXL3xx Accelerometer This tutorial shows you how to read an Analog Devices ADXL3xx series (e.g. ADXL320, ADXL321, ADXL322, ADXL330)accelerometer and communicate the acceleration to the a personal computer. This tutorial was built using the breakout boards from Sparkfun. The adafruit accelerometer breakout board also works, though it must be wired differently. The ADXL3xx outputs the acceleration on each axis as an analog voltage between 0 and 5 volts. To read this, all you need is the analogRead() function. Hardware Required Arduino Board ADXL3xx Accelerometer Circuit The accelerometer uses very little amperage, so it can be plugged into your Arduino and run directly off of the output from the Arduino's digital output pins. To do this, you'll use three of the analog input pins
- 119. as digital I/O pins, for power and ground to the accelerometer, and for the self-test pin. You'll use the other three analog inputs to read the acclerometer's analog outputs. image developed using Fritzing. For more circuit examples, see the Fritzing project page Schematic: click the image to enlarge Here are the pin connections for the configuration shown above: Breakout Board Pin Self-Test Z-Axis Y-Axis X-Axis Ground VDD Arduino Analog Input Pin 0 1 2 3 4 5 Or, if you're using just the accelerometer: ADXL3xx Pin Self-Test Arduino Pin ZOut YOut XOut Ground VDD None (unconnected) Analog Input 1 Analog Input 2 Analog Input 3 GND Code /* ADXL3xx Reads an Analog Devices ADXL3xx accelerometer and communicates the acceleration to the computer. The pins used are designed to be easily compatible with the breakout boards from Sparkfun, available from: http://www.sparkfun.com/commerce/categories.php?c=80 http://www.arduino.cc/en/Tutorial/ADXL3xx The circuit: analog 0: accelerometer self test analog 1: z-axis 5V
- 120. analog analog analog analog 2: 3: 4: 5: y-axis x-axis ground vcc created 2 Jul 2008 by David A. Mellis modified 30 Aug 2011 by Tom Igoe This example code is in the public domain. */ // these constants describe the pins. They won't change: const int groundpin = 18; // analog input pin 4 -- ground const int powerpin = 19; // analog input pin 5 -- voltage const int xpin = A3; // x-axis of the accelerometer const int ypin = A2; // y-axis const int zpin = A1; // z-axis (only on 3-axis models) void setup() { // initialize the serial communications: Serial.begin(9600); // Provide ground and power by using the analog inputs as normal // digital pins. This makes it possible to directly connect the // breakout board to the Arduino. If you use the normal 5V and // GND pins on the Arduino, you can remove these lines. pinMode(groundpin, OUTPUT); pinMode(powerpin, OUTPUT); digitalWrite(groundpin, LOW); digitalWrite(powerpin, HIGH); } void loop() { // print the sensor values: Serial.print(analogRead(xpin)); // print a tab between values: Serial.print("t"); Serial.print(analogRead(ypin)); // print a tab between values: Serial.print("t"); Serial.print(analogRead(zpin)); Serial.println(); // delay before next reading: delay(100); } [Get Code] Data Here are some accelerometer readings collected by the positioning the y-axis of an ADXL322 2g accelerometer at various angles from ground. Values should be the same for the other axes, but will vary based on the sensitivity of the device. With the axis horizontal (i.e. parallel to ground or 0°), the accelerometer reading should be around 512, but values at other angles will be different for a different accelerometer (e.g. the ADXL302 5g one). Angle -90 -80 -70 -60 -50 40 -30 -20 -10 0 10 20 30 40 50 60 70 80 90 Acceleratio 66 66 65 64 62 61 58 56 53 51 48 45 43 40 39 37 36 35 35 n 0 4 2 8 0 9 3 5 0 4 3 2 7 0 5 3 8 7 5
- 121. Knock Knock This tutorial shows you how to use a Piezo element to detect vibration, in this case, a knock on a door, table, or other solid surface. A piezo is an electronic device that generates a voltage when it's physically deformed by a vibration, sound wave, or mechanical strain. Similarly, when you put a voltage across a piezo, it vibrates and creates a tone. Piezos can be used both to play tones and to detect tones. The sketch reads the piezos output using the analogRead() command, encoding the voltage range from 0 to 5 volts to a numerical range from 0 to 1023 in a process referred to as analog-to-digital conversion, or ADC. If the sensors output is stronger than a certain threshold, your Arduino will send the string "Knock!" to the computer over the serial port. Open the serial monitor to see this text. Hardware Required Arduino Board (1) Piezo electric disc (1) Megohm resistor solid surface Circuit Piezos are polarized, meaning that voltage passes through them (or out of them) in a specific direction. Connect the black wire (the lower voltage) to ground and the red wire (the higher voltage) to analog pin 0. Additionally, connect a 1-megohm resistor in parallel to the Piezo element to limit the voltage and current produced by the piezo and to protect the analog input. It is possible to acquire piezo elements without a plastic housing. These will look like a metallic disc, and are easier to use as input sensors. PIezo sensors work best when firmly pressed against, taped, or glued their sensing surface. click the image to enlarge
- 122. image developed using Fritzing. For more circuit examples, see the Fritzing project page Schematic: click the image to enlarge
- 123. A Piezo to attached to analog pin 0 with a 1-Megohm resistor Code In the code below, the incoming piezo data is compared to a threshold value set by the user. Try raising or lowering this value to increase your sensor's overall sensitivity. /* Knock Sensor This sketch reads a piezo element to detect a knocking sound. It reads an analog pin and compares the result to a set threshold. If the result is greater than the threshold, it writes "knock" to the serial port, and toggles the LED on pin 13.
- 124. The circuit: * + connection of the piezo attached to analog in 0 * - connection of the piezo attached to ground * 1-megohm resistor attached from analog in 0 to ground http://www.arduino.cc/en/Tutorial/Knock created 25 Mar 2007 by David Cuartielles <http://www.0j0.org> modified 30 Aug 2011 by Tom Igoe This example code is in the public domain. */ // these constants won't change: const int ledPin = 13; // led connected to digital pin 13 const int knockSensor = A0; // the piezo is connected to analog pin 0 const int threshold = 100; // threshold value to decide when the detected sound is a knock or not // these variables will change: int sensorReading = 0; // variable to store the value read from the sensor pin int ledState = LOW; // variable used to store the last LED status, to toggle the light void setup() { pinMode(ledPin, OUTPUT); // declare the ledPin as as OUTPUT Serial.begin(9600); // use the serial port } void loop() { // read the sensor and store it in the variable sensorReading: sensorReading = analogRead(knockSensor); // if the sensor reading is greater than the threshold: if (sensorReading >= threshold) { // toggle the status of the ledPin: ledState = !ledState; // update the LED pin itself: digitalWrite(ledPin, ledState); // send the string "Knock!" back to the computer, followed by newline Serial.println("Knock!"); } delay(100); // delay to avoid overloading the serial port buffer } Memsic 2125 Accelerometer Memsic 2125 Accelerometer The Memsic 2125 (datasheet) is a two-axis accelerometer capable of measuring acceleration up to plus or minus 2g. It has a simple digital interface: two pins (one for each axis) emit pulses whose duration corresponds to the acceleration of that axis. By measuring the length of that pulse, in microseconds, using the Arduino's pulseIn() function, it is possible to determine the rate of acceleration and to use that data for your purposes.
- 125. Hardware Required Arduino Board (1) Memsic 2125 Accelerometer bread board hook-up wire Circ uit Use the small triangle on the Memsic to properly orient the sensor on your breadboard. Connect the 5V and GND pins of the Memsic 2125 to the power and ground ports on the Arduino. Connect digital pin 2 of the Arduino to the X out pin of the accelerometer, and digital pin 3 to the Y out pin. Your Arduino must be connected to your computer in order for it to transmit serial data. click the image to enlarge
- 126. image developed using Fritzing. For more circuit examples, see the Fritzing project page Schematic: click the image to enlarge
- 127. Code /* Memsic2125 Read the Memsic 2125 two-axis accelerometer. Converts the pulses output by the 2125 into milli-g's (1/1000 of earth's gravity) and prints them over the serial connection to the computer. The circuit: * X output of accelerometer to digital pin 2 * Y output of accelerometer to digital pin 3 * +V of accelerometer to +5V * GND of accelerometer to ground
- 128. http://www.arduino.cc/en/Tutorial/Memsic2125 created 6 Nov 2008 by David A. Mellis modified 30 Aug 2011 by Tom Igoe This example code is in the public domain. */ // these constants won't change: const int xPin = 2; // X output of the accelerometer const int yPin = 3; // Y output of the accelerometer void setup() { // initialize serial communications: Serial.begin(9600); // initialize the pins connected to the accelerometer // as inputs: pinMode(xPin, INPUT); pinMode(yPin, INPUT); } void loop() { // variables to read the pulse widths: int pulseX, pulseY; // variables to contain the resulting accelerations int accelerationX, accelerationY; // read pulse from x- and y-axes: pulseX = pulseIn(xPin,HIGH); pulseY = pulseIn(yPin,HIGH); // convert the pulse width into acceleration // accelerationX and accelerationY are in milli-g's: // earth's gravity is 1000 milli-g's, or 1g. accelerationX = ((pulseX / 10) - 500) * 8; accelerationY = ((pulseY / 10) - 500) * 8; // print the acceleration Serial.print(accelerationX); // print a tab character: Serial.print("t"); Serial.print(accelerationY); Serial.println(); delay(100); } Ping Ultrasonic Range Finder Ping U ltrasonic Range Finder The Ping))) is an ultrasonic range finder from Parallax. It detects the distance of the closest object in front of the sensor (from 2 cm up to 3m). It works by sending out a burst of ultrasound and listening for the echo when it bounces off of an object. The Arduino board sends a short pulse to trigger the detection, then listens for a pulse on the same pin using thepulseIn() function. The duration of this second pulse
- 129. is equal to the time taken by the ultrasound to travel to the object and back to the sensor. Using the speed of sound, this time can be converted to distance. Hardware Required Arduino Board (1) Ping Ultrasonic Range Finder hook-up wire Circ uit The 5V pin of the PING))) is connected to the 5V pin on the Arduino, the GND pin is connected to the GND pin, and the SIG (signal) pin is connected to digital pin 7 on the Arduino. click the image to enlarge image developed using Fritzing. For more circuit examples, see the Fritzing project page Schematic: click the image to enlarge
- 130. Code /* Ping))) Sensor This sketch reads a PING))) ultrasonic rangefinder and returns the distance to the closest object in range. To do this, it sends a pulse to the sensor to initiate a reading, then listens for a pulse to return. The length of the returning pulse is proportional to the distance of the object from the sensor. The circuit: * +V connection of the PING))) attached to +5V * GND connection of the PING))) attached to ground * SIG connection of the PING))) attached to digital pin 7 http://www.arduino.cc/en/Tutorial/Ping created 3 Nov 2008 by David A. Mellis modified 30 Aug 2011 by Tom Igoe This example code is in the public domain. */ // this constant won't change. // of the sensor's output: const int pingPin = 7; It's the pin number void setup() { // initialize serial communication: Serial.begin(9600); } void loop() { // establish variables for duration of the ping, // and the distance result in inches and centimeters: long duration, inches, cm; // The PING))) is triggered by a HIGH pulse of 2 or more microseconds. // Give a short LOW pulse beforehand to ensure a clean HIGH pulse: pinMode(pingPin, OUTPUT); digitalWrite(pingPin, LOW); delayMicroseconds(2); digitalWrite(pingPin, HIGH); delayMicroseconds(5); digitalWrite(pingPin, LOW); // The same pin is used to read the signal from the PING))): a HIGH // pulse whose duration is the time (in microseconds) from the sending // of the ping to the reception of its echo off of an object. pinMode(pingPin, INPUT); duration = pulseIn(pingPin, HIGH); // convert the time into a distance inches = microsecondsToInches(duration); cm = microsecondsToCentimeters(duration); Serial.print(inches); Serial.print("in, "); Serial.print(cm); Serial.print("cm"); Serial.println(); delay(100); } long microsecondsToInches(long microseconds) { // According to Parallax's datasheet for the PING))), there are // 73.746 microseconds per inch (i.e. sound travels at 1130 feet per
- 131. // second). This gives the distance travelled by the ping, outbound // and return, so we divide by 2 to get the distance of the obstacle. // See: http://www.parallax.com/dl/docs/prod/acc/28015-PING-v1.3.pdf return microseconds / 74 / 2; } long microsecondsToCentimeters(long microseconds) { // The speed of sound is 340 m/s or 29 microseconds per centimeter. // The ping travels out and back, so to find the distance of the // object we take half of the distance travelled. return microseconds / 29 / 2; }
- 132. 7.Display LED Bar Graph LED Bar Graph The bar graph - a series of LEDs in a line, such as you see on an audio display - is a common hardware display for analog sensors. It's made up of a series of LEDs in a row, an analog input like a potentiometer, and a little code in between. You can buy multi-LED bar graph displays fairly cheaply, like this one. This tutorial demonstrates how to control a series ofLEDs in a row, but can be applied to any series of digital outputs. This tutorial borrows from the For Loop and Arrays tutorial as well as the Analog Input tutorial. The sketch works like this: first you read the input. You map the input value to the output range, in this case ten LEDs. Then you set up a for loop to iterate over the outputs. If the output's number in the series is lower than the mapped input range, you turn it on. If not, you turn it off. Hardware Required
- 133. Arduino Board (1) LED bar graph display or 10 LEDs (10) 220 ohm resistors hook-up wire breadboard Circuit click the image to enlarge image developed using Fritzing. For more circuit examples, see the Fritzing project page Schematic: click the image to enlarge
- 134. Code /* LED bar graph Turns on a series of LEDs based on the value of an analog sensor. This is a simple way to make a bar graph display. Though this graph uses 10 LEDs, you can use any number by changing the LED count and the pins in the array. This method can be used to control any series of digital outputs that depends on an analog input. The circuit: * LEDs from pins 2 through 11 to ground created 4 Sep 2010 by Tom Igoe This example code is in the public domain. http://www.arduino.cc/en/Tutorial/BarGraph */ // these constants won't change: const int analogPin = A0; // the pin that the potentiometer is attached to const int ledCount = 10; // the number of LEDs in the bar graph int ledPins[] = { 2, 3, 4, 5, 6, 7,8,9,10,11 }; // an array of pin numbers to which LEDs are attached void setup() { // loop over the pin array and set them all to output: for (int thisLed = 0; thisLed < ledCount; thisLed++) { pinMode(ledPins[thisLed], OUTPUT); } } void loop() { // read the potentiometer:
- 135. int sensorReading = analogRead(analogPin); // map the result to a range from 0 to the number of LEDs: int ledLevel = map(sensorReading, 0, 1023, 0, ledCount); // loop over the LED array: for (int thisLed = 0; thisLed < ledCount; thisLed++) { // if the array element's index is less than ledLevel, // turn the pin for this element on: if (thisLed < ledLevel) { digitalWrite(ledPins[thisLed], HIGH); } // turn off all pins higher than the ledLevel: else { digitalWrite(ledPins[thisLed], LOW); } } } Row-columm Scanning to control an 8x8 LED Matrix Row-columm Scanning to control an 8x8 LED Matrix LED displays are often packaged as matrixes of LEDs arranged in rows of common anodes and columns of common cathodes, or the reverse. Here's a typical example, and its schematic:
- 136. These can be very useful displays. To control a matrix, you connect both its rows and columns to your microcontroller. The columns are connected to the LEDs anodes (see Figure 1), so a column needs to be high for any of the LEDs in that column to turn on. The rows are connected to the LEDs cathodes, so the row needs to be low for an individual LED to turn on. If the row and the column are both high or both low, no voltage flows through the LED and it doesn’t turn on. To control an individual LED, you set its column high and its row low. To control multiple LEDs in a row, you set the rows high, then take the column high, then set the lows row or high as appropriate; a low row will turn the corresponding LED on, and a high row will turn it off. Although there are pre-made LED matrices, you can also make your own matrix from 64 LEDs, using the schematic as shown above. It doesn’t matter which pins of the microcontroller you connect the rows and columns to, because you can assign things in software. Connected the pins in a way that makes wiring easiest. A typical layout is shown below. Here's a matrix of the pin connections, based on the diagram above: Matrix pin no. Row Column Arduino pin number 1 5 - 13 2 7 - 12 3 - 2 11 4 - 3 10 5 8 - 16 (analog pin 2) 6 - 5 17 (analog pin 3) 7 6 - 18 (analog pin 4) 8 3 - 19 (analog pin 5) 9 1 - 2 10 - 4 3 11 - 6 4 12 4 - 5 13 - 1 6
- 137. 14 2 - 7 15 - 7 8 16 - 8 9 Hardware Required Arduino Board (1) 8 x 8 LED Matrix (2) potentiometers hook-up wire breadboard Circuit The 16 pins of the matrix are hooked up to 16 pins of the Arduino. Four of the analog pins are used as digital inputs 16 through 19. The order of the pins is assigned in two arrays in the code. Two potentiometers, connected to analog pins 0 and 1, control the movement of a lit LED in the matrix. click the image to enlarge image developed using Fritzing. For more circuit examples, see the Fritzing project page Schematic: click the image to enlarge.
- 138. Code /* Row-Column Scanning an 8x8 LED matrix with X-Y input This example controls an 8x8 LED matrix using two analog inputs created 27 May 2009 modified 30 Aug 2011 by Tom Igoe This example works for the Lumex LDM-24488NI Matrix. See http://sigma.octopart.com/140413/datasheet/Lumex-LDM-24488NI.pdf for the pin connections For other LED cathode column matrixes, you should only need to change the pin numbers in the row[] and column[] arrays rows are the anodes cols are the cathodes --------Pin numbers: Matrix: * Digital pins 2 through 13, * analog pins 2 through 5 used as digital 16 through 19 Potentiometers: * center pins are attached to analog pins 0 and 1, respectively * side pins attached to +5V and ground, respectively. This example code is in the public domain. http://www.arduino.cc/en/Tutorial/RowColumnScanning see also http://www.tigoe.net/pcomp/code/category/arduinowiring/514 for more */
- 139. // 2-dimensional array of row pin numbers: const int row[8] = { 2,7,19,5,13,18,12,16 }; // 2-dimensional array of column pin numbers: const int col[8] = { 6,11,10,3,17,4,8,9 }; // 2-dimensional array of pixels: int pixels[8][8]; // cursor position: int x = 5; int y = 5; void setup() { // initialize the I/O pins as outputs // iterate over the pins: for (int thisPin = 0; thisPin < 8; thisPin++) { // initialize the output pins: pinMode(col[thisPin], OUTPUT); pinMode(row[thisPin], OUTPUT); // take the col pins (i.e. the cathodes) high to ensure that // the LEDS are off: digitalWrite(col[thisPin], HIGH); } // initialize the pixel matrix: for (int x = 0; x < 8; x++) { for (int y = 0; y < 8; y++) { pixels[x][y] = HIGH; } } } void loop() { // read input: readSensors(); // draw the screen: refreshScreen(); } void readSensors() { // turn off the last position: pixels[x][y] = HIGH; // read the sensors for X and Y values: x = 7 - map(analogRead(A0), 0, 1023, 0, 7); y = map(analogRead(A1), 0, 1023, 0, 7); // set the new pixel position low so that the LED will turn on // in the next screen refresh: pixels[x][y] = LOW; } void refreshScreen() { // iterate over the rows (anodes): for (int thisRow = 0; thisRow < 8; thisRow++) { // take the row pin (anode) high: digitalWrite(row[thisRow], HIGH); // iterate over the cols (cathodes): for (int thisCol = 0; thisCol < 8; thisCol++) { // get the state of the current pixel; int thisPixel = pixels[thisRow][thisCol]; // when the row is HIGH and the col is LOW, // the LED where they meet turns on: digitalWrite(col[thisCol], thisPixel); // turn the pixel off: if (thisPixel == LOW) { digitalWrite(col[thisCol], HIGH); } } // take the row pin low to turn off the whole row: digitalWrite(row[thisRow], LOW); } }
- 140. 8.Strings String Addition Operator String Addition Operator You can add Strings together in a variety of ways. This is called concatenation and it results in the original String being longer by the length of the String or character array with which you concatenate it. The + operator allows you to combine a String with another String, with a constant character array, an ASCII representation of a constant or variable number, or a constant character. // adding a constant integer to a string: stringThree = stringOne + 123; // adding a constant long interger to a string: stringThree = stringOne + 123456789; // adding a constant character to a string: stringThree = stringOne + 'A'; // adding a constant string to a string: stringThree = stringOne + "abc"; // adding two Strings together: stringThree = stringOne + stringTwo; [Get Code] You can also use the + operator to add the results of a function to a String, if the function returns one of the allowed data types mentioned above. For example, stringThree = stringOne + millis(); [Get Code] This is allowable since the millis() function returns a long integer, which can be added to a String. You could also do this: stringThree = stringOne + analogRead(A0); [Get Code] because analogRead() returns an integer. String concatenation can be very useful when you need to display a combination of values and the descriptions of those values into one String to display via serial communication, on an LCD display, over an Ethernet connection, or anywhere that Strings are useful. Caution: You should be careful about concatenating multiple variable types on the same line, as you may get unexpected results. For example: int sensorValue = analogRead(A0); String stringOne = "Sensor value: "; String stringThree = stringOne + sensorValue; Serial.println(stringThree); [Get Code] results in "Sensor Value: 402" or whatever the analogRead() result is, but int sensorValue = analogRead(A0); String stringThree = "Sensor value: " + sensorValue; Serial.println(stringThree); [Get Code] gives unpredictable results because stringThree never got an initial value before you started concatenating different data types. Here's another example where improper initialization will cause errors: Serial.println("I want " + analogRead(A0) + " donuts"); [Get Code]
- 141. This won't compile because the compiler doesn't handle the operator precedence correctly. On the other hand, the following will compile, but it won't run as expected: int sensorValue = analogRead(A0); String stringThree = "I want " + sensorValue; Serial.println(stringThree + " donuts"); [Get Code] It doesn't run correctly for the same reason as before: stringThree never got an initial value before you started concatenating different data types. For best results, initialize your Strings before you concatenate them. Hardware Required: Arduino Board Circuit There is no circuit for this example, though your Arduino must be connected to your computer via USB. image developed using Fritzing. For more circuit examples, see the Fritzing project page Code Here's a working example of several different concatenation examples : /* Adding Strings together Examples of how to add strings together You can also add several different data types to string, as shown here: created 27 July 2010 modified 2 Apr 2012 by Tom Igoe http://arduino.cc/en/Tutorial/StringAdditionOperator This example code is in the public domain. */ // declare three strings: String stringOne, stringTwo, stringThree; void setup() { // initialize serial and wait for port to open: Serial.begin(9600); while (!Serial) { ; // wait for serial port to connect. Needed for Leonardo only } stringOne = String("stringThree = "); stringTwo = String("this string"); stringThree = String (); // send an intro: Serial.println("nnAdding strings together (concatenation):"); Serial.println(); } void loop() { // adding a constant integer to a string: stringThree = stringOne + 123; Serial.println(stringThree); // prints "stringThree = 123"
- 142. // adding a constant long interger to a string: stringThree = stringOne + 123456789; Serial.println(stringThree); // prints " You added 123456789" // adding a constant character to a string: stringThree = stringOne + 'A'; Serial.println(stringThree); // prints "You added A" // adding a constant string to a string: stringThree = stringOne + "abc"; Serial.println(stringThree); // prints "You added abc" stringThree = stringOne + stringTwo; Serial.println(stringThree); // prints "You added this string" // adding a variable integer to a string: int sensorValue = analogRead(A0); stringOne = "Sensor value: "; stringThree = stringOne + sensorValue; Serial.println(stringThree); // prints "Sensor Value: 401" or whatever value analogRead(A0) has // adding a variable long integer to a string: long currentTime = millis(); stringOne="millis() value: "; stringThree = stringOne + millis(); Serial.println(stringThree); // prints "The millis: 345345" or whatever value currentTime has // do nothing while true: while(true); } String Appending Operators String Appending Operators Just as you can concatenate Strings with other data objects using the StringAdditionOperator, you can also use the +=operator and the cconcat() method to append things to Strings. The += operator and the concat() method work the same way, it's just a matter of which style you prefer. The two examples below illustrate both, and result in the same String: String stringOne = "A long integer: "; // using += to add a long variable to a string: stringOne += 123456789; [Get Code] or String stringOne = "A long integer: "; // using concat() to add a long variable to a string: stringTwo.concat(123456789); [Get Code] In both cases, stringOne equals "A long integer: 123456789". Like the + operator, these operators are handy for assembling longer strings from a combination of data objects. Hardware Required:
- 143. Arduino Board Circuit There is no circuit for this example, though your Arduino must be connected to your computer via USB. image developed using Fritzing. For more circuit examples, see the Fritzing project page Code /* Appending to Strings using the += operator and concat() Examples of how to append different data types to strings created 27 July 2010 modified 2 Apr 2012 by Tom Igoe http://arduino.cc/en/Tutorial/StringAppendOperator This example code is in the public domain. */ String stringOne, stringTwo; void setup() { // Open serial communications and wait for port to open: Serial.begin(9600); while (!Serial) { ; // wait for serial port to connect. Needed for Leonardo only } stringOne = String("Sensor "); stringTwo = String("value"); // send an intro: Serial.println("nnAppending to a string:"); Serial.println(); } void loop() { Serial.println(stringOne); // prints "Sensor " // adding a string to a string: stringOne += stringTwo; Serial.println(stringOne); // prints "Sensor value" // adding a constant string to a string: stringOne += " for input "; Serial.println(stringOne); // prints "Sensor value for input" // adding a constant character to a string: stringOne += 'A'; Serial.println(stringOne); // prints "Sensor value for input A" // adding a constant integer to a string: stringOne += 0; Serial.println(stringOne); // prints "Sensor value for input A0" // adding a constant string to a string: stringOne += ": "; Serial.println(stringOne); // prints "Sensor value for input" // adding a variable integer to a string: stringOne += analogRead(A0);
- 144. Serial.println(stringOne); analogRead(A0) is // prints "Sensor value for input A0: 456" or whatever Serial.println("nnchanging the Strings' values"); stringOne = "A long integer: "; stringTwo = "The millis(): "; // adding a constant long integer to a string: stringOne += 123456789; Serial.println(stringOne); // prints "A long integer: 123456789" // using concat() to add a long variable to a string: stringTwo.concat(millis()); Serial.println(stringTwo); // prints "The millis(): 43534" or whatever the value of the millis() is // do nothing while true: while(true); } String Case Change Functions String Case Change Functions The String case change functions allow you to change the case of a String. They work just as their names imply.toUpperCase() changes the whole string to upper case characters, and toLowerCase() changes the whole String to lower case characters. Only the characters A to Z or a to z are affected. Hardware Required: Arduino Board Circuit There is no circuit for this example, though your Arduino must be connected to your computer via USB. image developed using Fritzing. For more circuit examples, see the Fritzing project page Code /* String Case changes Examples of how to change the case of a string created 27 July 2010 modified 2 Apr 2012 by Tom Igoe
- 145. http://arduino.cc/en/Tutorial/StringCaseChanges This example code is in the public domain. */ void setup() { // Open serial communications and wait for port to open: Serial.begin(9600); while (!Serial) { ; // wait for serial port to connect. Needed for Leonardo only } // send an intro: Serial.println("nnString Serial.println(); case changes:"); } void loop() { // toUpperCase() changes all letters to upper case: String stringOne = "<html><head><body>"; Serial.println(stringOne); stringOne.toUpperCase(); Serial.println(stringOne); // toLowerCase() changes all letters to lower case: String stringTwo = "</BODY></HTML>"; Serial.println(stringTwo); stringTwo.toLowerCase(); Serial.println(stringTwo); // do nothing while true: while(true); } String Character Functions String Character Functions The String functions charAt() and setCharAt() are used to get or set the value of a character at a given position in a String. At their simplest, these functions help you search and replace a given character. For example, the following replaces the colon in a given String with an equals sign: String reportString = "SensorReading: 456"; int colonPosition = reportString.indexOf(':'); reportString.setCharAt(colonPosition, '='); [Get Code] Here's an example that checks to see if the first letter of the second word is 'B': String reportString = "Franklin, Benjamin"; int spacePosition = reportString.indexOf(' '); if (reportString.charAt(spacePosition + 1) == 'B') { Serial.println("You might have found the Benjamins.") } [Get Code]
- 146. Caution: If you try to get the charAt or try to setCharAt() a value that's longer than the String's length, you'll get unexpected results. If you're not sure, check to see that the position you want to set or get is less than the string's length using the length() function. Hardware Required: Arduino Board Circuit There is no circuit for this example, though your Arduino must be connected to your computer via USB. image developed using Fritzing. For more circuit examples, see the Fritzing project page Code /* String charAt() and setCharAt() Examples of how to get and set characters of a String created 27 July 2010 modified 2 Apr 2012 by Tom Igoe http://arduino.cc/en/Tutorial/StringCharacters This example code is in the public domain. */ void setup() { // Open serial communications and wait for port to open: Serial.begin(9600); while (!Serial) { ; // wait for serial port to connect. Needed for Leonardo only } Serial.println("nnString charAt() and setCharAt():"); } void loop() { // make a string to report a sensor reading: String reportString = "SensorReading: 456"; Serial.println(reportString); // the reading's most significant digit is at position 15 in the reportString: char mostSignificantDigit = reportString.charAt(15); Serial.println("Most significant digit of the sensor reading is: " + mostSignificantDigit); // add blank space: Serial.println(); // you can alo set the character of a string. Change the : to a = character reportString.setCharAt(13, '='); Serial.println(reportString); // do nothing while true: while(true); }
- 147. String Comparison Operators String Comparison Operators The String comparison operators, ==, !=,>, < ,>=, <= , and the functionsequals() and equalsIgoreCase() allow you to make alphabetic comparisons between Strings. They're useful for sorting and alphabetizing, among other things. The operator == and the function equals() perform identically. It's just a matter of which you prefer. So if (stringOne.equals(stringTwo)) { [Get Code] is identical to if (stringOne ==stringTwo) { [Get Code] The greater than and less than operators evaluate strings in alphabetical order, on the first character where the two differ. So, for example "a" < "b" and "1" < "2", but "999"> "1000" because 9 comes after 1. Caution: String comparison operators can be confusing when you're comparing numeric strings, because you're used to thinking of them as numbers, not strings. If you have to compare numbers, compare them as ints, floats, or longs, and not as Strings. Hardware Required Arduino Board Circuit There is no circuit for this example, though your Arduino must be connected to your computer via USB. image developed using Fritzing. For more circuit examples, see the Fritzing project page Code /* Comparing Strings Examples of how to compare strings using the comparison operators created 27 July 2010 modified 2 Apr 2012 by Tom Igoe http://arduino.cc/en/Tutorial/StringComparisonOperators This example code is in the public domain. */ String stringOne, stringTwo; void setup() { // Open serial communications and wait for port to open: Serial.begin(9600); while (!Serial) { ; // wait for serial port to connect. Needed for Leonardo only }
- 148. stringOne = String("this"); stringTwo = String("that"); // send an intro: Serial.println("nnComparing Strings:"); Serial.println(); } void loop() { // two strings equal: if (stringOne == "this") { Serial.println("StringOne == "this""); } // two strings not equal: if (stringOne != stringTwo) { Serial.println(stringOne + " =! " + stringTwo); } // two strings not equal (case sensitivity matters): stringOne = "This"; stringTwo = "this"; if (stringOne != stringTwo) { Serial.println(stringOne + " =! " + stringTwo); } // you can also use equals() to see if two strings are the same: if (stringOne.equals(stringTwo)) { Serial.println(stringOne + " equals " + stringTwo); } else { Serial.println(stringOne + " does not equal " + stringTwo); } // or perhaps you want to ignore case: if (stringOne.equalsIgnoreCase(stringTwo)) { Serial.println(stringOne + " equals (ignoring case) " + stringTwo); } else { Serial.println(stringOne + " does not equal (ignoring case) " + stringTwo); } // a numeric string compared to the number it represents: stringOne = "1"; int numberOne = 1; if (stringOne.toInt() == numberOne) { Serial.println(stringOne + " = " + numberOne); } // two numeric strings compared: stringOne = "2"; stringTwo = "1"; if (stringOne >= stringTwo) { Serial.println(stringOne + " >= " + stringTwo); } // comparison operators can be used to compare strings for alphabetic sorting too: stringOne = String("Brown"); if (stringOne < "Charles") { Serial.println(stringOne + " < Charles"); } if (stringOne > "Adams") { Serial.println(stringOne + " > Adams"); } if (stringOne <= "Browne") { Serial.println(stringOne + " <= Browne"); } if (stringOne >= "Brow") { Serial.println(stringOne + " >= Brow"); } // the compareTo() operator also allows you to compare strings // it evaluates on the first character that's different.
- 149. // if the first character of the string you're comparing to // comes first in alphanumeric order, then compareTo() is greater than 0: stringOne = "Cucumber"; stringTwo = "Cucuracha"; if (stringOne.compareTo(stringTwo) < 0 ) { Serial.println(stringOne + " comes before " + stringTwo); } else { Serial.println(stringOne + " comes after " + stringTwo); } delay(10000); // because the next part is a loop: // compareTo() is handy when you've got strings with numbers in them too: while (true) { stringOne = "Sensor: "; stringTwo= "Sensor: "; stringOne += analogRead(A0); stringTwo += analogRead(A5); if (stringOne.compareTo(stringTwo) < 0 ) { Serial.println(stringOne + " comes before " + stringTwo); } else { Serial.println(stringOne + " comes after " + stringTwo); } } } String Object Constructors String Object Constructors The String object allows you to manipulate strings of text in a variety of useful ways. You can append characters to Strings, combine Strings through concatenation, get the length of a String, search and replace substrings, and more. This tutorial shows you how to initialize String objects. String stringOne String stringOne String String stringTwo String object String stringOne String stringOne String stringOne String stringOne (hexadecimal) String stringOne String stringOne = "Hello String"; = String('a'); // using a constant String // converting a constant char into a = String("This is a string"); // converting a constant string into a = = = = String(stringTwo + " with more");// concatenating two strings String(13); // using a constant integer String(analogRead(0), DEC); // using an int and a base String(45, HEX); // using an int and a base = = String(255, BIN); String(millis(), DEC); // using an int and a base (binary) // using a long and a base [Get Code] All of these methods are valid ways to declare a String object. They all result in an object containing a string of characters that can be manipulated using any of the String methods. To see them in action,
- 150. upload the code below onto an Arduino and open the Serial Monitor. You'll see the results of each declaration. Compare what's printed by each println() to the declaration above it. Hardware Required Arduino Board Circuit There is no circuit for this example, though your Arduino must be connected to your computer via USB. image developed using Fritzing. For more circuit examples, see the Fritzing project page Code /* String constructors Examples of how to create strings from other data types created 27 July 2010 modified 30 Aug 2011 by Tom Igoe http://arduino.cc/en/Tutorial/StringConstructors This example code is in the public domain. */ void setup() { // Open serial communications and wait for port to open: Serial.begin(9600); while (!Serial) { ; // wait for serial port to connect. Needed for Leonardo only } // send an intro: Serial.println("nnString Constructors:"); Serial.println(); } void loop() { // using a constant String: String stringOne = "Hello String"; Serial.println(stringOne); // prints "Hello String" // converting a constant char into a String: stringOne = String('a'); Serial.println(stringOne); // prints "a" // converting a constant string into a String object: String stringTwo = String("This is a string"); Serial.println(stringTwo); // prints "This is a string" // concatenating two strings: stringOne = String(stringTwo + " with more"); // prints "This is a string with more": Serial.println(stringOne); // using a constant integer: stringOne = String(13); Serial.println(stringOne); // prints "13"
- 151. // using an int and a base: stringOne = String(analogRead(A0), DEC); // prints "453" or whatever the value of analogRead(A0) is Serial.println(stringOne); // using an int and a base (hexadecimal): stringOne = String(45, HEX); // prints "2d", which is the hexadecimal version of decimal 45: Serial.println(stringOne); // using an int and a base (binary) stringOne = String(255, BIN); // prints "11111111" which is the binary value of 255 Serial.println(stringOne); // using a long and a base: stringOne = String(millis(), DEC); // prints "123456" or whatever the value of millis() is: Serial.println(stringOne); // do nothing while true: while(true); } String indexOf() and lastIndexOf()Method String indexOf() and lastIndexOf()Method The String object indexOf() method gives you the ability to search for the first instance of a particular character value in a String. You can also look for the first instance of the character after a given offset. The lastIndexOf() method lets you do the same things from the end of a String. String stringOne = "<HTML><HEAD><BODY>"; int firstClosingBracket = stringOne.indexOf('>'); [Get Code] In this case, firstClosingBracket equals 5, because the first > character is at position 5 in the String (counting the first character as 0). If you want to get the second closing bracket, you can use the fact that you know the position of the first one, and search from firstClosingBracket + 1 as the offset, like so: stringOne = "<HTML><HEAD><BODY>"; int secondClosingBracket = stringOne.indexOf('>', firstClosingBracket + 1 ); [Get Code] The result would be 11, the position of the closing bracket for the HEAD tag. If you want to search from the end of the String, you can use the lastIndexOf() method instead. This function returns the position of the last occurrence of a given character. stringOne = "<HTML><HEAD><BODY>"; int lastOpeningBracket = stringOne.lastIndexOf('<'); [Get Code] In this case, lastOpeningBracket equals 12, the position of the < for the BODY tag. If you want the opening bracket for the HEAD tag, it would be at stringOne.lastIndexOf('<', Hardware Required Arduino Board lastOpeningBracket -1), or 6.
- 152. Circuit There is no circuit for this example, though your Arduino must be connected to your computer via USB. image developed using Fritzing. For more circuit examples, see the Fritzing project page Code /* String indexOf() and lastIndexOf() functions Examples of how to evaluate, look for, and replace characters in a String created 27 July 2010 modified 2 Apr 2012 by Tom Igoe http://arduino.cc/en/Tutorial/StringIndexOf This example code is in the public domain. */ void setup() { // Open serial communications and wait for port to open: Serial.begin(9600); while (!Serial) { ; // wait for serial port to connect. Needed for Leonardo only } // send an intro: Serial.println("nnString indexOf() and lastIndexOf() Serial.println(); functions:"); } void loop() { // indexOf() returns the position (i.e. index) of a particular character // in a string. For example, if you were parsing HTML tags, you could use it: String stringOne = "<HTML><HEAD><BODY>"; int firstClosingBracket = stringOne.indexOf('>'); Serial.println("The index of > in the string " + stringOne + " is " + firstClosingBracket); stringOne = "<HTML><HEAD><BODY>"; int secondOpeningBracket = firstClosingBracket + 1; int secondClosingBracket = stringOne.indexOf('>', secondOpeningBracket ); Serial.println("The index of the second > in the string " + stringOne + " is " + secondClosingBracket); // you can also use indexOf() to search for Strings: stringOne = "<HTML><HEAD><BODY>"; int bodyTag = stringOne.indexOf("<BODY>"); Serial.println("The index of the body tag in the string " + stringOne + " is " + bodyTag); stringOne = "<UL><LI>item<LI>item<LI>item</UL>"; int firstListItem = stringOne.indexOf("<LI>"); int secondListItem = stringOne.indexOf("item", firstListItem + 1 ); Serial.println("The index of the second list item in the string " + stringOne + " is " +secondClosingBracket); // lastIndexOf() gives you the last occurrence of a character or string: int lastOpeningBracket = stringOne.lastIndexOf('<'); Serial.println("The index of the last < in the string " + stringOne + " is " + lastOpeningBracket);
- 153. int lastListItem = stringOne.lastIndexOf("<LI>"); Serial.println("The index of the last list item in the string " + stringOne + " is " + lastListItem); // lastIndexOf() can also search for a string: stringOne = "<p>Lorem ipsum dolor sit amet</p><p>Ipsem</p><p>Quod</p>"; int lastParagraph = stringOne.lastIndexOf("<p"); int secondLastGraf = stringOne.lastIndexOf("<p", lastParagraph - 1); Serial.println("The index of the second last paragraph tag " + stringOne + " is " + secondLastGraf); // do nothing while true: while(true); } String length() and trim() Commands String length() and trim() Commands You can get the length of a Strings using the length() command, or eliminate extra characters using the trim() command. This example shows you how to use both commands. Hardware Required Arduino Board Circuit There is no circuit for this example, though your Arduino must be connected to your computer via USB. image developed using Fritzing. For more circuit examples, see the Fritzing project page Code length() returns the length of a String. There are many occasions when you need this. For example,if you wanted to make sure a String was less than 140 characters, to fit it in a text message, you could do this: /* String length() Examples of how to use length() in a String.
- 154. Open the Serial Monitor and start sending characters to see the results. created 1 Aug 2010 by Tom Igoe http://arduino.cc/en/Tutorial/StringLengthTrim This example code is in the public domain. */ String txtMsg = ""; // a string for incoming text int lastStringLength = txtMsg.length(); // previous length of the String void setup() { // Open serial communications and wait for port to open: Serial.begin(9600); while (!Serial) { ; // wait for serial port to connect. Needed for Leonardo only } // send an intro: Serial.println("nnString Serial.ptintln(); length():"); } void loop() { // add any incoming characters to the String: while (Serial.available() > 0) { char inChar = Serial.read(); txtMsg += inChar; } // print the message and a notice if it's changed: if (txtMsg.length() != lastStringLength) { Serial.println(txtMsg); Serial.println(txtMsg.length()); // if the String's longer than 140 characters, complain: if (txtMsg.length() < 140) { Serial.println("That's a perfectly acceptable text message"); } else { Serial.println("That's too long for a text message."); } // note the length for next time through the loop: lastStringLength = txtMsg.length(); } } [Get Code] trim() is useful for when you know there are extraneous whitespace characters on the beginning or the end of a String and you want to get rid of them. Whitespace refers to characters that take space but aren't seen. It includes the single space (ASCII 32), tab (ASCII 9), vertical tab (ASCII 11), form feed (ASCII 12), carriage return (ASCII 13), or newline (ASCII 10). The example below shows a String with whitespace, before and after trimming: /* String length() and trim() Examples of how to use length() and trim() in a String created 27 July 2010 modified 2 Apr 2012 by Tom Igoe http://arduino.cc/en/Tutorial/StringLengthTrim This example code is in the public domain. */ void setup() { // Open serial communications and wait for port to open: Serial.begin(9600); while (!Serial) { ; // wait for serial port to connect. Needed for Leonardo only } // send an intro: Serial.println("nnString length() and trim():");
- 155. Serial.println(); } void loop() { // here's a String with empty spaces at the end (called white space): String stringOne = "Hello! "; Serial.print(stringOne); Serial.print("<--- end of string. Length: "); Serial.println(stringOne.length()); // trim the white space off the string: stringOne.trim(); Serial.print(stringOne); Serial.print("<--- end of trimmed string. Length: "); Serial.println(stringOne.length()); // do nothing while true: while(true); } String replace Function String replace Function The String replace() function allows you to replace all instances of a given character with another character. You can also use replace to replace substrings of a string with a different substring. Hardware Required Arduino Board Circuit There is no circuit for this example, though your Arduino must be connected to your computer via USB. image developed using Fritzing. For more circuit examples, see the Fritzing project page Code Caution: If you try to replace a substring that's more than the whole string itself, nothing will be replaced. For example: String stringOne = "<html><head><body>"; String stringTwo = stringOne.replace("<html><head></head><body></body></html>", "Blah"); [Get Code]
- 156. In this case, the code will compile, but stringOne will remain unchanged, since the replacement substring is more than the String itself. /* String replace() Examples of how to replace characters or substrings of a string created 27 July 2010 modified 2 Apr 2012 by Tom Igoe http://arduino.cc/en/Tutorial/StringReplace This example code is in the public domain. */ void setup() { // Open serial communications and wait for port to open: Serial.begin(9600); while (!Serial) { ; // wait for serial port to connect. Needed for Leonardo only } // send an intro: Serial.println("nnString Serial.println(); replace:n"); } void loop() { String stringOne = "<html><head><body>"; Serial.println(stringOne); // replace() changes all instances of one substring with another: // first, make a copy of th original string: String stringTwo = stringOne; // then perform the replacements: stringTwo.replace("<", "</"); // print the original: Serial.println("Original string: " + stringOne); // and print the modified string: Serial.println("Modified string: " + stringTwo); // you can also use replace() on single characters: String normalString = "bookkeeper"; Serial.println("normal: " + normalString); String leetString = normalString; leetString.replace('o', '0'); leetString.replace('e', '3'); Serial.println("l33tspeak: " + leetString); // do nothing while true: while(true); } String startsWith and endsWith Functions String startsWith and endsWith Functions
- 157. The String functions startsWith() and endsWith() allow you to check what character or substring a given String starts or ends with. They're basically special cases of substring. Hardware Required Arduino Board Circuit There is no circuit for this example, though your Arduino must be connected to your computer via USB. image developed using Fritzing. For more circuit examples, see the Fritzing project page Code startsWith() and endsWith() can be used to look for a particular message header, or for a single character at the end of a String. They can also be used with an offset to look for a substring starting at a particular position. For example: stringOne = "HTTP/1.1 200 OK"; if (stringOne.startsWith("200 OK", 9)) { Serial.println("Got an OK from the server"); } [Get Code] This is functionally the same as this: stringOne = "HTTP/1.1 200 OK"; if (stringOne.substring(9) == "200 OK") { Serial.println("Got an OK from the server"); } [Get Code] Caution: If you look for a position that's outside the range of the string,you'll get unpredictable results. For example, in the example above stringOne.startsWith("200 OK", 16) wouldn't check against the String itself, but whatever is in memory just beyond it. For best results, make sure the index values you use for startsWith and endsWith are between 0 and the String's length(). /* String startWith() and endsWith() Examples of how to use startsWith() and endsWith() in a String created 27 July 2010 modified 2 Apr 2012 by Tom Igoe http://arduino.cc/en/Tutorial/StringStartsWithEndsWith This example code is in the public domain. */ void setup() { // Open serial communications and wait for port to open: Serial.begin(9600); while (!Serial) { ; // wait for serial port to connect. Needed for Leonardo only } // send an intro: Serial.println("nnString startsWith() and endsWith():"); Serial.println();
- 158. } void loop() { // startsWith() checks to see if a String starts with a particular substring: String stringOne = "HTTP/1.1 200 OK"; Serial.println(stringOne); if (stringOne.startsWith("HTTP/1.1")) { Serial.println("Server's using http version 1.1"); } // you can also look for startsWith() at an offset position in the string: stringOne = "HTTP/1.1 200 OK"; if (stringOne.startsWith("200 OK", 9)) { Serial.println("Got an OK from the server"); } // endsWith() checks to see if a String sensorReading = "sensor = sensorReading += analogRead(A0); Serial.print (sensorReading); if (sensorReading.endsWith(0)) { Serial.println(". This reading } else { Serial.println(". This reading String ends with a particular character: "; is divisible by ten"); is not divisible by ten"); } // do nothing while true: while(true); } String substring Function String substring Function The String function substring() is closely related to charAt(), startsWith() and endsWith(). It allows you to look for an instance of a particular substring within a given String. Hardware Required Arduino Board Circuit There is no circuit for this example, though your Arduino must be connected to your computer via USB.
- 159. image developed using Fritzing. For more circuit examples, see the Fritzing project page Code substring() with only one parameter looks for a given substring from the position given to the end of the string. It expects that the substring extends all the way to the end of the String. For example: String stringOne = "Content-Type: text/html"; // substring(index) looks for the substring from the index position to the end: if (stringOne.substring(19) == "html") { } [Get Code] is true, while String stringOne = "Content-Type: text/html"; // substring(index) looks for the substring from the index position to the end: if (stringOne.substring(19) == "htm") { } [Get Code] is not true, because there's an substring() l after the htm in the String. with two parameters looks for a given substring from the first parameter to the second. For example: String stringOne = "Content-Type: text/html"; // you can also look for a substring in the middle of a string: if (stringOne.substring(14,18) == "text") { } [Get Code] This looks for the word text from positions 14 through 18 of the String. Caution: make sure your index values are within the String's length or you'll get unpredictable results. This kind of error can be particularly hard to find with the second instance of substring() if the starting position is less than the String's length, but the ending position isn't. SORRY, There is an error at our code repository, please inform to [email protected]
- 160. 9.USB (Leonardo, Micro, and Due specific examples) Keyboard and Mouse Control Key board and Mouse Control This example illustrates the use of the Mouse and keyboard libraries together. Five momentary switches act as directional buttons for your cursor. When a button is pressed, the cursor on your screen will move, and a keypress will be sent to the computer. Once you have the Leonardo programmed and wired up, open up your favorite text editor to see the results. NB: When you use these libraries, the Arduino takes over your computer's keyboard and mouse! Hardware Required Arduino Leonardo or Arduino Due board breadboard Five pushbuttons Five 10-kiloohm resistors Software Required Any text editor Circuit Attach one end of the the pushbuttons to pins 2, 3, 4, 5, and 6 on the Leonardo. Attach the other end to +5V. Use the resistors as pull-downs, providing a reference to ground for the switches. Attach them from the pin connecting to the Leonardo to ground. Once you've programmed your Leonardo, unplug the USB cable and open a text editor. Connect your Leonardo board to your computer and press the buttons to write in the document as you move the cursor. click the images to enlarge
- 161. image developed using Fritzing. For more circuit examples, see the Fritzing project page Code /* KeyboardAndMouseControl Controls the mouse from five pushbuttons on an Arduino Leonardo or Micro. Hardware: * 5 pushbuttons attached to D2, D3, D4, D5, D6 The mouse movement is always relative. This sketch reads four pushbuttons, and uses them to set the movement of the mouse. WARNING: When you use the Mouse.move() command, the Arduino takes over your mouse! Make sure you have control before you use the mouse commands. created 15 Mar 2012 modified 27 Mar 2012 by Tom Igoe this code is in the public domain */ // set pin numbers for the five buttons:
- 162. // set pin numbers for the five buttons: const int upButton = 2; const int downButton = 3; const int leftButton = 4; const int rightButton = 5; const int mouseButton = 6; void setup() { // initialize the buttons' inputs: pinMode(upButton, INPUT); pinMode(downButton, INPUT); pinMode(leftButton, INPUT); pinMode(rightButton, INPUT); pinMode(mouseButton, INPUT); Serial.begin(9600); // initialize mouse control: Mouse.begin(); Keyboard.begin(); } void loop() { // use serial input to control the mouse: if (Serial.available() > 0) { char inChar = Serial.read(); switch (inChar) { case 'u': // move mouse up Mouse.move(0, -40); break; case 'd': // move mouse down Mouse.move(0, 40); break; case 'l': // move mouse left Mouse.move(-40, 0); break; case 'r': // move mouse right Mouse.move(40, 0); break; case 'm': // move mouse right Mouse.click(MOUSE_LEFT); break; } } // use the pushbuttons to control the keyboard: if (digitalRead(upButton) == HIGH) { Keyboard.write('u'); } if (digitalRead(downButton) == HIGH) { Keyboard.write('d'); } if (digitalRead(leftButton) == HIGH) { Keyboard.write('l'); } if (digitalRead(rightButton) == HIGH) { Keyboard.write('r'); } if (digitalRead(mouseButton) == HIGH) { Keyboard.write('m'); } }
- 163. Keyboard Message Key board Message When the button is pressed in this example, a text string is sent to the computer as keyboard input. The string reports the number of times the button has been pressed. Once you have the Leonardo programmed and wired up, open up your favourite text editor to see the results. NB: When you use the Keyboard.print() command, the Arduino takes over your computer's keyboard! To insure you don't lose control of your computer while running a sketch with this function, make sure to set up a reliable control system before you call Keyboard.print(). This sketch includes a pushbutton to toggle the keyboard, so that it only runs after the button is pressed. Hardware Required Arduino Leonardo, Micro, or Due board One momentary pushbutton One 10-kiloohm resistor Software Required Any text editor Circuit Attach one end of the pushbutton to pin 4 on the Arduino. Attach the other end to power. Use the resistor as a pull-down, providing a reference to ground, by attaching it from pin 4 to ground. Once you've programmed your board, unplug the USB cable and open a text editor. Connect the board to your computer and press the button to write in the document. click the images to enlarge image developed using Fritzing. For more circuit examples, see the Fritzing project page
- 164. Code /* Keyboard Button test For the Arduino Leonardo and Micro. Sends a text string when a button is pressed. The circuit: * pushbutton attached from pin 2 to +5V * 10-kilohm resistor attached from pin 4 to ground created 24 Oct 2011 modified 27 Mar 2012 by Tom Igoe This example code is in the public domain. http://www.arduino.cc/en/Tutorial/KeyboardButton */ const int buttonPin = 2; int previousButtonState = HIGH; int counter = 0; // input pin for pushbutton // for checking the state of a pushButton // button push counter void setup() { // make the pushButton pin an input: pinMode(buttonPin, INPUT); // initialize control over the keyboard: Keyboard.begin(); } void loop() { // read the pushbutton: int buttonState = digitalRead(buttonPin); // if the button state has changed, if ((buttonState != previousButtonState) // and it's currently pressed: && (buttonState == HIGH)) { // increment the button counter counter++; // type out a message Keyboard.print("You pressed the button "); Keyboard.print(counter); Keyboard.println(" times."); }
- 165. // save the current button state for comparison next time: previousButtonState = buttonState; } Keyboard Logout Key board Logout This example uses the Keyboard library to log you out of your user session on your computer when pin 2 on your Leonardo or Due is pulled to ground. NB: When you use the Keyboard.print() command, the Arduino takes over your computer's keyboard! To insure you don't lose control of your computer while running a sketch with this function, make sure to set up a reliable control system before you call Keyboard.print(). This sketch is designed to only send a Keyboard command after a pin has been pulled to ground. Hardware Required Arduino Leonardo, Micro, or Due board hookup wire Software Required none Circuit Connect your board to your computer with a micro-USB cable. To run the sketch, connect a hook-up wire from pin 2 to ground.
- 166. image developed using Fritzing. For more circuit examples, see the Fritzing project page Code Before you upload the program to your board, make sure to comment out any OS you are not currently using. /* Keyboard logout This sketch demonstrates the Keyboard library. When you connect pin 2 to ground, it performs a logout. It uses keyboard combinations to do this, as follows: On Windows, CTRL-ALT-DEL followed by ALT-l On Ubuntu, CTRL-ALT-DEL, and ENTER On OSX, CMD-SHIFT-q To wake: Spacebar. Circuit: * Arduino Leonardo or Micro * wire to connect D2 to ground. created 6 Mar 2012 modified 27 Mar 2012 by Tom Igoe This example is in the public domain http://www.arduino.cc/en/Tutorial/KeyboardLogout */ #define OSX 0 #define WINDOWS 1 #define UBUNTU 2 // change this to match your platform: int platform = OSX;
- 167. void setup() { // make pin 2 an input and turn on the // pullup resistor so it goes high unless // connected to ground: pinMode(2, INPUT_PULLUP); Keyboard.begin(); } void loop() { while (digitalRead(2) == HIGH) { // do nothing until pin 2 goes low delay(500); } delay(1000); switch (platform) { case OSX: Keyboard.press(KEY_LEFT_GUI); // Shift-Q logs out: Keyboard.press(KEY_LEFT_SHIFT); Keyboard.press('Q'); delay(100); Keyboard.releaseAll(); // enter: Keyboard.write(KEY_RETURN); break; case WINDOWS: // CTRL-ALT-DEL: Keyboard.press(KEY_LEFT_CTRL); Keyboard.press(KEY_LEFT_ALT); Keyboard.press(KEY_DELETE); delay(100); Keyboard.releaseAll(); //ALT-s: delay(2000); Keyboard.press(KEY_LEFT_ALT); Keyboard.press('l'); Keyboard.releaseAll(); break; case UBUNTU: // CTRL-ALT-DEL: Keyboard.press(KEY_LEFT_CTRL); Keyboard.press(KEY_LEFT_ALT); Keyboard.press(KEY_DELETE); delay(1000); Keyboard.releaseAll(); // Enter to confirm logout: Keyboard.write(KEY_RETURN); break; } // do nothing: while(true); }
- 168. Keyboard Serial Key board Serial This example listens for a byte coming from the serial port. When received, the board sends a keystroke back to the computer. The sent keystroke is one higher than what is received, so if you send an "a" from the serial monitor, you'll receive a "b" from the Leonardo (or Due). A "1" will return a "2" and so on. NB: When you use the Keyboard.print() command, the Arduino takes over your computer's keyboard! To insure you don't lose control of your computer while running a sketch with this function, make sure to set up a reliable control system before you call Keyboard.print(). This sketch is designed to only send a Keyboard command after the Leonardo has received a byte over the serial port. Hardware Required Arduino Leonardo, Micro, or Due board Software Required none Circuit Connect your board to your computer with a micro-USB cable. Once programmed, open your serial monitor and send a byte. The Arduino will reply with a keystroke that is one number higher.
- 169. image developed using Fritzing. For more circuit examples, see the Fritzing project page Code /* Keyboard test For the Arduino Leonardo or Micro Reads a byte from the serial port, sends a keystroke back. The sent keystroke is one higher than what's received, e.g. if you send a, you get b, send A you get B, and so forth. The circuit: * none created 21 Oct 2011 modified 27 Mar 2012 by Tom Igoe This example code is in the public domain. http://www.arduino.cc/en/Tutorial/KeyboardSerial */ void setup() { // open the serial port: Serial.begin(9600); // initialize control over the keyboard: Keyboard.begin(); } void loop() { // check for incoming serial data: if (Serial.available() > 0) { // read incoming serial data:
- 170. char inChar = Serial.read(); // Type the next ASCII value from what you received: Keyboard.write(inChar+1); } } Keyboard Reprogram Key board Reprogram This example uses the Keyboard library to open a new Arduino sketch window, send keyboard commands that type in the Blink example, and reprograms the board. After running this sketch and connecting pin2 to ground, the Arduinio will have a new program. NB: When you use the Keyboard.print() command, the Arduino takes over your computer's keyboard! To insure you don't lose control of your computer while running a sketch with this function, make sure to set up a reliable control system before you call Keyboard.print(). This sketch is designed to only send Keyboard commands after digital pin 2 is pulled to ground. Hardware Required Arduino Leonardo, Micro, or Due board hookup wire Software Required Arduino IDE Circuit Connect your board to your computer with a micro-USB cable. To run the sketch, connect a hook-up wire from pin 2 to ground. For this to run successfully, keep the Arduino software running as the frontmost application. click the images to enlarge
- 171. image developed using Fritzing. For more circuit examples, see the Fritzing project page Code /* Arduino Programs Blink This sketch demonstrates the Keyboard library. When you connect pin 2 to ground, it creates a new window with a key combination (CTRL-N), then types in the Blink sketch, then auto-formats the text using another key combination (CTRL-T), then uploads the sketch to the currently selected Arduino using a final key combination (CTRL-U). Circuit: * Arduino Leonardo or Micro * wire to connect D2 to ground. created 5 Mar 2012 modified 29 Mar 2012 by Tom Igoe This example is in the public domain http://www.arduino.cc/en/Tutorial/KeyboardReprogram */ // use this option for OSX. // Comment it out if using Windows or Linux: char ctrlKey = KEY_LEFT_GUI; // use this option for Windows and Linux. // leave commented out if using OSX: // char ctrlKey = KEY_LEFT_CTRL;
- 172. void setup() { // make pin 2 an input and turn on the // pullup resistor so it goes high unless // connected to ground: pinMode(2, INPUT_PULLUP); // initialize control over the keyboard: Keyboard.begin(); } void loop() { while (digitalRead(2) == HIGH) { // do nothing until pin 2 goes low delay(500); } delay(1000); // new document: Keyboard.press(ctrlKey); Keyboard.press('n'); delay(100); Keyboard.releaseAll(); // wait for new window to open: delay(1000); // Type out "blink": Keyboard.println("void setup() {"); Keyboard.println("pinMode(13, OUTPUT);"); Keyboard.println("}"); Keyboard.println(); Keyboard.println("void loop() {"); Keyboard.println("digitalWrite(13, HIGH);"); Keyboard.print("delay(3000);"); // 3000 ms is too long. Delete it: for (int keystrokes=0; keystrokes < 6; keystrokes++) { delay(500); Keyboard.write(KEY_BACKSPACE); } // make it 1000 instead: Keyboard.println("1000);"); Keyboard.println("digitalWrite(13, LOW);"); Keyboard.println("delay(1000);"); Keyboard.println("}"); // tidy up: Keyboard.press(ctrlKey); Keyboard.press('t'); delay(100); Keyboard.releaseAll(); delay(3000); // upload code: Keyboard.press(ctrlKey); Keyboard.press('u'); delay(100); Keyboard.releaseAll(); // wait for the sweet oblivion of reprogramming: while(true); }
- 173. Button Mouse Control Button Mouse Control Using the Mouse library, you can controls a computer's onscreen cursor with an Arduino Leonardo, Micro, or Due. This particular example uses a five pushbuttons to move the onscreen cursor. Four of the buttons are directional (up, down, left, right) and one is for a left mouse click Cursor movement from the Arduino is always relative. Every time an input is read, the cursor's position is updated relative to it's current position. Whenever one of the directional buttons is pressed, the Arduino will move the mouse, mapping a HIGH input to a range of 5 in the appropriate direction. The fifth button is for controlling a left click from a mouse. When pressed, the board sends a press to the computer. When the button is released, the computer will recognize the event. NB: When you use the Mouse.move() command, the Arduino takes over your computer's cursor! To insure you don't lose control of your computer while running a sketch with this function, make sure to set up a controller before you call Mouse.move(). This sketch only updates the cursor position when a button is pressed. Hardware Required Arduino Leonardo, Micr or Due board 5 momentary pushbuttons Five 10-kilohm resistors hook up wire breadboard Software Required none Circuit Connect your board to your computer with a micro-USB cable. The buttons are connected to digital inputs 2-6. Make sure you use pulldown resistors. click the images to enlarge image developed using Fritzing. For more circuit examples, see the Fritzing project page
- 174. Code /* ButtonMouseControl Controls the mouse from five pushbuttons on an Arduino Leonardo or Micro. Hardware: * 5 pushbuttons attached to D2, D3, D4, D5, D6 The mouse movement is always relative. This sketch reads four pushbuttons, and uses them to set the movement of the mouse. WARNING: When you use the Mouse.move() command, the Arduino takes over your mouse! Make sure you have control before you use the mouse commands. created 15 Mar 2012 modified 27 Mar 2012 by Tom Igoe this code is in the public domain */ // set pin numbers for the five buttons: const int upButton = 2;
- 175. const const const const int int int int downButton = 3; leftButton = 4; rightButton = 5; mouseButton = 6; int range = 5; int responseDelay = 10; // output range of X or Y movement; affects movement speed // response delay of the mouse, in ms void setup() { // initialize the buttons' inputs: pinMode(upButton, INPUT); pinMode(downButton, INPUT); pinMode(leftButton, INPUT); pinMode(rightButton, INPUT); pinMode(mouseButton, INPUT); // initialize mouse control: Mouse.begin(); } void loop() { // read the buttons: int upState = digitalRead(upButton); int downState = digitalRead(downButton); int rightState = digitalRead(rightButton); int leftState = digitalRead(leftButton); int clickState = digitalRead(mouseButton); // calculate the movement distance based on the button states: int xDistance = (leftState - rightState)*range; int yDistance = (upState - downState)*range; // if X or Y is non-zero, move: if ((xDistance != 0) || (yDistance != 0)) { Mouse.move(xDistance, yDistance, 0); } // if the mouse button is pressed: if (clickState == HIGH) { // if the mouse is not pressed, press it: if (!Mouse.isPressed(MOUSE_LEFT)) { Mouse.press(MOUSE_LEFT); } } // else the mouse button is not pressed: else { // if the mouse is pressed, release it: if (Mouse.isPressed(MOUSE_LEFT)) { Mouse.release(MOUSE_LEFT); } } // a delay so the mouse doesn't move too fast: delay(responseDelay); }
- 176. Joystick Mouse Control Joy stick Mouse Control Using the Mouse library, you can controls a computer's onscreen cursor with an Arduino Leonardo, Micro, or Due. This particular example uses a pushbutton to turn on and off mouse control with a joystick. Cursor movement from the Arduino is always relative. So every time the analog input is read, the cursor's position is updated relative to it's current position. Two analog inputs ranging from 0 to 1023 are translated to ranges of -12 to 12. The sketch assumes that the joystick resting values are around the middle of the range, but that they vary within a threshold. The pushbutton allows you to toggle mouse control on and off. A status LED connected to pin 5 lights when the Arduino is controlling the mouse. NB: When you use the Mouse.move() command, the Arduino takes over your computer's cursor! To insure you don't lose control of your computer while running a sketch with this function, make sure to set up a controller before you call Mouse.move(). This sketch includes a pushbutton to toggle the mouse control state, so you can turn on and off mouse control. Hardware Required Arduino Leonardo, Micro, or Due board 2 axis joystick momentary pushbutton One 10-kilohm resistor (if needed) Software Required none Circuit Connect your Leonardo board to your computer with a micro-USB cable. The pushbutton is connected to pin 6. If you're using a part like the Joystick shield pictured below, you may not need a pulldown resistor. The x-axis on the joystick is connected to analog in 0, the y-axis is on analog in 1. click the images to enlarge
- 177. image developed using Fritzing. For more circuit examples, see the Fritzing project page Code /* JoystickMouseControl Controls the mouse from a joystick on an Arduino Leonardo or Micro. Uses a pushbutton to turn on and off mouse control, and
- 178. a second pushbutton to click the left mouse button Hardware: * 2-axis joystick connected to pins A0 and A1 * pushbuttons connected to pin D2 and D3 The mouse movement is always relative. This sketch reads two analog inputs that range from 0 to 1023 (or less on either end) and translates them into ranges of -6 to 6. The sketch assumes that the joystick resting values are around the middle of the range, but that they vary within a threshold. WARNING: When you use the Mouse.move() command, the Arduino takes over your mouse! Make sure you have control before you use the command. This sketch includes a pushbutton to toggle the mouse control state, so you can turn on and off mouse control. created 15 Sept 2011 updated 28 Mar 2012 by Tom Igoe this code is in the public domain */ // set pin numbers for switch, joystick axes, and LED: const int switchPin = 2; // switch to turn on and off mouse control const int mouseButton = 3; // input pin for the mouse pushButton const int xAxis = A0; // joystick X axis const int yAxis = A1; // joystick Y axis const int ledPin = 5; // Mouse control LED // parameters for reading the joystick: int range = 12; // output range of X or Y movement int responseDelay = 5; // response delay of the mouse, in ms int threshold = range/4; // resting threshold int center = range/2; // resting position value boolean mouseIsActive = false; int lastSwitchState = LOW; void setup() { pinMode(switchPin, INPUT); pinMode(ledPin, OUTPUT); // take control of the mouse: Mouse.begin(); } // whether or not to control the mouse // previous switch state // the switch pin // the LED pin void loop() { // read the switch: int switchState = digitalRead(switchPin); // if it's changed and it's high, toggle the mouse state: if (switchState != lastSwitchState) { if (switchState == HIGH) { mouseIsActive = !mouseIsActive; // turn on LED to indicate mouse state: digitalWrite(ledPin, mouseIsActive); } } // save switch state for next comparison: lastSwitchState = switchState; // read and scale the two axes: int xReading = readAxis(A0); int yReading = readAxis(A1); // if the mouse control state is active, move the mouse: if (mouseIsActive) { Mouse.move(xReading, yReading, 0); } // read the mouse button and click or not click: // if the mouse button is pressed: if (digitalRead(mouseButton) == HIGH) { // if the mouse is not pressed, press it: if (!Mouse.isPressed(MOUSE_LEFT)) { Mouse.press(MOUSE_LEFT); } }
- 179. // else the mouse button is not pressed: else { // if the mouse is pressed, release it: if (Mouse.isPressed(MOUSE_LEFT)) { Mouse.release(MOUSE_LEFT); } } delay(responseDelay); } /* reads an axis (0 or 1 for x or y) and scales the analog input range to a range from 0 to <range> */ int readAxis(int thisAxis) { // read the analog input: int reading = analogRead(thisAxis); // map the reading from the analog input range to the output range: reading = map(reading, 0, 1023, 0, range); // if the output reading is outside from the // rest position threshold, use it: int distance = reading - center; if (abs(distance) < threshold) { distance = 0; } // return the distance for this axis: return distance; }